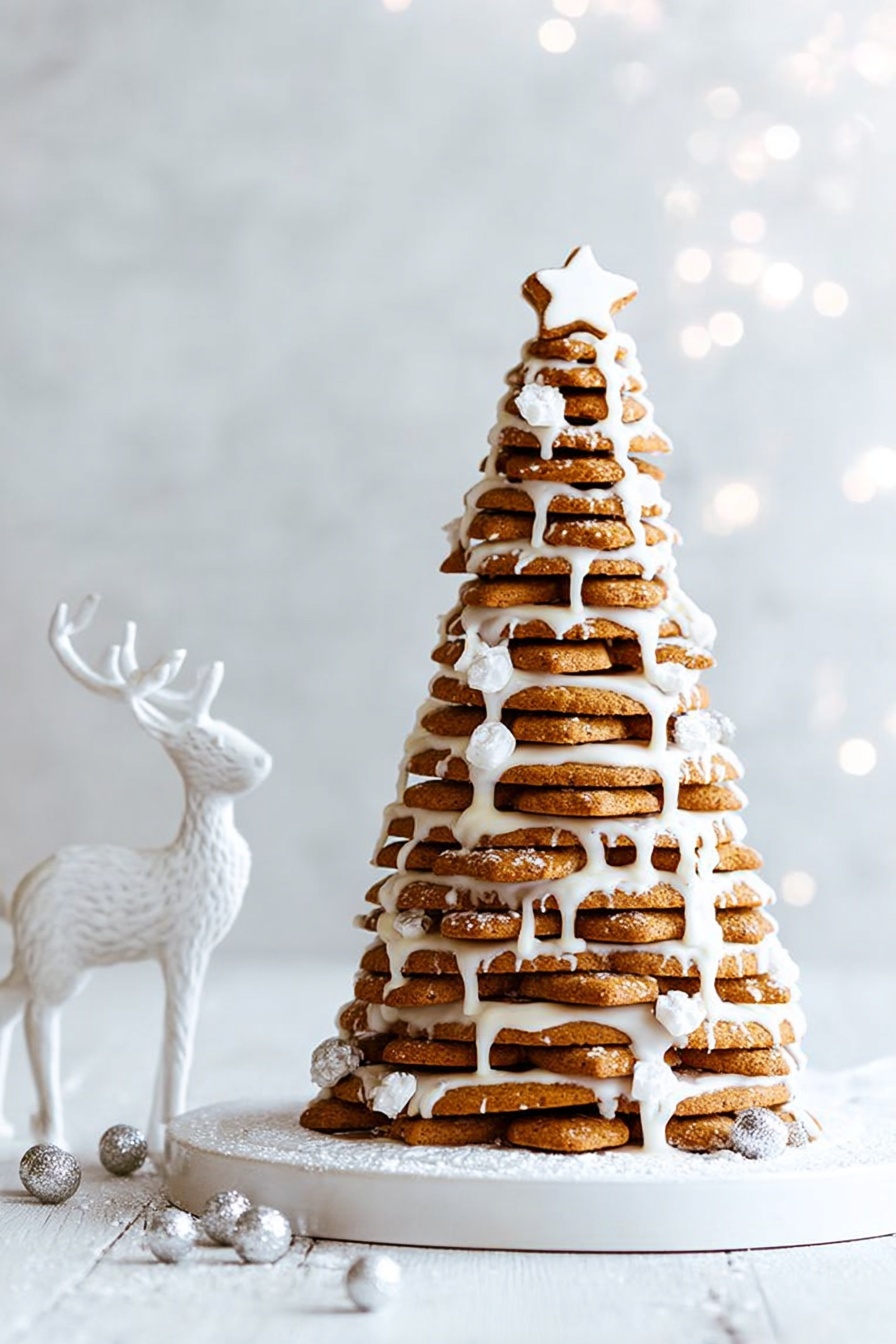
If you’re looking for a festive project that’s as fun to make as it is to eat, you’re going to adore this Gingerbread Christmas Tree Cookies Recipe. I absolutely love how these cookies come together — with the warm spices, sweet golden syrup, and that perfect royal icing finish, they’re a total crowd-pleaser. Plus, the assembly into a beautiful, edible Christmas tree makes it a centerpiece that’ll wow your guests. Trust me, once you try this, it’ll become a holiday tradition you look forward to every year.
Why You’ll Love This Recipe
- Festive and Fun: You get to create a stunning Christmas tree made entirely of delicious cookies, a true conversation starter.
- Perfect Spices Blend: The mixture of ginger, cloves, and mixed spice brings just the right amount of warmth without overpowering the sweet elements.
- Customizable Decorating: You can make it as simple or as fancy as you want with royal icing and silver cachous for that magical frosted look.
- Kid-Friendly Activity: Rolling, cutting, and decorating these cookies is a joy for all ages – a perfect holiday bonding experience.

Ingredients You’ll Need
These ingredients combine classic gingerbread staples with some baking magic. Each one plays a role: the golden syrup brings a deep, rich sweetness, while the mix of flours gives just the right texture. Here’s a rundown of what you’ll want to have on hand, with some handy tips I’ve learned along the way.
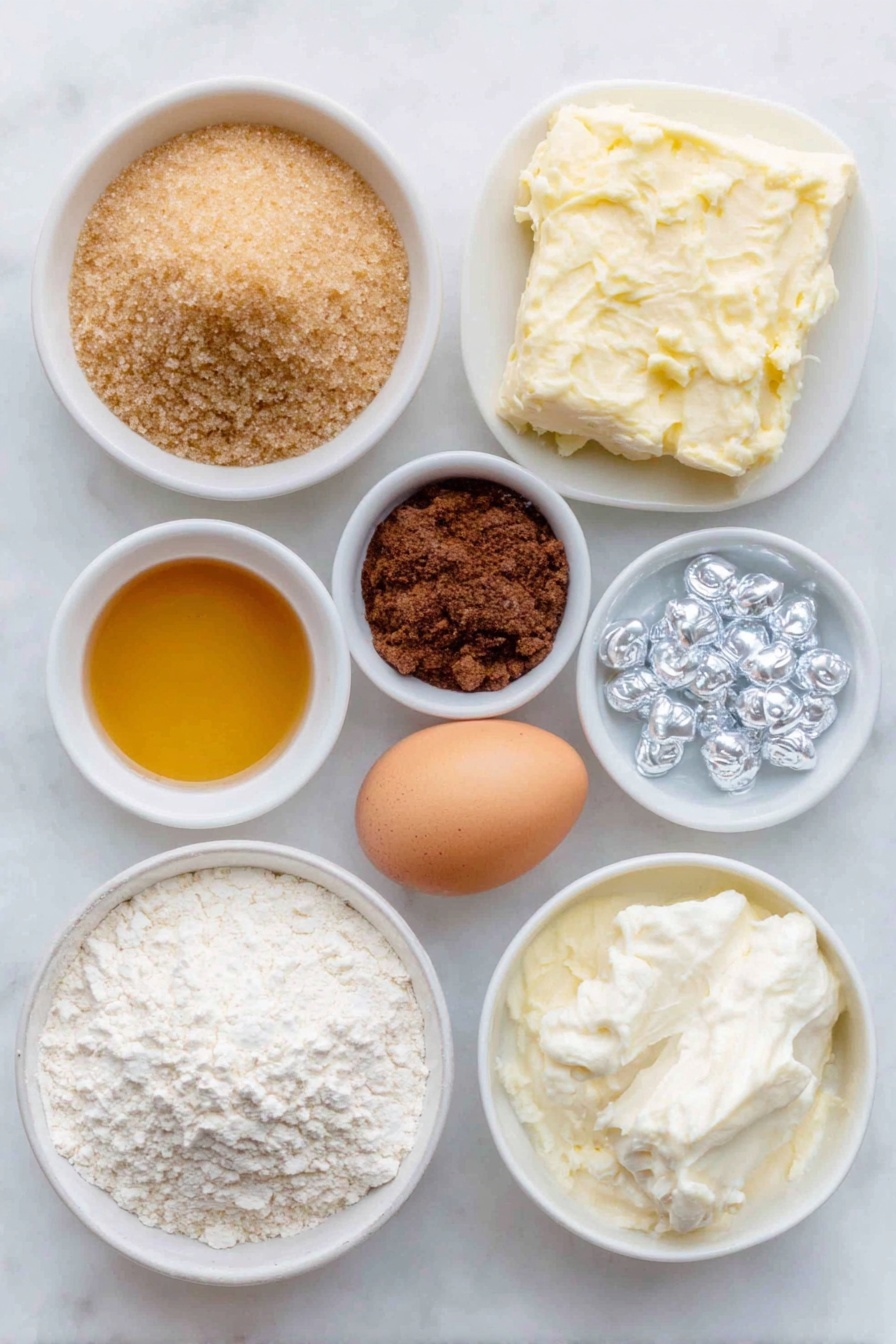
- Brown sugar: Look for light or medium brown sugar for moisture and a hint of molasses flavor.
- Golden syrup: This adds a luscious, caramel-like sweetness that’s hard to substitute easily, so try to get the real deal.
- Butter: Use unsalted for better control of saltiness and always soft but not melted.
- Plain flour: Your basic all-purpose flour—makes the body of the dough.
- Self-raising flour: Adds a bit of lift, helping the cookies stay light and crisp rather than dense.
- Ground ginger: The star spice here—fresh ground will give the best flavor.
- Mixed spice: A blend that usually includes cinnamon, nutmeg, and sometimes cloves—adds depth.
- Ground cloves: Powerful and fragrant, this needs to be used sparingly for a nice zing.
- Bicarbonate of soda: The leavening agent to keep your cookies tender.
- Egg: Lightly whisked, it binds everything together beautifully.
- Royal icing: I prefer ready-made for convenience, but you can always make your own.
- Fresh lemon juice: The acidity brightens up the royal icing and helps it pipe smoothly.
- Silver cachous: Decorative edible silver balls to add sparkle to your finished tree.
Variations
I love putting my own little spin on this Gingerbread Christmas Tree Cookies Recipe. Whether it’s switching up decorations, adding a twist to the spice blend, or going gluten-free, there’s so much room to make this your own holiday favorite.
- Egg-Free Version: I once made these with a flax egg for a friend with allergies, and they turned out great—just let the dough chill a bit longer for easier handling.
- Spice Up Your Life: Adding a pinch of cardamom or black pepper can create a subtle warmth that changes the flavor profile in a delightful way.
- Decorate Differently: Swap silver cachous for colorful sprinkles or edible glitter to suit your festive vibe.
- Gluten-Free Dough: Using a gluten-free flour blend works well—just be gentle when rolling out the dough as it’s a bit more delicate.
How to Make Gingerbread Christmas Tree Cookies Recipe
Step 1: Melt the Sweetness
Start by gently warming your brown sugar, golden syrup, and butter together over low heat. I like to stir constantly to make sure everything melts evenly without burning. This step creates the rich, sticky base of your gingerbread goodness. Once fully combined, let it cool for about five minutes so you don’t end up cooking the egg in the next step.
Step 2: Mix the Dry and Wet Ingredients
Combine your flours, ginger, cloves, mixed spice, and bicarbonate of soda in a large bowl. Pour in the cooled sugar syrup mixture and the lightly whisked egg. Stir everything until it just comes together, then turn it out onto a lightly floured surface. Knead gently until smooth—you want the dough to be workable but not sticky. Tip: Dividing the dough in half here makes rolling much easier later.
Step 3: Chill the Dough
Wrap your dough discs tightly in plastic wrap and pop them in the fridge for at least an hour. I know it feels like a waiting game, but this is key to getting precisely shaped cookies that won’t spread during baking. It’s the one step I never skip!
Step 4: Cut and Bake Your Stars
Preheat your oven to 170°C (or 150°C fan forced). Line your trays with baking paper. Roll out one portion of your chilled dough on a floured baking paper until it’s about 3mm thick. Here’s where the magic begins: use star cutters of different sizes to cut out various stars—big and small—a mix that helps your tree look beautifully layered. Don’t forget, use a plain piping nozzle to poke a hole near each star’s center; you’ll thread these later! Bake batches for 10-12 minutes until crisp and lightly golden, then cool completely on the trays.
Step 5: Whisk Up the Icing
Put your royal icing and strained lemon juice into a big bowl and whisk with a balloon whisk until the icing thickens and gets fluffy—usually 3-5 minutes. If it feels too thick to pipe, add a little hot water a teaspoon at a time until you hit the sweet spot. Transfer the icing to a piping bag fitted with a tiny nozzle. I always decorate the points of the stars with small dabs of icing to look like snowflakes or frosty accents. Let these set for 3-4 hours at room temperature, ideally somewhere cool.
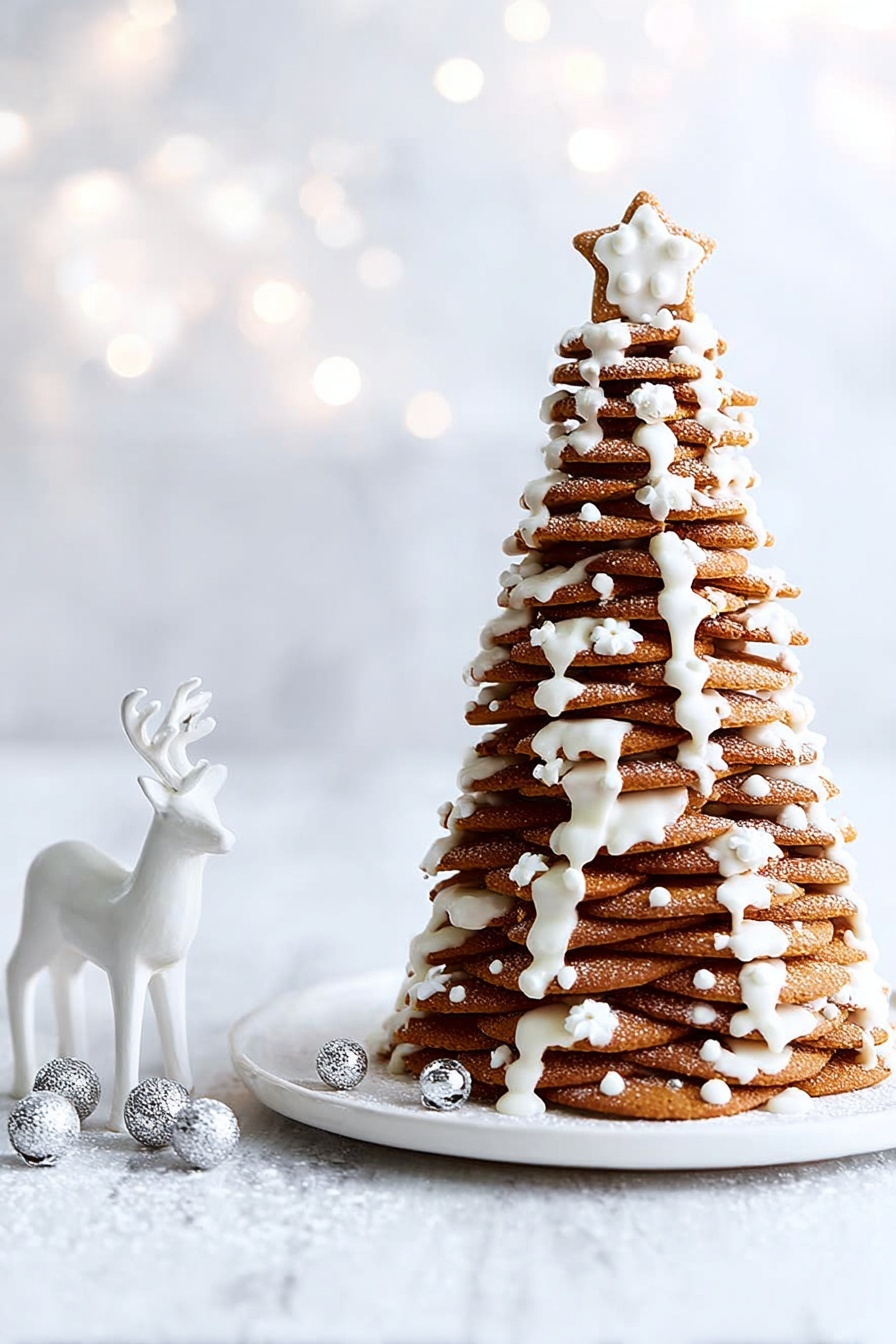
Step 6: Assemble Your Jewelled Gingerbread Tree
Grab a plastic dowel and thread the largest stars first, stacking them with a dab of icing between each layer and turning each one slightly so the points stagger beautifully. When you reach the top, finish with the smallest star, stuck upright with icing. I love piping extra snowy dots and lines between layers and adding silver cachous to really bring the magic alive. Then patience is your friend—let it all set completely before moving the tree.
Pro Tips for Making Gingerbread Christmas Tree Cookies Recipe
- Keep Dough Cool: If your kitchen is warm, pop the dough back in the fridge between rolling batches to avoid sticky messes.
- Use Baking Paper for Rolling: Rolling dough between two sheets of baking paper makes cleanup a breeze and keeps thickness even.
- Let Cookies Cool Fully: I like to leave mine on the tray to cool completely before transferring—helps prevent breakage.
- Be Patient With Icing: Let your decorated stars dry fully before assembly; it makes the tree sturdier and easier to handle.
How to Serve Gingerbread Christmas Tree Cookies Recipe
Garnishes
I’m a sucker for those silver cachous—they add festive sparkle and a little crunch. Sometimes, I’ll dust the whole tree with a tiny bit of edible glitter or add tiny red candy pearls for a pop of color that screams Christmas cheer. Using white royal icing piped as snow on the edges turns this cookie tree into a winter wonderland.
Side Dishes
This cookie tree pairs wonderfully with a warm cup of mulled wine or hot chocolate. For holiday parties, I like to serve it alongside plates of spiced nuts and little bowls of fresh fruit to balance the sweetness.
Creative Ways to Present
One year, I placed the tree on a large cake board dusted lightly with coconut flakes to mimic snow, surrounded by little edible gingerbread presents wrapped with icing bows. Another time, I used a mirrored plate so the sparkling icing really popped. You could even place it on a tiered stand for a stunning dessert display at your holiday gatherings.
Make Ahead and Storage
Storing Leftovers
I store leftover cookies in an airtight container at room temperature. They keep their crispness for up to a week—if they soften, I pop them in a warm oven for a few minutes, and they crisp right back up. Just avoid storing them in the fridge, as that can add moisture.
Freezing
If you want to get ahead, these cookies freeze beautifully. I bake and decorate the stars, then freeze them in layers separated by parchment paper inside a sealed freezer bag. When ready to use, thaw at room temperature, then assemble the tree. The icing holds up well, too, if it’s completely dry before freezing.
Reheating
To refresh slightly soft cookies, place them on a baking tray and warm in a 160°C oven for 5 minutes. This revives their crunch without melting the icing decoration. Just keep an eye on them—you want warmth, not browning.
FAQs
-
Can I make the dough ahead of time?
Absolutely! The dough keeps well wrapped in the refrigerator for up to 24 hours. This actually helps the flavors develop. Just bring it back to room temperature before rolling out.
-
What if I don’t have golden syrup?
Golden syrup gives a unique flavor and texture, but maple syrup or honey can be substitutes in a pinch. The flavor will be slightly different, and the dough might be a bit softer, so chill it well before rolling.
-
How do I prevent the cookies from spreading too much during baking?
Chilling the dough for at least an hour before baking is key to keeping the shapes crisp and defined. Also, avoid over-melting the butter mixture at the start, as that can cause too much spreading.
-
Can I use other cookie cutters besides stars?
For sure! While stars are traditional and perfect for layering into a tree, you can get creative with hearts, snowflakes, or circles—just make sure you can stack them securely if you want to maintain the tree shape.
-
How long does the royal icing take to set?
Typically, royal icing needs about 3-4 hours to set fully at room temperature. For best results, avoid humid environments and don’t rush this step, as fully set icing ensures a sturdy assembly.
Final Thoughts
Making these Gingerbread Christmas Tree Cookies is one of my favorite ways to get into the holiday spirit. It’s a joyful blend of baking, decorating, and assembling that makes your kitchen smell like Christmas itself. The smiles when you reveal the finished cookie tree are priceless, and honestly, the taste is just as wonderful as it looks. So, grab your apron and give this recipe a go—you’ll find it brings a special kind of magic to your holiday celebrations!
Print
Gingerbread Christmas Tree Cookies Recipe
- Prep Time: 1 hour 15 minutes
- Cook Time: 12 minutes
- Total Time: 1 hour 27 minutes active + 3-4 hours icing set + assembly time (approx 6h 30m including chilling and setting)
- Yield: 1 gingerbread Christmas tree
- Category: Dessert
- Method: Baking
- Cuisine: Western, Christmas
- Diet: Vegetarian
Description
This delightful Gingerbread Christmas Tree recipe features spiced gingerbread stars baked to crisp perfection, assembled into a festive tree shape using royal icing. The gingerbread dough is flavored with warm spices like ginger, mixed spice, and cloves, then cut into various star sizes and baked. The stars are decorated with lemon-flavored royal icing and silver cachous, creating a charming holiday centerpiece that’s both edible and visually stunning.
Ingredients
Dough Ingredients
- 100g (1/2 cup, firmly packed) brown sugar
- 125ml (1/2 cup) golden syrup
- 50g butter
- 340g (2 1/4 cups) plain flour
- 75g (1/2 cup) self-raising flour
- 1 1/2 tbsp ground ginger
- 1 1/2 tsp mixed spice
- 1 tsp ground cloves
- 1/2 tsp bicarbonate of soda
- 1 egg, lightly whisked
Icing and Decoration
- 330g packet royal icing
- 60ml (1/4 cup) fresh lemon juice, strained
- Silver cachous, to decorate
Instructions
- Make the sugar mixture: Place the brown sugar, golden syrup, and butter in a small saucepan over low heat. Cook while stirring constantly for 3-5 minutes until the butter melts and the sugar dissolves completely. Remove from heat and let it cool for 5 minutes.
- Prepare the dough: In a large bowl, combine the plain flour, self-raising flour, ground ginger, mixed spice, ground cloves, and bicarbonate of soda. Add the cooled sugar mixture and the lightly whisked egg. Stir everything together until a dough forms. Turn the dough onto a lightly floured surface and knead until smooth. Divide the dough into two portions, form each into discs, wrap in plastic wrap, and chill in the fridge for 1 hour.
- Preheat oven and cut shapes: Preheat the oven to 170°C (150°C fan forced). Line three large baking trays with baking paper. Roll out one portion of dough on a lightly floured surface or sheet of baking paper to 3mm thickness. Using star-shaped cutters, cut out the following shapes: four 2cm stars, six 4cm stars, six 6cm stars, six 8cm stars, six 10cm stars, and six 12cm stars. Use the second portion of dough as needed for additional shapes. Carefully cut out a hole in the center of each star using a 1cm plain piping nozzle tip. Place the stars on the prepared trays.
- Bake the stars: Bake the stars in the oven for 10-12 minutes or until they become light golden and crispy. Remove from oven and let the stars cool completely on the trays.
- Prepare the icing: Place the royal icing in a large bowl. Add the strained lemon juice. Whisk the mixture vigorously with a balloon whisk for 3-5 minutes until the icing is thick and has doubled in volume. If the icing becomes too stiff or difficult to pipe, add a little hot water and whisk again to achieve a smooth, pipeable consistency. Transfer the icing to a piping bag fitted with a 1-2mm plain nozzle.
- Decorate the stars: Pipe icing onto the points of each star for decoration. Set the decorated stars aside for 3-4 hours or until the icing has fully set.
- Assemble the gingerbread tree: To build the tree, thread the largest 12cm stars onto a plastic dowel rod, securing each layer with royal icing and slightly rotating them to give dimension. Continue threading the stars in decreasing size order—10cm, 8cm, 6cm, 4cm, and finally the 2cm star—gluing each layer with icing. Finish by piping extra icing on the stars to simulate snow and decorate with silver cachous. Allow the assembled tree to set completely before display.
Notes
- Make sure to chill the dough well to prevent the stars from spreading during baking.
- If the dough becomes too sticky, add a little flour while rolling out to achieve the correct thickness.
- Use a plastic dowel rod or sturdy skewer to support the tree structure securely.
- The decorated stars can be stored in an airtight container for up to a week before assembly.
- For a gluten-free alternative, swap the flours with a suitable gluten-free blend with similar properties.
Nutrition
- Serving Size: 1 slice (based on 12 slices from the assembled tree)
- Calories: 220 kcal
- Sugar: 18 g
- Sodium: 110 mg
- Fat: 8 g
- Saturated Fat: 4 g
- Unsaturated Fat: 3 g
- Trans Fat: 0 g
- Carbohydrates: 34 g
- Fiber: 1.5 g
- Protein: 3 g
- Cholesterol: 30 mg


