
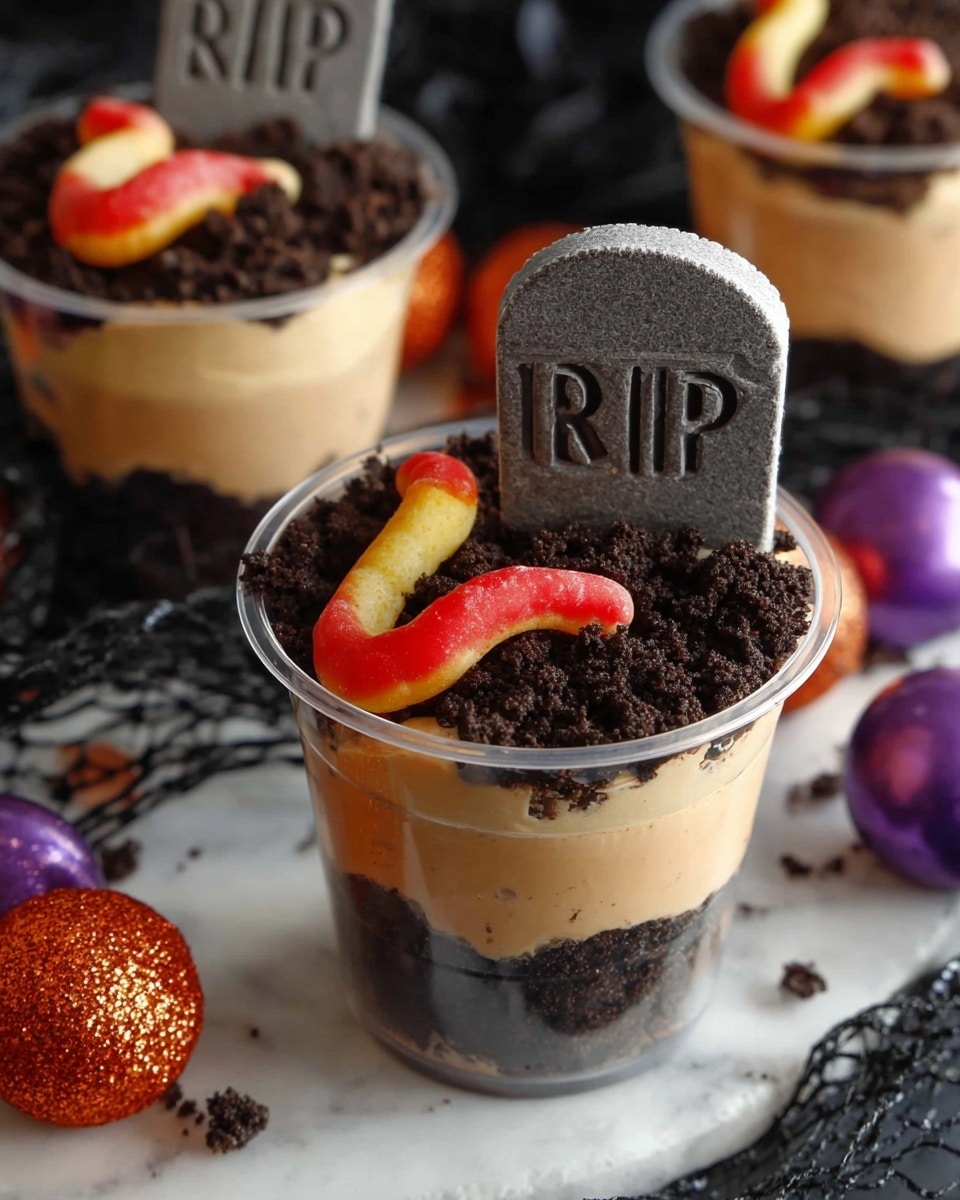
If you’re looking for a fun, spooky treat that’s ridiculously easy to make but impressively tasty, let me introduce you to my Graveyard Pudding Recipe. It’s one of those desserts that never fails to get smiles—especially around Halloween—but honestly, my family enjoys it year-round! With layers of creamy chocolate pudding, crunchy Oreos, and playful gummy worms, it’s like a little edible graveyard in a cup. Trust me, once you make this, you’ll be hooked and ready to share it at every get-together.
Why You’ll Love This Recipe
- Simple Ingredients: You likely already have most of these in your pantry or fridge, making it a breeze to whip up anytime.
- Kid-Friendly Fun: The gummy worms and oreo crumbs make it a hit with the little ones who love “digging” into this spooky treat.
- Customizable Layers: You can easily add your own twist by swapping cookies or toppings, giving you lots of flexibility.
- Quick and Chill: This no-bake dessert comes together fast and chills in under an hour, perfect for last-minute plans.

Ingredients You’ll Need
The magic of this Graveyard Pudding Recipe lies in the balance of creamy and crunchy textures and just the right amount of chocolatey richness. I like to keep the ingredient list straightforward so you can focus on assembling instead of hunting for obscure items.
- Oreos: Crushed Oreo cookies give the “dirt” effect and crunch; try to crush them coarsely rather than into fine crumbs for better texture.
- Instant chocolate pudding mix: The base flavor that’s creamy and rich, instant makes it quick without sacrificing taste.
- Milk: Needed to whisk the pudding; whole milk works best for creaminess, but 2% also does the job.
- Whipped topping: Lightens the pudding and adds fluffiness; I use store-bought for convenience, but fresh whipped cream is lovely too.
- Milano cookies: These act as the “grave stones” — their firm texture holds up well for decorating.
- Gummy worms: Classic spooky garnish that’s fun and slightly chewy; you can substitute with other gummy candies if you prefer.
- Black gel decorating icing: Essential for writing “RIP” on the grave stones; it adds that finishing spooky touch.
- Clear plastic cups: These give you that cute individual “graveyard” presentation and make it easy to serve.
Variations
I love making this Graveyard Pudding Recipe my own by tweaking little details depending on the occasion or who I’m serving it to. Feel free to get creative—this recipe is a fantastic base for your own spooky spin.
- Flavor swaps: I once made it with vanilla pudding instead of chocolate to mix things up, and it was a sweet surprise with the Oreo crumbs still intact.
- Cookie alternatives: Instead of Oreos, crushed chocolate graham crackers or chocolate wafer cookies work great if you want a different crunch or flavor.
- Dairy-free option: You can substitute the pudding and whipped topping for dairy-free versions, so your vegan friends won’t feel left out.
- Extra spooky: Try adding candy eyeballs or mini marshmallows as extra “graveyard decor”—my kids go nuts for this little extra.
How to Make Graveyard Pudding Recipe
Step 1: Whisk Up the Chocolate Pudding Base
Start by grabbing a large mixing bowl and whisk your instant chocolate pudding mix with the milk until it’s nice and smooth. I like to do this for about two minutes to avoid any lumps. Then let it sit for around five minutes so it thickens perfectly—this step makes a big difference in the creamy texture you’ll get later.
Step 2: Build That Delicious Dirt Layer
Take your clear plastic cups and spoon in a thin layer of the crushed Oreo cookie crumbs. I like to press them down gently with the back of the spoon so it settles evenly—it looks and feels more like dirt in the graveyard this way!
Step 3: Layer the Pudding and More Oreo “Dirt”
Divide half of your prepared pudding evenly among the cups, smoothing the top to form a luscious layer over the cookie crumbs. Then sprinkle a generous second layer of crushed Oreos on top to keep that fake dirt effect alive and crunchy.
Step 4: Fluff It Up with Whipped Topping
In a separate bowl, stir together the remaining pudding with your whipped topping until it’s fluffy and fully combined. This lighter mix gets spread on top of the second Oreo layer, creating a creamy contrast that’s irresistible.
Step 5: Final Crunch and Chill Time
Top each cup with the last of the crushed Oreos, then pop the cups in the fridge to chill for at least an hour. This resting time helps the layers set nicely and meld all those flavors together.
Step 6: Decorate Your Graveyard
Once chilled, it’s time to get creative! Use your black gel decorating icing to write “RIP” on each Milano cookie and firmly press one into each cup as a tombstone. Then top with a gummy worm to complete your creepy, fun graveyard scene.
Pro Tips for Making Graveyard Pudding Recipe
- Perfect Pudding Thickness: Don’t skip that five-minute rest after whisking the pudding; it thickens to just the right consistency for layering.
- Crushing the Cookies: Use your hands or a resealable bag with a rolling pin for chunkier crumbs—this adds texture that’s more fun to eat.
- Decorating Patience: Let the pudding chill fully before adding the “gravestones”—this helps the cookies stand firmly without sinking.
- Avoiding Soggy Cookies: By layering pudding and cookies alternately and chilling between steps, you keep the cookie layers crisp and tasty.
How to Serve Graveyard Pudding Recipe
Garnishes
For garnishes, I keep it classic: the Milano cookies with black “RIP” icing and gummy worms are a must—they bring character and charm to each cup. If I’m feeling extra festive, I’ll top with a sprinkle of edible glitter or candy eyes for a spooky pop, and everyone loves that little surprise!
Side Dishes
Since this pudding is more of a fun dessert, I usually serve it alongside simpler sides like fresh fruit or a light salad if it’s part of a larger meal. It’s a perfect sweet finale that doesn’t feel too heavy after dinner.
Creative Ways to Present
I’ve served this Graveyard Pudding Recipe in mason jars for a rustic vibe and once turned the cups into mini graveyards by adding mini tombstones made from chocolate bars and pretzel sticks for fences. These little details make it stand out at parties and bring laughs—try it and watch your friends’ faces light up!
Make Ahead and Storage
Storing Leftovers
If you have leftovers, I usually cover the pudding cups with plastic wrap and store them in the fridge. They stay fresh and creamy for up to 2 days, though I recommend eating them sooner to enjoy the crunch of the Oreos at their best.
Freezing
Freezing this dessert isn’t ideal because the whipped topping and pudding can separate and change texture. But if you do freeze it, thaw overnight in the fridge and stir gently before serving—the texture will be different, but still tasty!
Reheating
This pudding is best served chilled, so reheating isn’t something I’d recommend. If you want it a bit softer, just let it sit at room temperature for 10 minutes before eating, and it’ll be perfect.
FAQs
-
Can I use homemade pudding instead of instant for the Graveyard Pudding Recipe?
Absolutely! Homemade pudding works great and adds a fresh touch. Just make sure your pudding has had enough time to thicken properly before layering to get that perfect texture.
-
How far ahead can I prepare Graveyard Pudding Recipe?
You can assemble it up to a day in advance. Just keep it refrigerated, and add the Milano cookies with icing and gummy worms right before serving to keep everything looking fresh and attractive.
-
Can the recipe be doubled easily?
Yes! I usually double this recipe when hosting a bigger crowd. Just keep the layering proportions consistent and use a bigger bowl for mixing the pudding. You might want to prepare in batches for easier assembly.
-
Any tricks for making the “RIP” writing easier on the Milano cookies?
Practice a bit on parchment paper before decorating the cookies, and make sure your decorating icing isn’t too runny. Refrigerate cookies briefly before writing if they are warm, as that helps the icing set faster and prevents smudging.
Final Thoughts
This Graveyard Pudding Recipe has been a staple in my house since I stumbled upon it one Halloween when I needed a quick and crowd-pleasing dessert. It’s fun, easy, and downright delicious, which is a winning combo in my book. I hope when you make it yourself, it brings as much joy and laughter to your table as it’s brought to mine. Give it a try—you’ll love how simple yet festive it is, and your friends and family will keep asking for more!
Print
Graveyard Pudding Recipe
- Prep Time: 15 minutes
- Cook Time: 0 minutes
- Total Time: 1 hour 15 minutes
- Yield: 5 servings
- Category: Dessert
- Method: No-Cook
- Cuisine: American
Description
A fun and spooky no-bake dessert perfect for Halloween parties, Graveyard Pudding layers creamy chocolate pudding with Oreo cookie crumbs and whipped topping, topped with Milano cookie tombstones and gummy worms for a playful graveyard effect.
Ingredients
Base and Pudding
- 20 Oreos, crushed
- 1 (3.4 ounce) box instant chocolate pudding mix
- 2 cups milk
Toppings
- 1 cup whipped topping
- 5 Milano cookies
- 5 gummy worms
- Black gel decorating icing
Supplies
- Clear plastic cups
Instructions
- Prepare Chocolate Pudding: In a large bowl, whisk together the instant chocolate pudding mix and milk until fully combined. Let it sit for five minutes to thicken up nicely.
- Create First Oreo Layer: Spread a thin layer of crushed Oreo cookie crumbs at the bottom of each clear plastic cup to form the base layer.
- Add First Pudding Layer: Divide half of the thickened chocolate pudding evenly among the cups, spreading it smoothly over the Oreo crumb base.
- Second Oreo Layer: Sprinkle another layer of crushed Oreo cookies evenly on top of the pudding layer in each cup.
- Mix Pudding with Whipped Topping: In a separate bowl, combine the remaining pudding with the whipped topping and stir until smooth and well blended.
- Add Final Pudding Layer: Evenly distribute this pudding-whipped topping mixture over the second Oreo layer, smoothing the tops of the cups.
- Top with Final Oreo Crumbs: Sprinkle the rest of the crushed Oreos over the top of each cup to mimic dirt.
- Chill the Cups: Place all the pudding cups in the refrigerator and chill for at least one hour to set and enhance flavors.
- Decorate Tombstones and Finish: Use black gel decorating icing to write “RIP” on each Milano cookie. Press one decorated cookie into the top of each cup, then top each with a gummy worm to complete the graveyard look.
Notes
- Use clear cups for the best visual effect of the layered dessert.
- For a dairy-free option, substitute milk and whipped topping with plant-based alternatives.
- Make ahead and refrigerate overnight for deeper flavor infusion.
- Adjust the number of gummy worms and tombstones based on cup quantity.
- Customize with different flavored puddings or cookie crumbs for variety.
Nutrition
- Serving Size: 1 cup
- Calories: 330
- Sugar: 30g
- Sodium: 190mg
- Fat: 14g
- Saturated Fat: 7g
- Unsaturated Fat: 5g
- Trans Fat: 0g
- Carbohydrates: 45g
- Fiber: 2g
- Protein: 4g
- Cholesterol: 25mg

