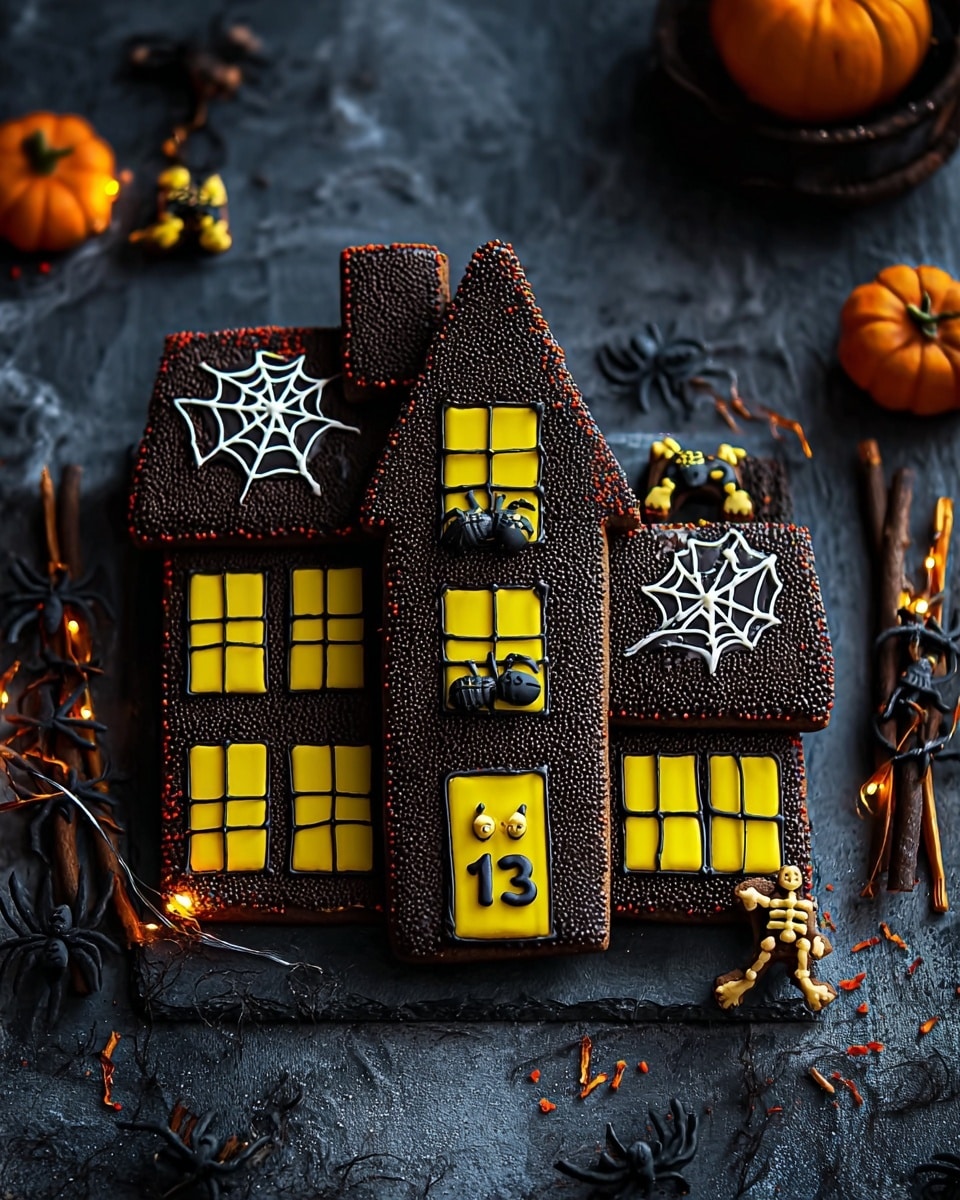
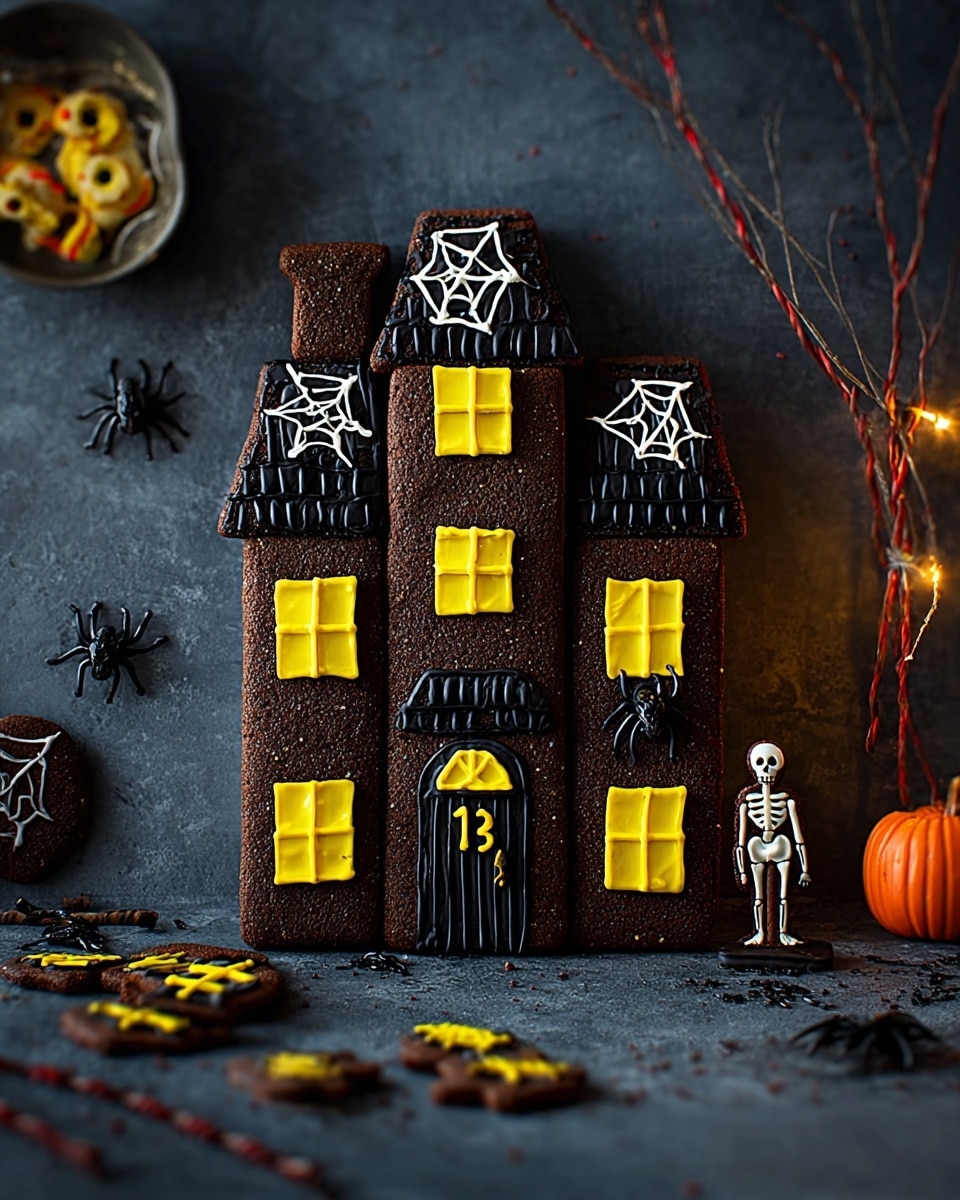
I’m so excited to share this Halloween Brownie House Cake Recipe with you because it’s a showstopper for spooky season! Imagine a rich, fudgy brownie transformed into a charming haunted house decked out with chocolate turrets, candy windows, and even a little ghost for good measure. When I first tried this, I was amazed at how easy it was to turn simple brownies into something magical and delicious. Whether you’re baking for kids, friends, or a festive party, this recipe will have everyone talking—and eating—every last bite.
Why You’ll Love This Recipe
- Rich and Decadent: The brownies stay perfectly fudgy with deep chocolate flavor that everyone loves.
- Creative Decorating Fun: You get to build a brownie house with candy accents—great for making memories.
- Impressively Easy: No complicated baking skills needed, just some cutting and icing magic.
- Make-Ahead Friendly: The undecorated brownie freezes beautifully, making party prep stress-free.

Ingredients You’ll Need
The blend of classic brownie ingredients creates a perfect canvas for decorating your Halloween masterpiece. I recommend using quality dark chocolate for that rich cocoa depth, and grabbing some ready-to-roll fondant for the easiest decorating experience.
- Unsalted butter: Cubed for easy melting and control over salt levels.
- Dark chocolate (around 54% cocoa): Gives that rich, slightly bittersweet flavor that balances the sweetness.
- Large eggs: Helps give the brownies structure and richness.
- Caster sugar: Finely ground sugar dissolves smoothly for a tender brownie crumb.
- Vanilla extract: Adds warmth and rounds out chocolate notes.
- Plain flour: Basic all-purpose flour works perfectly here.
- Salt: Just a teaspoon to lift the chocolate flavor.
- Chocolate-flavored frosting: For that creamy ‘icing’ layer that helps candy stick.
- Matchmakers (chocolate sticks): Amazing for building your turrets and roof trims.
- Yellow ready-to-roll fondant icing: For windows and light-up effects.
- Biscuits (Nice are great!): Serve as windows and door bases—easy to handle and tasty.
- White and black fondant icing: Perfect for spooky ghosts and spider details.
- Colored writing icing pens (white & yellow): For drawing creepy cobwebs and spider legs.
- Purple Smarties: Tiny spiders or fun pops of color for decoration.
Variations
I love mixing things up depending on who I’m baking for and what candy I have on hand. This Halloween Brownie House Cake Recipe is flexible, so don’t hesitate to make it your own with these fun twists!
- Gluten-Free Option: Swap plain flour with a gluten-free blend and double-check your decorations for gluten-free status. It worked well for my gluten-intolerant friends.
- Vegan Adaptation: Use vegan butter and egg replacers, with dairy-free chocolate. I experimented once, and while texture changes a bit, it’s still super tasty!
- Seasonal Candy Swaps: Try orange or black candy sticks, or gummy spiders for different Halloween vibes. My kids had a blast customizing their spooky houses.
- Intensity of Chocolate: Choose milk or bittersweet chocolate to suit your family’s taste preferences; darker chocolate makes a richer brownie.
How to Make Halloween Brownie House Cake Recipe
Step 1: Baking the Perfect Brownie Base
Start by preheating your oven to 180°C (fan 160°C) and lining a large baking tin with nonstick paper. Melt the butter and dark chocolate gently over low heat until smooth—this is where you get that glossy fudgy finish. I like to let it cool for 5 minutes so it doesn’t cook the eggs in the next step. Then whisk eggs, sugar, and vanilla until pale and just combined—this helps create that tender crumb. Stir in the chocolate mix, fold in flour and salt carefully to avoid overmixing, and pour into the tin. Bake about 30-35 minutes until the edges are set and the center doesn’t wobble. This step takes patience but trust me, it’s worth it to get the perfect brownie texture.
Step 2: Crafting the House and Turrets
Once cooled completely, place the brownie on a board with the short edge towards you. Slice a 4 x 16 cm rectangle from the top left corner, then cut that piece diagonally to create two triangular turret shapes—this detail makes your house pop. Next, cut a 4 x 18 cm rectangle next to the first cut for the shorter turret part. I find it helps to use a sharp knife and steady hands here. Arrange the turrets as shown to build the haunted vibe. This bit feels like playing with edible building blocks—a kid at heart, I promise!
Step 3: Icing and Roofing the House
Use a palette knife to spread a thin layer of chocolate frosting all over your brownie—the frosting acts like glue for your candy. Cover the right roof turret with whole Matchmakers, leaving one aside for later. Halve some Matchmakers to cover the left turret, then decorate the lower roof indentations similarly. For the middle roof, break Matchmakers smaller and cover halfway. Place the reserved Matchmaker between turrets as a cool little divider. I learned from experience that frosting thickness is key—too thick and your candy won’t stick well; too thin and the brownie crumbles. Finding that balance makes decorating easier and cleaner.
Step 4: Adding Doors, Windows, and Spooky Details
Cut a Matchmaker to 7.5 cm and arrange three more on each side, trimming the tops at angles to create an arched door frame—it adds so much character! Roll yellow fondant to 2mm thickness and cut pieces just larger than your biscuits; attach the fondant to biscuits with a dab of water, folding edges under. These become your luminous windows. Add ghost shapes cut from white fondant on top of some windows. Cut thin black fondant strips for windowpanes and spider legs. I even made a tiny spider by shaping black fondant into a body and legs and attached it to a window. Don’t forget to use icing pens to draw cobwebs and scary eyes—the little touches are what bring the house to life and delight everyone who sees it.
Step 5: Final Touches with Cobwebs and Mini Spiders
Use white writing icing to draw delicate cobweb patterns on the windows and roof. Stick purple Smarties where you want mini spiders and draw their eyes and legs with yellow icing pens. I like to add a spooky number on the door to give the house an address—this is a fun detail that kids love noticing. This whimsical decorating session is where your creativity shines, so have fun and don’t stress perfection. Your Halloween Brownie House Cake will be a conversation starter and a delicious centerpiece.
Pro Tips for Making Halloween Brownie House Cake Recipe
- Cool Completely Before Decorating: I learned this the hard way—the frosting and fondant stick best to fully cooled brownies, so don’t rush!
- Use a Sharp Knife for Clean Cuts: When cutting turrets and doors, a sharp blade helps create neat shapes without crumbling.
- Thin Frosting Layer Is Key: Too much frosting makes your candy slide off; thinly but evenly spread gives the best hold.
- Personalize Decorations: Avoid stress by customizing with your favorite candies—everyone loves adding their own twist.
How to Serve Halloween Brownie House Cake Recipe
Garnishes
I love finishing this brownie house with a light dusting of powdered sugar around the edges to mimic eerie fog. Fresh edible flowers or sugared cranberries can add color and texture if you want a slightly less spooky vibe. For Halloween parties, extra candy like gummy worms or candy eyes placed around the base create a fun spooky landscape.
Side Dishes
Pair this with simple vanilla or pumpkin ice cream to balance the rich chocolate, or serve alongside warm spiced apple cider for a cozy treat. For a bigger Halloween spread, I’ll sometimes make caramel popcorn or candy corn bowls that complement the brownie house perfectly.
Creative Ways to Present
Try placing your Halloween Brownie House on a platter surrounded by crushed chocolate cookies to look like dirt, with candy “graves” made from Oreos and icing. For parties, a glass dome over the house adds mystery until the big reveal. I’ve also used black serving trays and flicked edible glitter for a magical touch that makes kids’ eyes light up every time!
Make Ahead and Storage
Storing Leftovers
If you have any leftovers (though honestly, there usually isn’t), cover the cake loosely with plastic wrap and keep in a cool, dry place for up to five days. I’ve found this keeps the brownie moist and the fondant decorations intact.
Freezing
The undecorated brownie freezes wonderfully if you want to prep ahead. Wrap tightly in cling film and foil before freezing for up to two months. When ready, thaw overnight in the fridge and decorate fresh. I suggest freezing plain brownies rather than the decorated house to preserve the delicate candy details.
Reheating
Because this brownie house is best enjoyed at room temperature, I usually reheat leftover brownie portions gently in the microwave for 10-15 seconds if desired—avoid the decorations during heating. This revives the fudgy texture without melting any candy or fondant.
FAQs
-
Can I use a different size baking tin for this Halloween Brownie House Cake Recipe?
Yes, you can adjust the baking time accordingly if you use a different tin size. Just keep an eye on the brownies and test for doneness with a gentle wobble in the center. A 33 x 23 cm tin is ideal for shaping your house and turrets as described.
-
What if I don’t have Matchmakers—can I use another candy?
Absolutely! Thin chocolate sticks or even pretzel rods coated in melted chocolate would work nicely. The idea is to have candy sticks that you can layout as roof tiles and turrets. Get creative with what you have handy.
-
How far in advance can I decorate the brownie house?
Decorating is best done the day you plan to serve the cake so the fondant and icing stay fresh and vibrant. You can bake and freeze the undecorated brownies up to two months ahead, but decorating closer to serving time gives the best results.
-
Can kids help with building the Halloween Brownie House Cake Recipe?
Definitely! This recipe is perfect for involving kids in the kitchen. Just supervise knife cuts or do that part yourself, and let them have fun placing candy decorations and drawing cobwebs with icing. It’s a great way to spend festive time together!
Final Thoughts
This Halloween Brownie House Cake Recipe has become a seasonal favorite in my home because it brings together baking, creativity, and a little spooky fun all in one. I love how everyone’s eyes light up when they see it on the table, and it tastes just as amazing as it looks. If you want a dessert that doubles as a conversation piece and a delicious treat, I promise this is the one to try. Have fun making your brownie house—it’s a joyful, rewarding project you’ll want to revisit year after year!
Print
Halloween Brownie House Cake Recipe
- Prep Time: 30 minutes
- Cook Time: 35 minutes
- Total Time: 1 hour 50 minutes including cooling and decorating
- Yield: 24 servings
- Category: Dessert
- Method: Baking
- Cuisine: Western
Description
This Halloween chocolate brownie cake is a spooky and delicious treat perfect for festive celebrations. Featuring a rich dark chocolate brownie base decorated to resemble a haunted house, complete with turrets, windows, a door, and ghost and spider details made from fondant and icing. The recipe combines classic chocolate brownie baking with creative decorating using chocolate frosting, Matchmakers, fondant icing, and colorful writing pens, resulting in a fun and impressive dessert that serves 24 and keeps well for up to 5 days.
Ingredients
For the Brownie
- 400g unsalted butter, cubed
- 400g dark chocolate (54% cocoa solids), broken into pieces
- 6 large eggs
- 500g caster sugar
- 1 tbsp vanilla extract
- 250g plain flour
- 1 tsp salt
To Decorate
- 300g chocolate flavour frosting
- 2 x 120g packs Matchmakers
- 100g yellow ready-to-roll fondant icing
- 5 biscuits (4 Nice and 1 halved jam sandwich cream)
- 20g white fondant icing
- 50g black fondant icing
- White and yellow coloured writing icing pens
- 3 purple Smarties
Instructions
- Preheat and Prepare: Preheat the oven to gas mark 4 (180°C, fan 160°C). Line a 33 x 23cm baking tin with nonstick baking paper to prevent sticking.
- Melt Butter and Chocolate: In a heavy-based saucepan over low heat, gently melt the cubed butter and dark chocolate pieces, stirring occasionally until the mixture becomes smooth and glossy. Remove from heat and let cool for 5 minutes.
- Mix Eggs, Sugar, and Vanilla: In a large bowl, use an electric whisk to beat the eggs, caster sugar, and vanilla extract for 1 minute until the mixture is pale and just combined.
- Combine Chocolate Mixture: Stir the cooled chocolate and butter mixture into the egg mixture until fully incorporated.
- Fold in Dry Ingredients: Gently fold in the plain flour and salt using a spatula until just combined, being careful not to overmix.
- Bake the Brownie: Pour the batter into the prepared baking tin and bake in the preheated oven for 30-35 minutes. The top should be pale brown and dry, and the center should no longer wobble. Remove from the oven and allow to cool completely in the tin.
- Cut Out House Shape and Turrets: Place the baked brownie on a board with the short edge facing you. Cut a 4 x 16cm vertical rectangular strip from the top left corner. Cut this piece in half lengthwise to make two 8cm pieces, then cut each piece diagonally to form four triangular turrets. Set aside. Next to the first cut, cut a shorter 4 x 18cm rectangle to form the turrets’ base.
- Assemble Turrets: Piece together the diagonal triangle pieces to create two turrets and arrange them at the top of the main brownie piece in the desired house shape.
- Ice the Brownie: Using a palette knife, spread a thin, even layer of chocolate flavour frosting over the entire brownie surface to act as glue for decorations.
- Decorate Roof with Matchmakers: Cover the right roof turret with full-length Matchmakers, setting one aside. Cover the left turret with halved Matchmakers. Repeat this design at the lower roof indentation. Use smaller broken Matchmaker pieces to cover the middle roof area halfway across. Place the reserved Matchmaker vertically between the turrets to separate them visually.
- Create Door: Cut one Matchmaker to 7.5cm length and arrange it vertically as the door’s central panel. Place three additional Matchmakers on each side, angling the outer edges downward to create an arched door. Press them gently onto the frosted brownie to fix in place.
- Prepare Windows: Roll out yellow fondant icing to 2mm thickness. Cut pieces slightly larger than the biscuits. Lightly moisten the icing and carefully apply it onto the biscuits, folding and pressing edges underneath to seal. Roll out white fondant icing to 2mm thickness and cut a small ghost shape approximately 3 x 6cm. Moisten and attach the ghost onto one window. Roll half the black fondant icing to 3mm thickness and cut 2mm strips to create windowpane details. Attach these strips onto the yellow fondant on the biscuits, then stick the decorated windows onto the brownie where desired.
- Make Ghost and Spider Decor: Take remaining black fondant icing; halve it. Shape one half into an egg shape for the spider’s body; roll the other half into a thin sausage and cut into four even lengths. Lay these parallel, pinch in the middle to form spider legs, and attach the body on top with a dab of water. Attach the spider to one of the windows. Use icing offcuts to create a door handle and ghost eyes.
- Draw Cobwebs and Details: Use white writing icing to draw eyes on the spider and cobweb designs on the windows and roof. Decorate further by sticking the purple Smarties where mini spiders are desired. Use yellow writing icing to draw spider legs, eyes, and to add numbers on the door.
- Store: Keep the decorated brownie cake in a cool, dry place for up to 5 days. The undecorated brownie can be frozen for later use.
Notes
- The undecorated brownie freezes well and can be baked ahead of time.
- Be sure not to overbake the brownie; it should be slightly soft in the center with no wobble for the best texture.
- Use a palette knife to apply frosting thinly to avoid a heavy coating that masks the brownie’s texture.
- Fondant icing sticks best when slightly moistened with water; use a brush to apply sparingly.
- The Matchmakers add both decoration and structure to the turrets and roof.
- Use writing icing pens carefully to create fine details like spider legs and cobwebs.
- Store the cake in a cool place away from moisture to prevent softening or melting of decorations.
Nutrition
- Serving Size: 1 slice (1/24 of cake)
- Calories: 310
- Sugar: 25g
- Sodium: 150mg
- Fat: 18g
- Saturated Fat: 10g
- Unsaturated Fat: 7g
- Trans Fat: 0g
- Carbohydrates: 35g
- Fiber: 3g
- Protein: 4g
- Cholesterol: 90mg


