
If you’re on the hunt for that perfect festive treat, you’re going to adore this Halloween Party Cookies Recipe. It’s one of those recipes I always keep in my back pocket when spooky season rolls around, and honestly, it never fails to impress—both visually and taste-wise. Whether you’re planning a party or just want to delight your family, these cookies are not only fun to make but they taste absolutely delicious. Stick with me, and I’ll walk you through everything you need to know to nail these festive favorites!
Why You’ll Love This Recipe
- Super Festive Decor: The icing colors and shapes scream Halloween, making these cookies an instant crowd-pleaser.
- Perfect for Parties: A fun activity to make with friends or kids, plus they look amazing on any Halloween spread.
- Icing That Pops: Using royal icing with meringue powder ensures your decorations stay vibrant and don’t smudge.
- Reliable and Easy to Follow: Clear steps mean even if you’re new to cookie decorating, you’ll succeed.

Ingredients You’ll Need
The magic is all in the combination of the dough and those colorful royal icings. Each color plays its part in bringing the Halloween shapes to life, so I always recommend using gel food coloring for brighter results that last.
- Roll-Out Cookie Dough: This dough is sturdy enough to hold spooky shapes and soft enough to enjoy.
- Meringue Powder: An egg white substitute that helps the royal icing stiffen perfectly and dry hard.
- Lemon Yellow Icing Color: Adds a warm glow, great for pumpkin details.
- Leaf Green Icing Color: Perfect for stems and little leafy accents.
- Black Icing Color: Essential for facial features and outlining bats for that spooky touch.
- Orange Icing Color: The pumpkin orange you want to highlight your cookies with that classic Halloween vibe.
- Royal Icing: Made with meringue powder; it’s your decorating best friend for sharp lines and smooth fills.
Variations
One of my favorite things about this Halloween Party Cookies Recipe is how flexible it is. I often tweak the colors or shapes to match whatever theme I’m going for, and you can easily adapt it to suit different tastes or dietary needs.
- Gluten-Free Option: I’ve switched to a sturdy gluten-free roll-out dough before, and it worked like a charm—just be careful not to overbake.
- Vegan Friendly: Substitute meringue powder with aquafaba-based icing alternatives to keep these vegan.
- Spooky Shapes: Don’t hesitate to add skeletons, witches, or any Halloween cutters you have to mix things up.
- Mix Up the Flavors: Try adding a dash of pumpkin spice or cinnamon to the dough for an extra seasonal touch.
How to Make Halloween Party Cookies Recipe
Step 1: Bake Your Spooky Shapes
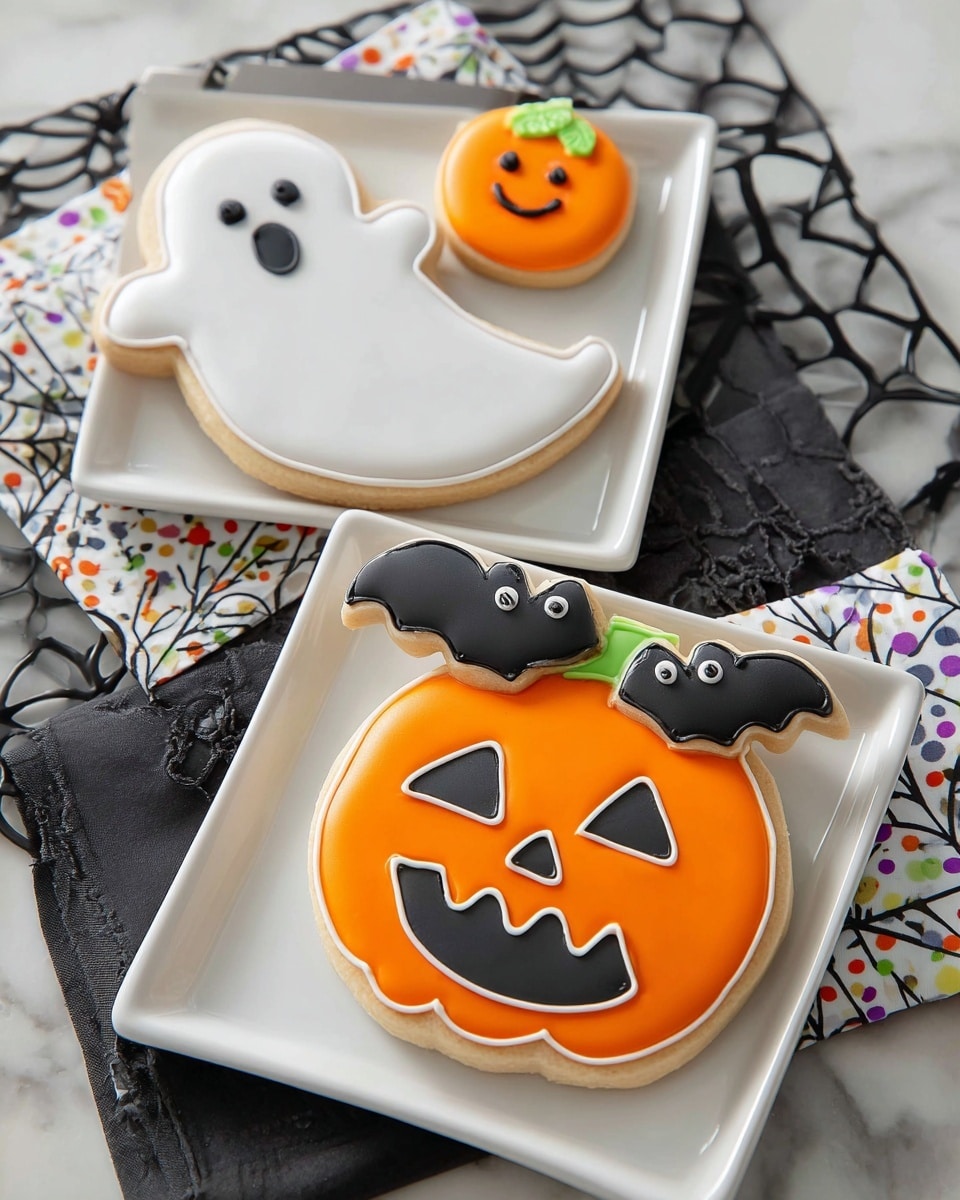
Start one day ahead—that’s my golden rule. Roll out your dough to about 1/4 inch thickness and use cookie cutters for a small pumpkin, large ghost, small bats, and a large pumpkin. I like cutting out a mix of sizes because it adds variety to the final display. After cutting, bake according to your dough recipe instructions until just golden around the edges, then cool completely on a wire rack. Trust me, it’s easier to ice cool cookies without smudging your designs.
Step 2: Prepare Your Royal Icing and Colors
I usually follow the meringue powder package directions for my royal icing—it dries hard and smooth, making it perfect for detailed decorating. Divide your icing into smaller bowls and tint them: black, green (by mixing lemon yellow and leaf green), orange, and keep some white icing plain. This way, you’re ready to outline and fill effortlessly.
Step 3: Ice the Cookies with Care
Using tip 2 for outlining, start by tracing the cookie edges with full-strength colors just like in your favorite Halloween designs. Thin the white and orange icings slightly with water for flooding the ghost and pumpkin areas. The bats and large pumpkin mouth get a thin black fill, and I use thinned green for the stems. Be patient—let them dry for at least 8 hours or overnight. This drying time is crucial for the perfect finish.
Step 4: Add the Final Spooky Details
Once the base layer is dry, grab your dark icings again for the finishing touches. Use full-strength black icing to create facial features on ghosts and pumpkins, and green icing for tiny bat eyes and the pumpkin stems. This step really brings your cookies to life and makes them irresistibly cute (or creepy!).
Pro Tips for Making Halloween Party Cookies Recipe
- Mix Colors Carefully: When blending greens, add yellow gradually to get that perfect leaf green—too much yellow can make it look off.
- Don’t Over-Thin Icing: Thinned icing should flow easily but not be runny—too watery, and it’ll bleed over edges, ruining your outlines.
- Use Quality Gel Colors: They provide vibrant shades without watering down your icing; trust me, I learned this the hard way with liquid dyes.
- Patience is Everything: Let icing layers dry fully before layering details to avoid muddled designs.
How to Serve Halloween Party Cookies Recipe
Garnishes
I like adding a little extra flair with edible glitter or tiny sugar pearls to the pumpkin stems and bat eyes. It gives the cookies a fun sparkle that kids especially love. A sprinkle of cinnamon sugar around the plate adds a cozy, aromatic touch too.
Side Dishes
These cookies pair wonderfully with a warm cup of spiced apple cider or a rich hot chocolate. For a party, I like to serve alongside a platter of fresh fruit or a pumpkin-flavored dip to balance all the sweetness.
Creative Ways to Present
One year, I arranged these cookies on a giant black platter lined with spider web napkins and a few plastic spiders—instant Halloween mood! You could also stack them in a jar tied with an orange ribbon as a party favor or gift.
Make Ahead and Storage
Storing Leftovers
After they’re completely dry, I keep these cookies in an airtight container layered with parchment paper in between to prevent sticking. Stored this way at room temperature, they stay fresh and perfect for about a week.
Freezing
If you want to prep early, freeze undecorated cookies wrapped tightly in plastic wrap and placed in a freezer bag. When you’re ready, thaw completely before icing. For iced cookies, freezing isn’t ideal as the royal icing can crack.
Reheating
No reheating needed here! These cookies are best enjoyed at room temperature to keep their crisp edges and soft centers intact. If they get a bit stale, a quick 10-second zap in the microwave revives them nicely, but only do that just before serving.
FAQs
-
Can I use regular egg whites instead of meringue powder?
Yes, you can use fresh egg whites to make royal icing, but meringue powder is often safer and easier, especially for longevity and hygiene. If using egg whites, ensure they are pasteurized to avoid any food safety issues.
-
What if my icing cracks after drying?
Cracking usually happens if the icing dries too quickly or is applied too thickly. Thin your icing slightly for flooding and allow drying in a cool, less humid environment. You can also try using a small fan to speed drying evenly without over-drying one spot.
-
How long can I make these cookies in advance?
You can bake and decorate them up to 3 days before your party. Just keep them stored airtight at room temperature. If you want to make dough ahead, freeze it for up to a month and thaw before rolling out.
-
Can I skip the royal icing and use store-bought frosting?
While you can use store-bought frosting, it won’t dry hard like royal icing and might smudge or get sticky, especially if stacking cookies. Royal icing provides those crisp, lasting decorations that are key to this recipe’s charm.
Final Thoughts
I absolutely love how this Halloween Party Cookies Recipe turns out every time—it’s like a tiny celebration on your plate. Decorating might feel a bit fiddly at first, but once you get into the rhythm, it’s incredibly rewarding and just plain fun. So grab your cookie cutters and those vivid colors, and I promise you’ll wow your guests or family with these delightful treats. Happy baking and happy Halloween!
Print
Halloween Party Cookies Recipe
- Prep Time: 20 minutes
- Cook Time: 10 minutes
- Total Time: 9 hours 30 minutes (including drying time)
- Yield: 6 treats
- Category: Dessert
- Method: Baking
- Cuisine: American
Description
These Halloween Party Cookies are festive, colorful sugar cookies decorated with vibrant royal icing in the shapes of pumpkins, ghosts, and bats. Perfect for spooky celebrations, they feature detailed icing work using lemon yellow, leaf green, black, and orange colors to create eye-catching designs. Prepared a day in advance, these cookies are ideal for parties and holiday treats.
Ingredients
Cookie Dough
- Roll-Out Cookie Dough (quantity as needed for 6 treats)
Food Coloring and Icing Colors
- Lemon Yellow Icing Color, 1 oz
- Lemon Yellow Gel Food Coloring, 1 oz
- Leaf Green Icing Color, 1 oz
- Leaf Green Gel Food Coloring, 1 oz
- Black Icing Color, 1 oz
- Black Gel Food Coloring, 1 oz
- Orange Icing Color, 1 oz
- Orange Gel Food Coloring, 1 oz
Royal Icing
- Royal Icing with Meringue Powder (prepared following package directions)
- Meringue Powder, 4 oz (egg white substitute)
Instructions
- Bake Cookies: One day in advance, prepare your roll-out cookie dough. Using cookie cutters, cut out one small pumpkin and one large ghost, as well as two small bats and one large pumpkin. Bake the cookies according to the dough instructions, then allow them to cool completely before decorating.
- Prepare Royal Icing: Follow the package directions to prepare your royal icing using meringue powder as an egg white substitute. Divide the icing into multiple portions and tint each using gel food coloring: combine leaf green and lemon yellow for a specific green shade; prepare 1/4 cup black, 1/4 cup green, 1 cup orange, and reserve the remaining icing white.
- Ice Cookies: Using decorating tip 2, outline each cookie with full-strength icings matching the colors you derived, following the design pattern (ghost, pumpkins, bats). Then thin some white, orange, black, and green icings with water to flood fill the cookies accordingly—white for the ghost, orange for pumpkins, black for bats and pumpkin mouths, and green for stems. Let the cookies dry for 8 hours or overnight to set the icing fully.
- Decorate Cookies: Once the base layer is dry, use tip 2 and full-strength icing to add details: black facial features on the ghost and small pumpkin, and green for bat eyes and small pumpkin stems to complete your festive Halloween treats.
Notes
- Allowing the royal icing to dry overnight ensures clean, smudge-proof decorations.
- Use gel food coloring for more vibrant colors without altering icing consistency.
- Store finished cookies in an airtight container at room temperature for up to one week.
- Using meringue powder as an egg white substitute makes the royal icing shelf-stable and safe for those avoiding raw egg whites.
Nutrition
- Serving Size: 1 cookie (approximately 50g)
- Calories: 150
- Sugar: 12g
- Sodium: 90mg
- Fat: 5g
- Saturated Fat: 1g
- Unsaturated Fat: 3g
- Trans Fat: 0g
- Carbohydrates: 23g
- Fiber: 0.5g
- Protein: 1g
- Cholesterol: 0mg

