
If you’re looking to add some spooky fun to your Halloween treats, this Halloween Spider Sugar Cookies Recipe is an absolute must-try. These cute-but-creepy cookies combine soft, buttery sugar cookies with playful spider decorations made from candy melts and edible eyes — perfect for parties, school events, or just treating yourself. Trust me, once you make these, your family and friends will be begging for more, and I’m excited to share all my tips so you nail them on your first try!
Why You’ll Love This Recipe
- Super Fun and Festive: These cookies bring Halloween to life with adorable spider designs that kids and adults adore.
- Beginner-Friendly: You don’t need to be a pro baker to whip these up—they’re straightforward and forgiving.
- Customizable: You can easily swap candy colors or eyes to suit your Halloween vibe or party theme.
- Perfect for Any Occasion: Whether it’s a classroom party or a cozy night in, these cookies are sure to impress.

Ingredients You’ll Need
The beauty of this Halloween Spider Sugar Cookies Recipe is that it uses simple ingredients you can find just about anywhere. Using a classic sugar cookie dough provides the perfect soft base that holds the candy decorations delightfully.
- Favorite sugar cookie dough: Use either your homemade or store-bought dough; I love how homemade dough gives a buttery flavor, but store-bought is a reliable shortcut.
- Edible candy eyeballs: These bring the spider to life! Choose ones that are small and detailed for the best effect.
- Lavender Candy Melts Candy: The lavender color is perfect for a spooky, yet playful, look — but feel free to experiment with black, orange, or green melts too!
Variations
I love mixing things up with this Halloween Spider Sugar Cookies Recipe depending on the occasion or what I have on hand. It’s so adaptable that you can easily make it your own!
- Use different candy melts colors: Once, I swapped lavender for classic black for a more intimidating spider look—it totally transformed the vibe and was a hit with the teens.
- Try chocolate sugar cookie dough: For a rich twist, I once used chocolate dough as the base and it added a deeper flavor that everyone raved about.
- Make them gluten-free: If you need a gluten-free option, a reliable gluten-free sugar cookie dough works great here without losing the texture.
How to Make Halloween Spider Sugar Cookies Recipe
Step 1: Bake Your Base Sugar Cookies
Start by rolling out your favorite sugar cookie dough and cutting it into rounds (Wilton’s Mega Cookie Baking Sheet is a game-changer here—it helps keep the cookies evenly shaped and spaced). Bake them according to your dough’s directions until edges turn just golden. I always keep a close eye to avoid overbaking, because soft cookies make the best canvas for decorating.
Step 2: Add the Candy Melt “Spider Body” and Eyes
Right out of the oven, while the cookies are still warm (but not piping hot), press one lavender candy melt disc in the center, round side up. The warmth softens the melt so it sticks perfectly once cooled. Then, place two candy eyeballs slightly above the candy melt to create your spider’s face. This step always feels so fun for me—it’s like the spiders are waking up from cookie slumber!
Step 3: Cool and Prepare the Spider Legs
Let the cookies cool on the pan for about five minutes so the candy melt sets a little, then carefully transfer them to a wire rack to cool fully (about 20-30 minutes). While they’re cooling, melt your lavender candy melts in a disposable decorating bag according to the package directions—you’ll want a smooth, silky consistency so they pipe nicely.
Step 4: Pipe on the Spider Legs and Let Set
Snip a tiny hole at the tip of your decorating bag and pipe four legs on each side of the candy melt “body.” It’s easiest if you think about spider legs as pairs of curved lines extending out. Chill your cookies in the fridge for 10–15 minutes to let everything set solid. This step always feels like magic when those delicate legs hold firm!
Pro Tips for Making Halloween Spider Sugar Cookies Recipe
- Warm Cookies for Candy Melt: Adding the candy melts while the cookies are still warm helps them stick better without sliding off later.
- Use a Parchment Liner: Baking on parchment or a silicone liner prevents sticking and keeps your cookies perfectly shaped.
- Pipe Slowly and Steadily: Take your time piping spider legs; a steady hand makes those little legs look super professional!
- Don’t Overbake: Baking just until edges are lightly golden keeps your cookies soft and chewy, which complements the candy melt texture wonderfully.
How to Serve Halloween Spider Sugar Cookies Recipe
Garnishes
For extra flair, I love adding a tiny sprinkle of edible glitter or black sanding sugar right before chilling — it gives a subtle sparkle that catches the light beautifully. You could also drizzle a little white chocolate over the top for the web effect if you’re feeling fancy.
Side Dishes
These cookies pair wonderfully with a warm cup of apple cider or creamy hot chocolate — the cozy drinks balance the sugar rush perfectly. If you’re hosting a party, a platter with other Halloween-themed treats like pumpkin muffins or candied popcorn rounds out your spooky table.
Creative Ways to Present
I once arranged these cookies on a black serving tray lined with faux spider webs and a few plastic spiders for a dramatic centerpiece. Wrapping a few in clear cellophane bags tied with orange ribbon also makes them perfect little favors or gifts. Don’t hesitate to get creative — presentation adds to the excitement!
Make Ahead and Storage
Storing Leftovers
I store leftover Halloween Spider Sugar Cookies in an airtight container layered with parchment paper to prevent sticking. They keep fresh and soft for about 3-4 days at room temperature, but I often find myself eating them way before that!
Freezing
If you want to get ahead, these cookies freeze well. I freeze them undecorated (just baked cookies) in a single layer on a baking sheet, then transfer to a sealed bag or container. When you’re ready, thaw and decorate—this keeps candy melts bright and prevents damage.
Reheating
To refresh cookies that have been stored, I warm them slightly in the oven at 300°F for 3-5 minutes. This brings back the softness without melting the candy melts. Just watch closely to avoid overheating!
FAQs
-
Can I use store-bought sugar cookie dough for this Halloween Spider Sugar Cookies Recipe?
Absolutely! Store-bought dough works perfectly here, especially for beginners or last-minute baking. Just follow the package baking instructions and proceed with decorating as described. Homemade dough offers a more buttery taste but isn’t necessary for great results.
-
What if I can’t find lavender candy melts?
No worries! You can substitute with any color candy melts you like—black for spooky, orange for traditional Halloween, or even white for a ghostly look. The key is to pick melts that melt smoothly and pipe easily.
-
How do I make spider legs look neat and even?
Practice makes perfect! Use a small decorating bag with a tiny hole and pipe slowly with steady pressure. Drawing the legs on parchment paper first to get a feel for the motion is a great trick I use before tackling the cookies themselves.
-
Can these cookies be made in advance?
Yes, you can bake and freeze the plain sugar cookies ahead of time, then decorate closer to your event. This keeps the candy melts fresh and makes your honey-do list lighter on party day.
Final Thoughts
I genuinely adore this Halloween Spider Sugar Cookies Recipe because it combines simplicity with imaginative fun—two things I think every great holiday treat should have. Every year, making these cookies kicks off the festive spirit in our home and brings smiles all around. I can’t recommend it enough if you want a foolproof, crowd-pleasing way to celebrate Halloween that looks as awesome as it tastes. So grab your dough, candy melts, and eyeballs, and let the spider baking begin!
Print
Halloween Spider Sugar Cookies Recipe
- Prep Time: 25 minutes
- Cook Time: 15 minutes
- Total Time: 1 hour 30 minutes
- Yield: 3 dozen cookies
- Category: Dessert
- Method: Baking
- Cuisine: American
Description
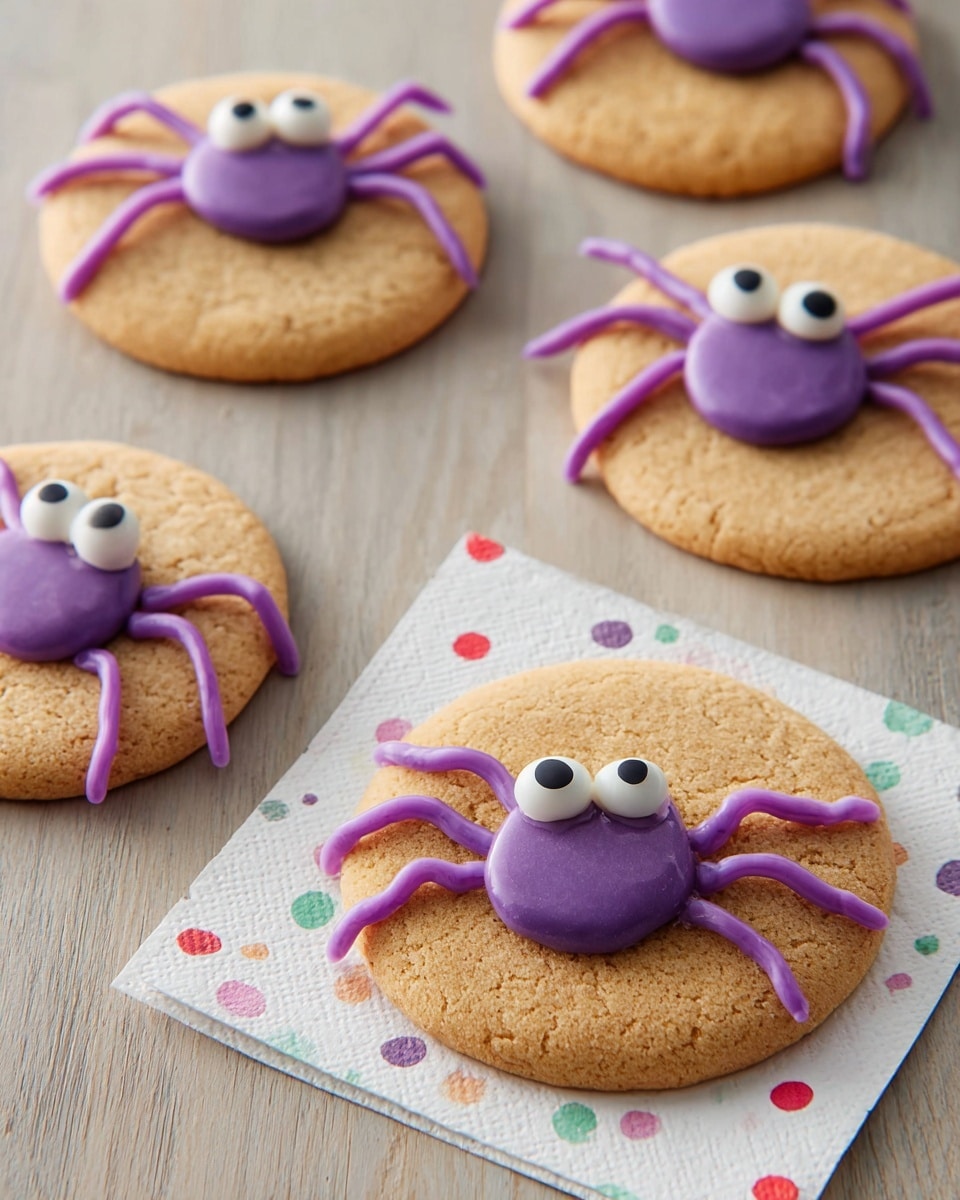
These Halloween Spider Sugar Cookies are a fun and festive treat perfect for any spooky celebration. Soft sugar cookies are topped with glossy lavender candy melts and adorable edible candy eyeballs to create creepy-crawly spider designs. With easy-to-follow steps ideal for beginners, this recipe yields three dozen charming cookies decorated with piped candy melt spider legs for a delightful seasonal dessert.
Ingredients
Cookie Base
- Favorite sugar cookie dough (enough for 3 dozen cookies)
Decorations
- Edible Candy Eyeballs, 0.88 oz.
- Lavender Candy Melts Candy, 12 oz.
Instructions
- Bake the Cookies: Using Wilton’s Mega Cookie Baking Sheet, bake the sugar cookies according to the dough’s package directions until golden and set. Remove from the oven carefully.
- Add Candy Melt Discs and Eyes: While the cookies are still warm, immediately place one Lavender Candy Melt disc in the center of each cookie, rounded side up. Then, position two edible candy eyes at the top of each cookie to mimic spider eyes.
- Cool the Cookies: Let the cookies cool in the pan for about five minutes to allow the candy melts to firm up. Then, transfer the cookies gently to a cooling rack to cool completely, which should take approximately 20 to 30 minutes.
- Melt the Candy Melts: Put the remaining Lavender Candy Melts Candy into a disposable decorating bag. Melt the candy melts in the microwave following the package instructions, stirring as necessary until smooth and pourable.
- Pipe Spider Legs: Cut a small hole at the tip of the decorating bag and pipe four spider legs extending outward from each candy melt body on the cookies. Be creative with your leg placements to enhance the spider effect.
- Set and Serve: Chill the decorated cookies for 10 to 15 minutes until the candy legs are fully set. Once firm, the cookies are ready to serve and enjoy as unique and festive Halloween desserts.
Notes
- Use a cooling rack for even cooling and to prevent soggy cookie bottoms.
- If you don’t have lavender candy melts, any color can be used to customize your spiders.
- Make sure the candy melts are warm and smooth before piping for clean lines.
- Store cookies in an airtight container at room temperature for up to 3 days.
- The edible candy eyeballs can sometimes be found in baking or craft stores around Halloween.
Nutrition
- Serving Size: 1 cookie
- Calories: 120
- Sugar: 10g
- Sodium: 90mg
- Fat: 5g
- Saturated Fat: 3g
- Unsaturated Fat: 1.5g
- Trans Fat: 0g
- Carbohydrates: 18g
- Fiber: 0.5g
- Protein: 1g
- Cholesterol: 10mg


