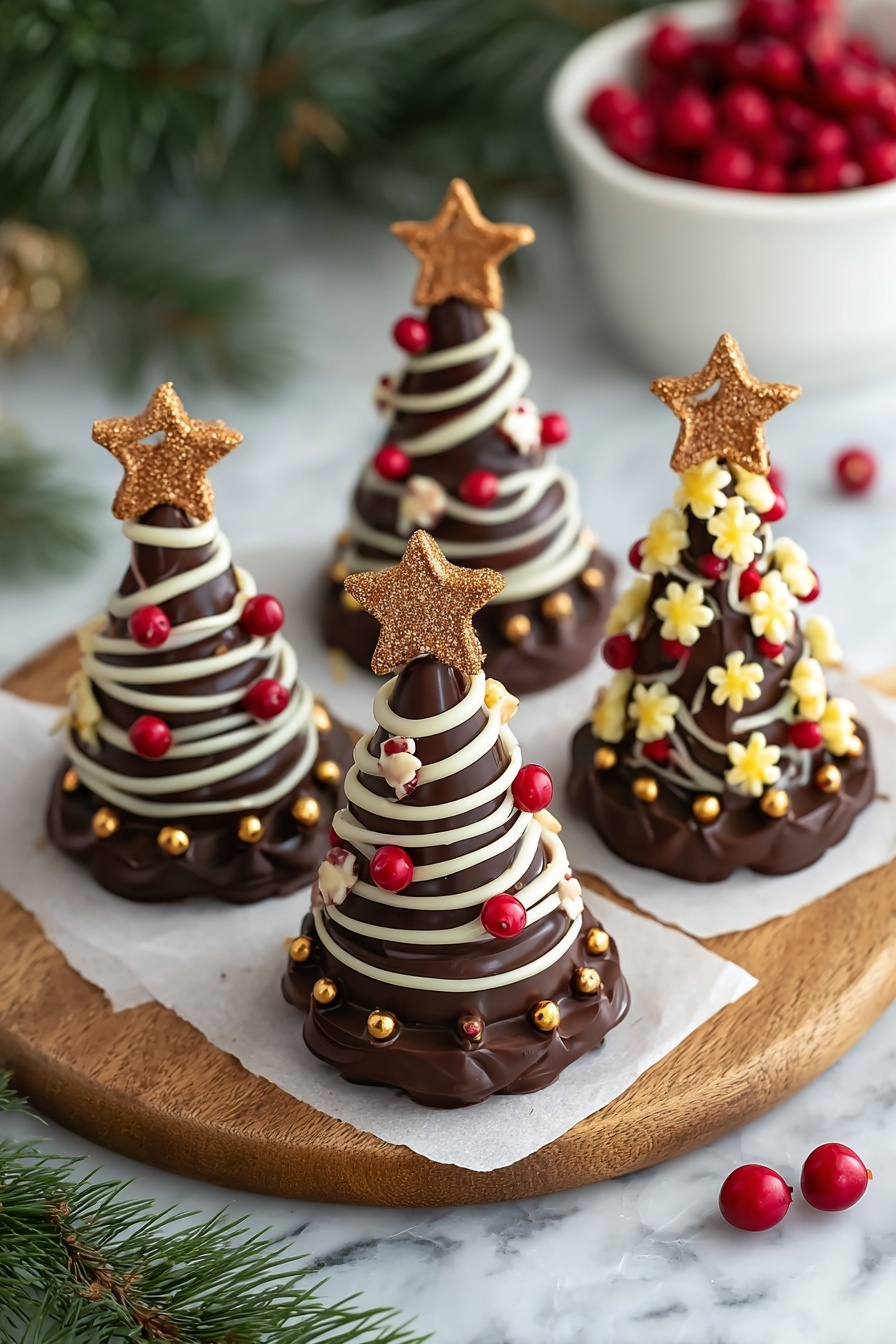
If you’re looking for a festive, fun, and absolutely delightful treat this season, you’ve just found it. This Holiday Chocolate Trees Recipe is one of my all-time favorite holiday projects — it’s simple, visually charming, and tastes incredible. Trust me, once you try it, you’ll find yourself making these chocolaty little trees year after year! So, grab your apron and get ready for some easy chocolate magic that doubles as both a sweet snack and adorable holiday décor.
Why You’ll Love This Recipe
- Simple Ingredients: You only need a handful of pantry staples to create these festive trees.
- Quick and Fun to Make: The whole process takes about 20 minutes, making it perfect even for last-minute holiday fun.
- Great for Gifting or Decorating: These trees look amazing on platters and double as edible gifts that everyone raves about.
- Customizable and Kid-Friendly: Kids love decorating with sprinkles and get a kick out of shaping these chocolaty trees themselves.

Ingredients You’ll Need
I always appreciate recipes like this that don’t require complicated ingredients. The flavors come together beautifully — rich dark chocolate, sweet white chocolate, and that crunch from pretzels is just the perfect finishing touch.

- Dark chocolate: Choose good quality chocolate bars or chips for smooth melting and rich flavor.
- White chocolate: I prefer melting white chocolate separately to drizzle on top, creating a lovely snow-like effect.
- Mini colorful sprinkles: These are your fun “ornaments” — feel free to get creative with festive colors or shapes.
- Pretzel sticks: These act as the sturdy tree trunks — I always pick the thin, crunchy ones for the best look and snap.
Variations
I love playing around with this Holiday Chocolate Trees Recipe — it’s so versatile. You can easily switch up the chocolate type or decorate differently depending on what you have and what you’re celebrating. Make it your own!
- Milk Chocolate Swap: When I first tried milk chocolate instead of dark, my family went crazy for the creamier, sweeter taste.
- Nutty Twist: Adding chopped nuts or crushed peppermint to the sprinkle mix gives a lovely texture and festive flavor.
- Gluten-Free Option: Use gluten-free pretzel sticks to accommodate dietary needs without sacrificing crunch.
- Holiday Theme Colors: Customize sprinkles color-wise for different holidays — red and green for Christmas, pastels for Easter, or even team colors for game day!
How to Make Holiday Chocolate Trees Recipe
Step 1: Prepare Your Workspace
First things first, line a baking tray with parchment paper. This helps the trees release easily once they set, which is crucial because you don’t want your hard work sticking to the tray! I always make sure my prep area is clean and ready before melting any chocolate to keep things moving smoothly.
Step 2: Melt the Dark Chocolate
Place your dark chocolate in a microwave-safe bowl or double boiler. Stir frequently as it melts for the smoothest texture — I usually do 20-30 second bursts in the microwave and stir in between. This is where patience pays off; overheated chocolate can seize up, which is a mess you don’t want!
Step 3: Pipe the Tree Shapes
Transfer melted chocolate into a piping bag — or a zip-top bag with a tiny corner cut if you don’t have one — and start piping tree shapes onto the parchment. Aim for about 3 inches tall and 2 inches wide. Make sure each tree’s bottom overlaps with a pretzel stick, which acts as the trunk. That overlap is key so the stick stays embedded and your trees don’t fall apart.
Step 4: Add White Chocolate and Sprinkles
Once your trees are done, melt the white chocolate like you did the dark chocolate. Drizzle it over the trees in a random pattern for a lovely “snowy” effect — it adds so much charm! While the white chocolate is still wet, quickly sprinkle your colorful minis to mimic ornaments. The sprinkles stick better and look so joyful.
Step 5: Let Them Set
Allow the chocolate trees to firm up at room temperature or pop them in the fridge for 15 to 20 minutes. Don’t rush this part — trying to lift them too soon can lead to breakage. Once set, carefully peel the parchment paper and arrange your trees on a festive platter. They’re instantly a showstopper!
Pro Tips for Making Holiday Chocolate Trees Recipe
- Temper Your Chocolate: If you want glossy trees that snap perfectly, gently temper your chocolate before piping.
- Use Parchment, Not Wax Paper: Wax paper can cause your chocolate to stick, but parchment peels away cleanly every time.
- Work Quickly But Calmly: Chocolate sets fast, so pipe in small batches to avoid rushing and mistakes.
- Avoid Moisture: Keep water away from your melting process to prevent chocolate from seizing; even a drop can ruin the batch.
How to Serve Holiday Chocolate Trees Recipe

Garnishes
I love to use vibrant mini sprinkles because they look like tiny baubles — they bring these chocolate trees to life! For a bit of extra sparkle, sometimes I dust a light sprinkle of edible glitter or crushed candy canes on top for a frosty effect.
Side Dishes
These sweet trees pair wonderfully with holiday cookies, peppermint bark, or even a cup of warm spiced cider or hot cocoa — perfect for an indulgent seasonal spread that guests will adore.
Creative Ways to Present
I like arranging them in clusters on a wooden board for a rustic look or placing each tree individually in small clear bags tied with ribbon to hand out as edible favors. Another fun idea: stick them upright into a cake or dessert centerpiece for an instant winter wonderland vibe.
Make Ahead and Storage
Storing Leftovers
Once your Holiday Chocolate Trees have set, I store them in an airtight container at room temperature in a cool place — this helps keep their crunch and shine without sweating or melting.
Freezing
Freezing works well if you want to prep ahead. I wrap the trees individually in parchment, then place them in a freezer-safe bag. Just be sure to bring them back to room temp slowly to avoid condensation forming on the chocolate.
Reheating
Honestly, these taste best cold or room temperature. If you want to soften the chocolate a bit, let them sit out for 10-15 minutes before serving rather than reheating. Heat can cause them to lose their shape or cause sprinkles to melt.
FAQs
-
Can I use chocolate chips instead of chocolate bars for this recipe?
Absolutely! Chocolate chips melt well and are very convenient. Just watch the melting process closely to avoid burning, and stir often for a smooth finish.
-
How do I prevent my chocolate from seizing while melting?
Chocolate seizes when it comes in contact with even a tiny amount of water. Make sure all your utensils and bowls are perfectly dry, and melt chocolate slowly over low heat or in short microwave bursts.
-
What if I don’t have a piping bag for shaping the trees?
No worries! A zip-top plastic bag with a small corner snipped off works perfectly as a makeshift piping bag and is super easy to handle.
-
Can I make these chocolate trees vegan or dairy-free?
Yes! Use vegan or dairy-free chocolate alternatives, and double-check that your sprinkles are free from animal-derived ingredients.
-
How long will these chocolate trees keep fresh?
Stored in an airtight container in a cool, dry spot, these chocolate trees should stay fresh for up to two weeks. Just avoid humidity to maintain their best texture.
Final Thoughts
I absolutely love how this Holiday Chocolate Trees Recipe brings a little extra joy and magic to our holiday gatherings. There’s something so satisfying about crafting something pretty and tasty that everyone can admire — and eat! I used to struggle with complicated holiday treats until I found recipes like this that combine simplicity, charm, and flavor perfectly. So, do yourself a favor this season and try making these chocolate trees — you’ll be so glad you did, and I bet they’ll become your go-to holiday treat too!
Print
Holiday Chocolate Trees Recipe
- Prep Time: 10 minutes
- Cook Time: 10 minutes
- Total Time: 20 minutes
- Yield: 8 chocolate trees
- Category: Dessert
- Method: No-Cook
- Cuisine: Western
Description
Create festive and delicious Christmas Chocolate Trees using rich dark chocolate, decorated with white chocolate ‘snow’ and colorful sprinkles. These charming edible treats are perfect for holiday parties, gifts, or decorating your festive table with fun and easy-to-make chocolate trees anchored by pretzel sticks.
Ingredients
Chocolate Trees
- 200 grams dark chocolate
- 50 grams white chocolate
- 1/4 cup mini colorful sprinkles
- 8 pieces pretzel sticks
Instructions
- Prepare Baking Tray: Line a baking tray with parchment paper to prevent the chocolate trees from sticking and to make cleanup easier.
- Melt Dark Chocolate: Melt the dark chocolate in a microwave-safe bowl in short bursts, stirring in between, or use a double boiler until smooth and fully melted.
- Pipe Tree Shapes: Spoon the melted dark chocolate into a piping bag or a zip-top bag with a small tip cut off. Pipe Christmas tree shapes about 3 inches tall and 2 inches wide onto the parchment paper, making sure the base of each tree overlaps a pretzel stick to form the tree trunk.
- Melt White Chocolate: Melt the white chocolate similarly until smooth.
- Decorate Trees: Drizzle the melted white chocolate over the dark chocolate trees to create a snow-like effect. While the chocolate is still wet, sprinkle mini colorful sprinkles over the trees to add festive decoration.
- Set the Chocolate: Allow the chocolate trees to set at room temperature or refrigerate for 15-20 minutes until firm to the touch.
- Serve: Carefully lift the chocolate trees from the parchment paper, arrange them on a festive platter, and enjoy your holiday treats or package for gifting.
Notes
- Work quickly while the chocolate is melted before it starts to set for best piping results.
- Substitute milk chocolate or white chocolate for dark chocolate depending on your preference.
- These chocolate trees make wonderful edible gifts and whimsical holiday decorations.
- Ensure the chocolate is fully set before handling to avoid smudging or breaking.
Nutrition
- Serving Size: 1 tree
- Calories: 120 kcal
- Sugar: 15 g
- Sodium: 50 mg
- Fat: 7 g
- Saturated Fat: 4.5 g
- Unsaturated Fat: 2 g
- Trans Fat: 0 g
- Carbohydrates: 15 g
- Fiber: 2 g
- Protein: 2 g
- Cholesterol: 5 mg

