
I absolutely love this Homemade Chili Crisp Recipe because it brings that perfect balance of spicy heat and crunchy texture to anything you drizzle it on. Whether it’s a bowl of rice, noodles, or even just a simple fried egg, this chili crisp adds a layer of flavor and crunch that feels indulgent yet homemade. You’ll find that once you make this yourself, store-bought versions just don’t compare.
When I first tried making my own chili crisp, I was amazed at how simple the ingredients are, but how transformative the end product can be. This Homemade Chili Crisp Recipe is not only great for spice lovers but also super versatile and easy to customize, so it makes a fantastic pantry staple you’ll reach for again and again.
Why You’ll Love This Recipe
- Authentic Flavor: Homemade ingredients give you rich, deep, smoky heat that store-bought chili crisp can’t match.
- Customizable Heat: You control the spice level, so you’ll never get overwhelmed by too much heat or blandness.
- Crunch Factor: The toasted aromatics add amazing texture, making every bite exciting and irresistible.
- Long Lasting: The oil base preserves the chili crisp, so making a batch means you have a flavorful condiment ready whenever you want.

Ingredients You’ll Need
Each ingredient here plays a key role in building layers of flavor: from the fresh aromatics to the toasted chili flakes, together they create that crave-worthy, spicy crunch we all adore. I always recommend sourcing good-quality chili flakes and fresh garlic for best results.
- Chili flakes: Look for medium heat flakes like Chinese chili flakes; too mild or too smoky can change the flavor.
- Garlic: Fresh, minced garlic is a must for that punch of aroma and flavor.
- Shallots: Thinly sliced—adds sweetness and crunch once fried.
- Oil (neutral): Use vegetable or canola oil as it won’t overpower the spices.
- Soy sauce: Adds umami depth; tamari works well if gluten-free is needed.
- Sugar: Balances the heat with a touch of sweetness.
- Salt: Enhances all the other flavors perfectly.
- Sichuan peppercorns (optional): Adds that unique floral, numbing heat if you want to elevate the recipe.
Variations
I love how flexible this Homemade Chili Crisp Recipe is—you can easily dial up the heat, make it nutty, or even vegan depending on what you have in your pantry. Feel free to experiment and make this your own!
- Add nuts or seeds: I sometimes toss in toasted peanuts or sesame seeds for extra crunch and nutty flavor.
- Make it smoky: Using smoked paprika or chipotle chili flakes gives a deeper, smokier punch.
- Vegan version: Just skip any fish sauce and stick to soy sauce to keep it plant-based and still delicious.
- Milder option: Reduce chili flakes and increase sweetness for a gentler kick—great if you’re new to spicy foods.
How to Make Homemade Chili Crisp Recipe
Step 1: Toast Your Aromatics
Start by heating your neutral oil gently over medium-low heat. Add minced garlic, sliced shallots, and if using, Sichuan peppercorns. Slowly fry these until golden and crisp, stirring often so nothing burns. This step builds the base flavor and that signature crunch in chili crisp, so patience here really pays off!
Step 2: Blend in Seasonings and Chili Flakes
Once your aromatics are perfectly crispy, remove the pan from heat and stir in your chili flakes, salt, sugar, soy sauce, and any other flavorings. The residual heat will toast the chili flakes just right without burning them, and mixing everything while warm helps those flavors meld together beautifully.
Step 3: Cool and Store
Let your chili crisp cool completely before transferring it to a clean, airtight jar. It’ll keep for weeks in the fridge, and the flavors actually deepen the longer it sits. I always make a big batch so I have it ready for busy weeknights or to spice up last-minute meals.
Pro Tips for Making Homemade Chili Crisp Recipe
- Low and Slow Frying: I learned the hard way that frying aromatics too fast scorches them; keep the heat gentle for golden, not burnt, flavor.
- Use Fresh Ingredients: Fresh garlic and shallots make all the difference in aroma and taste—avoid bottled minced garlic if possible.
- Toast Chili Flakes Off Heat: Adding chili flakes after removing the pan from stove prevents bitterness and keeps their bright, spicy taste.
- Let It Rest: Giving your chili crisp a day to sit deepens the flavor and enhances the melding of spices—try to resist tasting right away!
How to Serve Homemade Chili Crisp Recipe
Garnishes
I love sprinkling a little fresh chopped scallions or cilantro over a finished dish with a spoonful of chili crisp on top. It adds a fresh pop of color and brightness that balances the oily heat perfectly. Sometimes, I’ll throw on toasted sesame seeds for an added nutty crunch.
Side Dishes
This chili crisp is a magic touch on simple steamed rice, fried rice, or tossed into stir-fried vegetables. I also like pairing it with roasted meats or crispy tofu, where that spicy crunch contrasts beautifully with tender textures. It’s amazing on noodles, whether cold or hot!
Creative Ways to Present
For special occasions, I serve this chili crisp in cute mini glass jars with wooden spoons on the side so guests can dollop their own. It also makes a fantastic gift when packaged with homemade noodles or even infused into flavored oils for dipping bread. Presentation really makes it feel like a kitchen gem you’re proud to share.
Make Ahead and Storage
Storing Leftovers
I keep my homemade chili crisp stored in an airtight jar in the fridge, where it lasts for weeks. The oil solidifies slightly when cold, so just bring it back to room temp before using to get that perfect drizzleable texture again.
Freezing
I don’t usually freeze this chili crisp because it keeps so well refrigerated. But if you want to stash some for later, freeze it in small portions to thaw quickly without compromising the crunchy bits.
Reheating
To bring back that fresh-from-the-pan warmth, I gently heat the chili crisp in a small pan or microwave for a few seconds, just enough to loosen the oil and crisp, but not so hot that the aromatics burn. This step revives all those lively flavors beautifully.
FAQs
-
What makes this Homemade Chili Crisp Recipe different from store-bought versions?
Unlike many commercial chili crisps that rely on preservatives and uniform flavors, this homemade version is fresh, customizable, and full of vibrant aromatics like freshly fried garlic and shallots you won’t get from jars at the store. Plus, you adjust heat and ingredients to suit your palate exactly.
-
How spicy is this chili crisp?
The spice level depends on the chili flakes you choose and how much you use. I recommend starting with a moderate amount, tasting as you go, and adjusting for your taste—it’s easy to add more but hard to take heat away once added!
-
Can I make this recipe vegan?
Absolutely! Just use soy sauce or tamari instead of fish sauce or any animal-based seasonings. The oil, garlic, shallots, and chili flakes provide plenty of flavor on their own.
-
How long does homemade chili crisp keep?
If stored properly in an airtight jar in the fridge, it keeps well for several weeks. The oil helps preserve the ingredients, and the flavors often deepen with time.
Final Thoughts
Sharing this Homemade Chili Crisp Recipe always feels like sharing a little piece of my kitchen’s soul. It’s one of those condiments that instantly lifts any dish and keeps me coming back for more. Give it a try—you’ll enjoy how easy it is to make, how rewarding it tastes, and I promise it’ll become your go-to spicy crunch in no time.
Print
Homemade Chili Crisp Recipe
- Prep Time: 15 minutes
- Cook Time: 10 minutes
- Total Time: 4 hours 25 minutes
- Yield: 48 cookies
- Category: Dessert
- Method: Baking
- Cuisine: American
Description
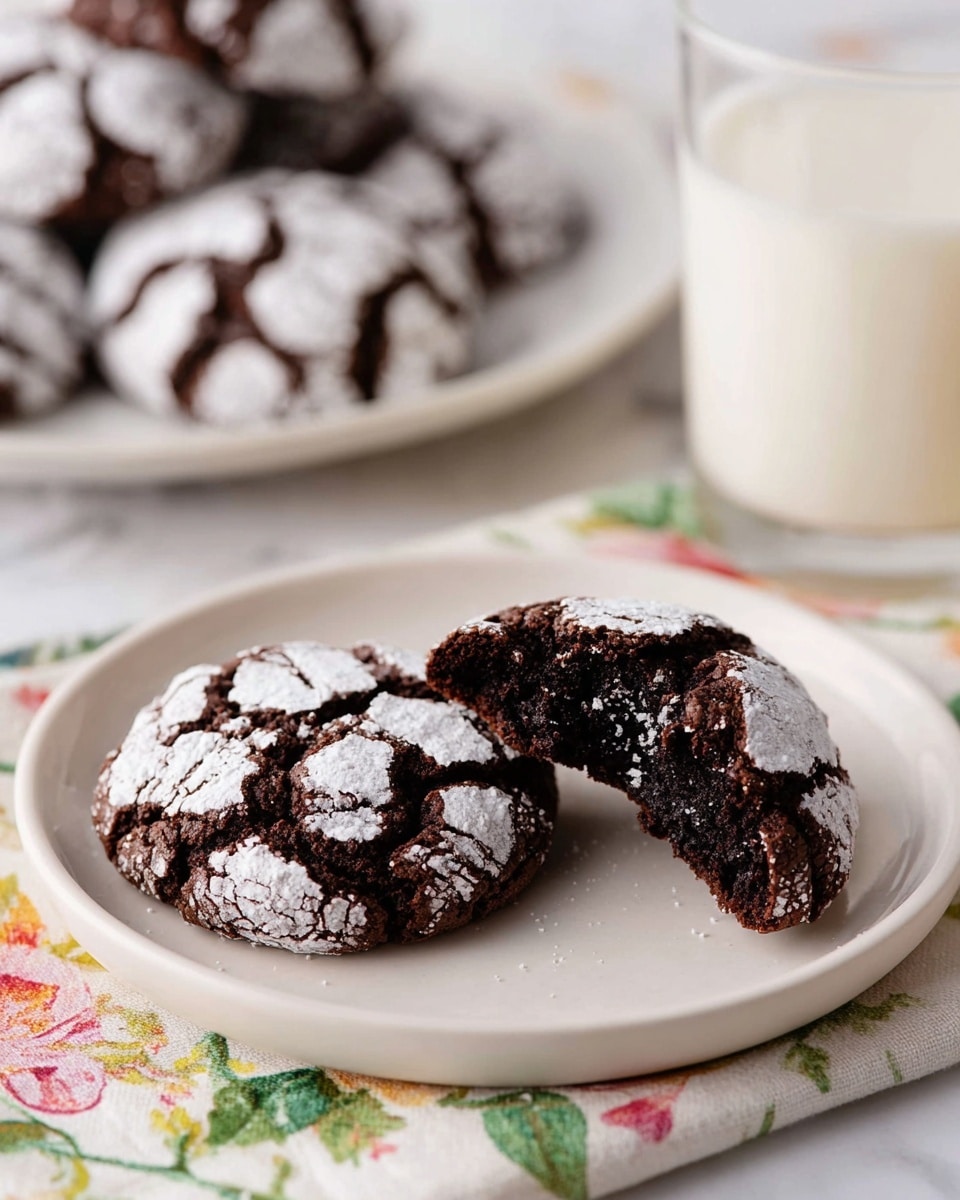
These classic Chocolate Crinkle Cookies are fudgy, chewy, and beautifully cracked on the outside with a sweet powdered sugar coating. Perfectly soft with a slightly gooey center, these cookies are a holiday favorite that require simple ingredients and minimal prep time. Chilling the dough enhances their texture and flavor, making every bite irresistible.
Ingredients
Dry Ingredients
- 1 cup unsweetened cocoa powder (100g)
- 2 cups all-purpose flour (240g)
- 2 teaspoons baking powder
- 3/4 teaspoon salt
- 1 cup powdered sugar (120g)
Wet Ingredients
- 1 3/4 cups granulated sugar (350g)
- 1/2 cup vegetable oil (120mL)
- 4 large eggs, room temperature
- 2 teaspoons vanilla extract
Instructions
- Combine Wet Ingredients: In a large mixing bowl, use a hand mixer or stand mixer fitted with the paddle attachment to beat together the granulated sugar, cocoa powder, and vegetable oil on medium speed until the mixture is well combined and shiny.
- Add Eggs and Vanilla: Beat in the eggs one at a time, ensuring each egg is fully incorporated before adding the next. Mix in the vanilla extract until just combined.
- Mix Dry Ingredients: In a separate medium bowl, whisk together the all-purpose flour, baking powder, and salt until evenly combined.
- Combine Wet and Dry Mixtures: Add the dry flour mixture to the wet cocoa mixture gradually and mix on low speed just until combined; avoid overmixing to maintain tender cookies.
- Chill the Dough: Cover the dough with plastic wrap and refrigerate for at least 4 hours or overnight to firm up and develop flavor.
- Preheat and Prepare for Baking: When ready to bake, preheat the oven to 350°F (175°C) and line two large baking sheets with parchment paper. Place the powdered sugar in a small bowl for rolling.
- Shape and Coat Cookies: Using a small ice cream scoop or tablespoon, scoop the chilled dough and roll it into approximately one-inch balls. Roll each ball generously in powdered sugar until completely coated. Place the coated dough balls on the prepared baking sheets about 2 inches apart. Only coat as many dough balls as fit on the sheets to keep remaining dough chilled.
- Bake Cookies: Bake for 10 to 12 minutes or until the edges are firm and the centers appear puffed and slightly wet. Avoid overbaking to preserve their chewy texture.
- Cool Cookies: Let the cookies cool on the baking sheets for a few minutes before transferring them to a wire rack to cool completely.
Notes
- For best results, chill the dough for at least 4 hours or overnight to prevent spreading and enhance flavor.
- Use room temperature eggs to ensure smooth incorporation into the batter.
- Roll the dough balls just before baking and keep remaining dough refrigerated to maintain consistency.
- Store cookies in an airtight container at room temperature for up to a week, or freeze for longer storage.
Nutrition
- Serving Size: 1 cookie
- Calories: 90 kcal
- Sugar: 10 g
- Sodium: 90 mg
- Fat: 4.5 g
- Saturated Fat: 0.5 g
- Unsaturated Fat: 4 g
- Trans Fat: 0 g
- Carbohydrates: 13 g
- Fiber: 1 g
- Protein: 1 g
- Cholesterol: 15 mg

