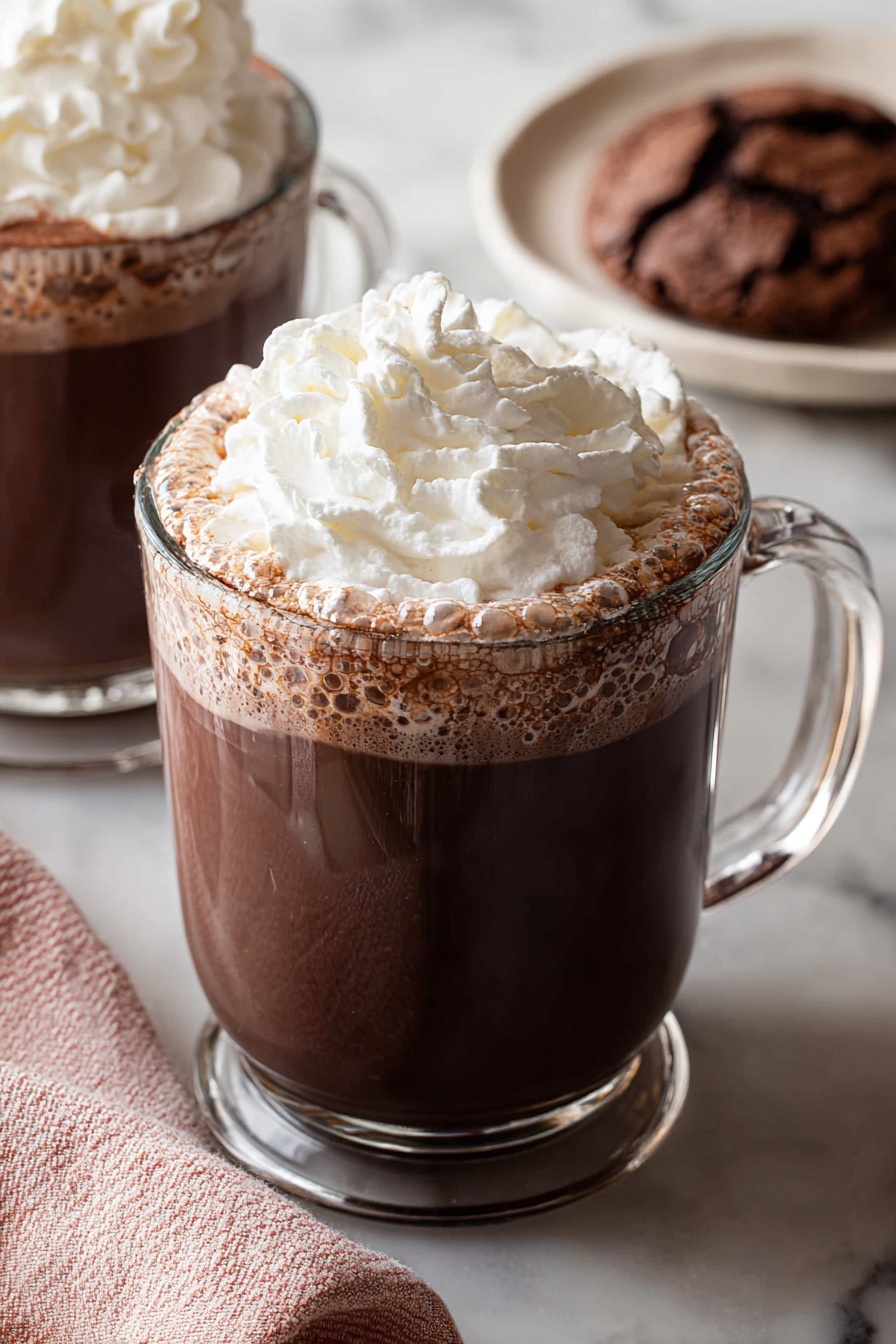
If you’re craving the ultimate cozy drink to warm your soul, you’re going to absolutely love this Homemade Hot Chocolate Recipe. It’s rich, creamy, and just the right amount of chocolatey—seriously, I promise once you try it, you won’t want the store-bought stuff anymore. I’m excited to share all my little tips and tricks with you, so your cup turns out perfectly every single time.
Why You’ll Love This Recipe
- Simple Ingredients: You probably already have everything you need in your kitchen—no fancy stuff required.
- Ultra Creamy & Rich: The way the chocolate melts into the warm milk creates this luscious texture that’s pure comfort in a mug.
- Customizable: You can easily swap and add flavors to make it just the way you like it.
- Quick & Stress-Free: In under 10 minutes, you’ll have a steaming cup of happiness—in my experience, no fuss, just a lot of yum.

Ingredients You’ll Need
The magic in this homemade hot chocolate recipe comes down to the balance of creamy milk, rich chocolate, and just the right amount of sweet cocoa powder. Choosing good-quality ingredients is key here—I’ve learned the hard way that using decent chocolate makes a huge difference.

- Whole Milk: This gives your hot chocolate that silky creaminess; you can swap with any milk you have, but full-fat gives the best results.
- Granulated Sugar: I use simple white sugar, but feel free to experiment with organic cane or coconut sugar for a slightly different flavor.
- Unsweetened Cocoa Powder: Pure cocoa powder is essential for that deep chocolate flavor—dark cocoa powder if you love it extra intense!
- Bittersweet Chocolate: I recommend semi-sweet or bittersweet bars because they melt beautifully and aren’t too sweet; milk chocolate works too, just expect a sweeter drink.
- Pure Vanilla Extract: Just a splash brings everything together and makes the chocolate flavor pop beautifully.
- Homemade Whipped Cream: The crowning glory! I like to top each mug generously—it’s a game changer.
Variations
I love that this homemade hot chocolate recipe is so flexible—you can tweak it based on what mood you’re in or what you have on hand. Here are a few ways I’ve personalized it that you might want to try!
- Spiced Hot Chocolate: I sometimes add a pinch of cinnamon, nutmeg, or even cayenne for a warm, spicy kick that surprises and delights.
- Minty Twist: Adding a drop or two of peppermint extract is a holiday classic in my house, and honestly, year-round too.
- Dairy-free Version: Coconut milk makes a rich substitute that’s super creamy; I swap the bittersweet chocolate for a vegan-friendly kind and it’s just as comforting.
- Extra Indulgent: Mixing in half whole milk and half heavy cream creates an ultra-luxe version for when you really want to treat yourself.
How to Make Homemade Hot Chocolate Recipe
Step 1: Warm Your Milk, Sugar & Cocoa
Start by pouring your milk into a medium saucepan. Add the sugar and cocoa powder right in. I like to whisk it right away to start blending everything so the cocoa powder doesn’t clump up. Heat over medium, stirring occasionally, until you see tiny bubbles forming at the edges—don’t let it boil! That’s a biggie I learned: boiling can scorch the milk or make the cocoa taste bitter.
Step 2: Melt In The Chocolate and Vanilla
Lower the heat a bit and add your chopped bittersweet chocolate and vanilla extract. Keep whisking gently until all the chocolate melts smoothly into your cocoa mixture—that silky texture is what you’re aiming for. If the heat is too high, the chocolate can seize up, so patience here is key!
Step 3: Serve It Up & Garnish
Pour the hot chocolate into your favorite mugs. This recipe makes about four small servings—perfect for sharing (or keeping them all to yourself, no judgment here!). Top with a big dollop of homemade whipped cream and maybe a sprinkle of cocoa powder or cinnamon if you’re feeling fancy.
Pro Tips for Making Homemade Hot Chocolate Recipe
- Use Good Quality Chocolate: Trust me, high-quality bittersweet chocolate makes the texture smoother and flavor richer, and it’s worth the small splurge.
- Don’t Boil the Milk: When you see steam and bubbles around the edges, that’s when to add the chocolate, or else you risk a scorched taste.
- Whisk Continuously: This helps fuse all the ingredients together smoothly and prevents lumps of cocoa powder settling at the bottom.
- Adjust Sweetness at the End: After tasting, feel free to add a pinch more sugar if needed—everyone’s taste buds are different!
How to Serve Homemade Hot Chocolate Recipe

Garnishes
I usually go classic and top mine with homemade whipped cream because it makes the whole experience indulgent and cozy. Marshmallows are fun too, especially if you toast them slightly (I use a kitchen torch). For a grown-up twist, a sprinkle of cinnamon, a grating of nutmeg, or even a tiny drizzle of caramel is delightful.
Side Dishes
To me, hot chocolate pairs perfectly with buttery shortbread cookies, biscotti, or even a warm slice of cinnamon bread. When my family’s gathered, these little bites alongside our mugs are always a hit and make it feel extra special.
Creative Ways to Present
For holidays or parties, I’ve served this homemade hot chocolate garnished with candy canes stuck into the whipped cream or sprinkled with festive colored sprinkles. Another fun trick is layering it in a clear glass mug so you can see the chocolate with the cream melting on top—instant cozy vibes!
Make Ahead and Storage
Storing Leftovers
If you have some hot chocolate left over (which I admit is rare in my house), pour it into an airtight glass jar or container and refrigerate. It will keep well for up to 5 days. Just give it a good stir or whisk before reheating to bring it back to lusciousness.
Freezing
I’ve tried freezing portions in ice cube trays, which works great if you want to reheat single servings in a pinch. Just thaw in the fridge overnight and warm gently on the stove or microwave until smooth again.
Reheating
Reheat gently on the stovetop over low heat, stirring constantly. If reheating in the microwave, stop and stir every 20 seconds to avoid overheating and curdling. Adding a splash of milk will freshen it up if it feels too thick or slightly separated.
FAQs
-
Can I make this Homemade Hot Chocolate Recipe vegan?
Absolutely! Just swap the whole milk for a creamy plant-based alternative like full-fat coconut milk or almond milk, and use dairy-free chocolate. It still turns out rich and decadent, perfect for any dietary preference.
-
What kind of chocolate is best for homemade hot chocolate?
Semi-sweet or bittersweet chocolate bars are my go-to because they melt beautifully and balance sweetness perfectly. Milk chocolate works if you want sweeter, and for a twist, you can try dark cocoa powder or even baker’s chocolate with extra sugar.
-
How do I prevent lumps in my hot chocolate?
Whisk the cocoa powder and sugar into the milk thoroughly and heat gently while stirring regularly. Adding the chocolate after the milk is warm ensures everything melts smoothly. Don’t rush heating or let it boil, which can cause clumping.
-
Can I prepare this homemade hot chocolate in advance?
Yes, you can make the hot chocolate base ahead of time, store it in the fridge, and gently reheat when ready. Just prepare your whipped cream fresh for the best results as it doesn’t store as well.
Final Thoughts
This Homemade Hot Chocolate Recipe holds a special place in my heart because it reminds me of cozy nights by the fire and sharing sweet moments with friends and family. It’s easy enough for any day but special enough to feel like a treat. I really hope you give it a try—you’ll find yourself coming back to this recipe again and again, just like I do!
Print
Homemade Hot Chocolate Recipe
- Prep Time: 2 minutes
- Cook Time: 5 minutes
- Total Time: 7 minutes
- Yield: 4 servings
- Category: Beverage
- Method: Stovetop
- Cuisine: American
Description
This Homemade Hot Chocolate Recipe is a rich and creamy cocoa drink made from whole milk, cocoa powder, and bittersweet chocolate. It provides a perfect balance of sweetness and chocolate flavor, enhanced with vanilla extract, making it a comforting beverage to enjoy on cold days. Serve topped with homemade whipped cream for an indulgent treat that is easy to prepare in under 10 minutes.
Ingredients
Hot Chocolate
- 2 ½ cups whole milk
- ¼ cup granulated sugar
- 2 tablespoons unsweetened cocoa powder
- 6 oz bittersweet chocolate (or semisweet, milk, or alternative chocolate)
- 1 teaspoon pure vanilla extract
For Serving
- Homemade whipped cream
Instructions
- Combine Ingredients: Add the whole milk, granulated sugar, and unsweetened cocoa powder to a medium saucepan to prepare the base for your hot chocolate.
- Heat Mixture: Place the saucepan over medium heat and whisk occasionally. Heat until the mixture just begins to bubble, ensuring it does not reach a full boil. This step is crucial for proper dissolution and flavor development.
- Add Chocolate and Vanilla: Stir in the bittersweet chocolate and vanilla extract. Continue whisking until the chocolate is fully melted and the mixture becomes smooth and creamy.
- Serve: Pour the hot chocolate evenly into 4 small mugs. Top each serving with homemade whipped cream for an added creamy texture and richness.
Notes
- 6 oz of chocolate is approximately equal to 1 cup in volume.
- Ingredient Substitutions: For milk, any dairy or non-dairy milk can be used, though whole milk or 2% milk provides a creamier texture. For a dairy-free option, full-fat coconut milk is recommended.
- Use pure unsweetened cocoa powder; dark cocoa powder will yield a deeper chocolate flavor.
- Granulated sugar alternatives include white sugar, organic cane sugar, or coconut sugar.
- For chocolate, semi-sweet or bittersweet varieties are best. Milk or white chocolate will result in a sweeter drink. Dairy-free chocolate can be used for vegan versions.
- Pure vanilla extract gives the best flavor, but other extracts like peppermint can be added for variation.
- Store any leftovers in an airtight container in the refrigerator for up to 5 days.
Nutrition
- Serving Size: 1 cup
- Calories: 230
- Sugar: 24g
- Sodium: 50mg
- Fat: 13g
- Saturated Fat: 8g
- Unsaturated Fat: 4g
- Trans Fat: 0g
- Carbohydrates: 28g
- Fiber: 3g
- Protein: 5g
- Cholesterol: 35mg


