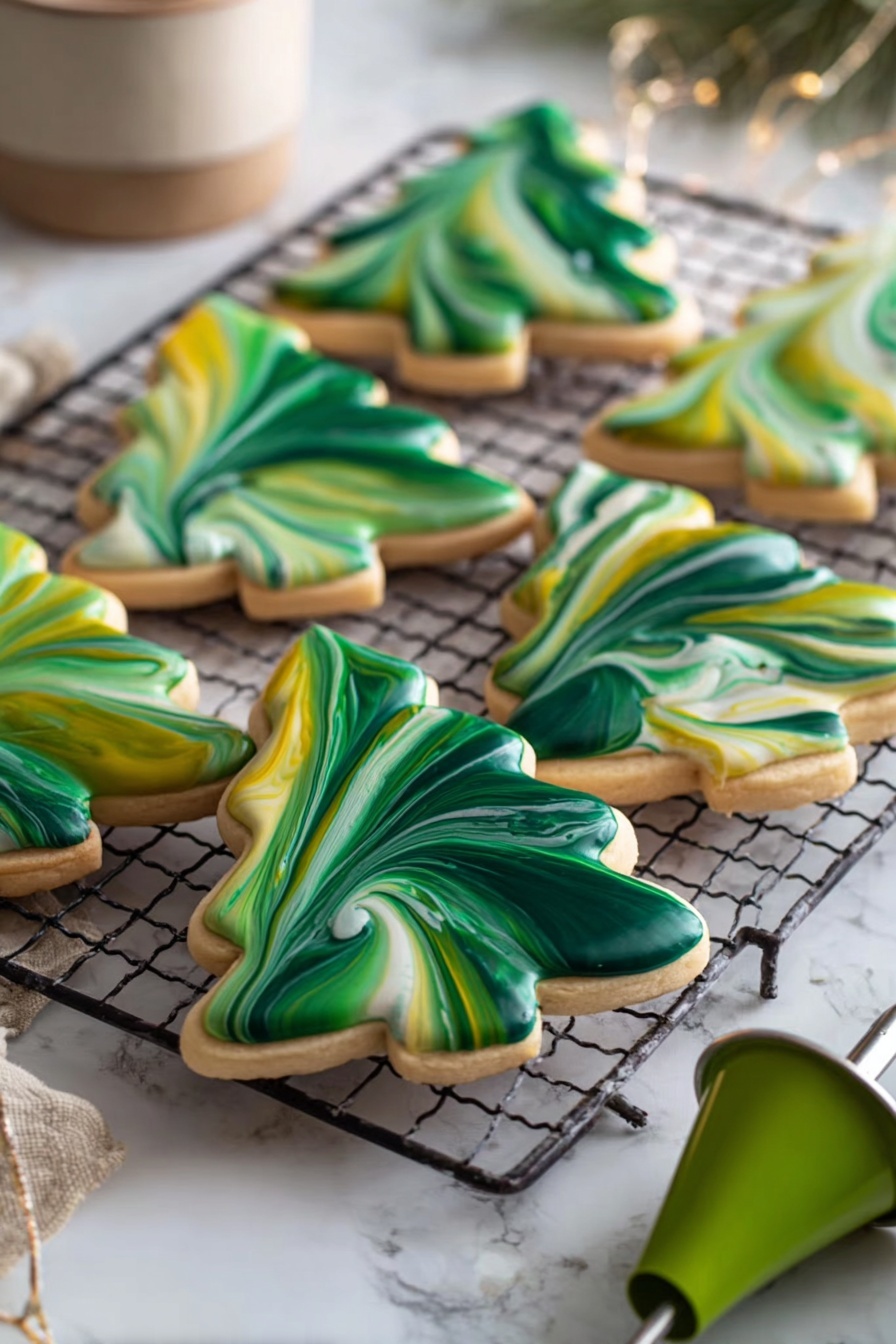
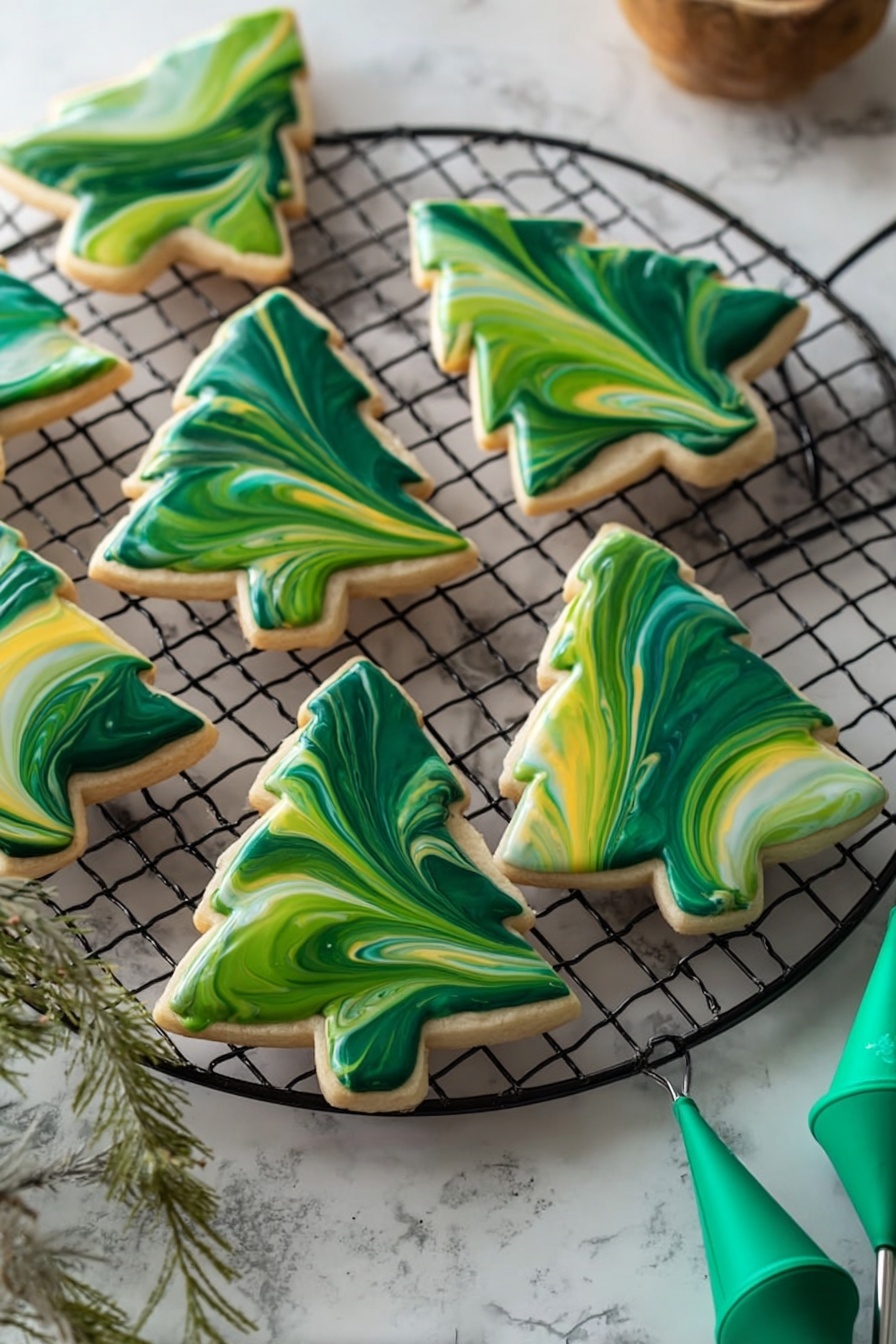
If you’re anything like me, you love a good cookie that’s both beautiful and delicious—and that’s exactly why this Marbled Sugar Cookies with Royal Icing Recipe is one of my absolute favorites. The marbled effect on these sugar cookies is simply stunning, making them a showstopper for any occasion, yet they’re surprisingly easy to make. Plus, the royal icing adds that perfect sweet crust that everyone will rave about. Stick with me, and I’ll share all the little tips and tricks I’ve picked up so you can create your own gorgeous batch that tastes as good as they look!
Why You’ll Love This Recipe
- Gorgeous Marbled Effect: I discovered a fun way to swirl vibrant icing colors that make each cookie a tiny work of art.
- Perfect Texture: Cream cheese in the dough makes these sugar cookies tender yet sturdy enough to hold up to the icing beautifully.
- Reliable Royal Icing: The frosting dries smooth and shiny, giving you that classic crisp cookie finish every time.
- Fun for All Skill Levels: Whether you’re new to royal icing or a seasoned pro, the step-by-step instructions set you up for success.

Ingredients You’ll Need
The magic behind these Marbled Sugar Cookies with Royal Icing Recipe lies not just in the technique but in the simple, high-quality ingredients that work so well together. Using full-fat cream cheese keeps your cookies tender and flavorful, while meringue powder in the icing ensures it dries perfectly every time. Here’s the lowdown on what you’ll want to have on hand.

- Unsalted Butter: Room temperature butter gives you the best creamy texture when creaming with cream cheese.
- Full Fat Cream Cheese: Adds tangy richness that keeps cookies soft but not greasy.
- Granulated Sugar: The right amount gives sweetness and helps with the dough’s structure.
- Egg: Make sure it’s at room temperature so everything combines smoothly.
- Vanilla Extract or Vanilla Bean Paste: Always fresh for that aromatic punch.
- Almond Extract (Optional): I love the subtle nutty depth it adds – but it’s totally up to you.
- All-Purpose Flour: The base for your dough, providing structure without toughness.
- Cornstarch: Keeps the cookies tender and helps with that delicate crumb.
- Baking Powder: A tiny lift to keep the cookies from getting flat.
- Fine Salt: Balances sweetness and enhances flavor.
- Powdered Sugar: For the royal icing – smooth and dissolves beautifully.
- Meringue Powder: Key to getting stiff peaks and a firm icing finish without the mess of raw egg whites.
- Water (Room Temperature): Controls icing consistency for the perfect glaze.
- Gel Food Coloring: For that vibrant marbled swirl – gel works best because it doesn’t thin your icing.
Variations
I love how versatile this Marbled Sugar Cookies with Royal Icing Recipe is! Once you get the hang of the basics, feel free to play around with flavors, colors, and even dietary tweaks to make it your own. Personalizing it not only keeps the process fun but also lets you tailor the cookies to whatever occasion you’re celebrating.
- Flavor Swaps: Sometimes I swap almond extract for lemon zest or orange blossom water for a fresh twist that pairs beautifully with the vanilla.
- Color Themes: For holidays or parties, I like using themed icing colors—think pastels for spring or rich jewel tones for winter celebrations.
- Gluten-Free Version: I’ve had good luck swapping all-purpose flour for a gluten-free baking blend, but be sure to chill the dough a bit longer to prevent spreading.
- Egg-Free Option: You can replace the egg with a flax egg, though the texture will be a bit different—still tasty, just a little denser.
How to Make Marbled Sugar Cookies with Royal Icing Recipe
Step 1: Creaming the Butter and Cream Cheese
This part is where the foundation for your soft, tender sugar cookies starts. Using a stand mixer or hand mixer, beat your room temp butter and cream cheese on medium speed until super smooth—no lumps here! This usually takes about 2-3 minutes. I found that making sure your cream cheese isn’t cold is key; otherwise, you end up with a lumpy mixture that doesn’t cream well and affects the texture of the cookies.
Step 2: Adding Sugar, Egg & Extracts
Next, toss in the granulated sugar and beat on medium-high until the mixture lightens in color and gets fluffy—that’s about 2 minutes. This aerates your dough and helps the cookies bake up tender. Add your egg, vanilla, and almond extract (if using), then mix on medium until everything is just combined. Don’t overmix here; you want everything to blend without making the dough tough.
Step 3: Combining the Dry Ingredients
Whisk together your flour, cornstarch, baking powder, and salt in a separate bowl. This uniform combine ensures even distribution in the dough, so every cookie tastes consistent. When you mix this into the wet ingredients, add it in two parts and mix on low speed—just until you see no dry flour. Overworking the dough can make your cookies tough, something I learned after a few too many tough batches!
Step 4: Chilling the Dough
This step is a game changer for getting those crisp, well-shaped cookies that don’t spread all over your baking sheet. Divide your dough in half, wrap each piece flat in plastic, and chill for at least 2 hours in the fridge or speed things up in the freezer for 30 minutes. Trust me, this makes rolling and cutting much easier and keeps the cookies perfectly shaped while baking.
Step 5: Rolling and Cutting
Roll out one piece of dough at a time between two lightly floured pieces of plastic wrap—this saves you from a sticky mess and cleanup is a breeze! Roll to about 1/3 inch thick, then cut out shapes with your cookie cutters dusted in flour. Brush off any excess flour with a kitchen brush before placing the cookies about an inch apart on your parchment or silicone mat-lined baking sheets. I always chill the cut-out cookies again for 15 minutes to help them keep their shapes while baking.
Step 6: Baking
Bake one sheet at a time on the top rack of your preheated oven at 350°F (175°C) for 10-12 minutes. Keep a careful eye after the 10-minute mark—your goal is no browning on the edges, just soft, cooked centers. Once baked, cool the cookies on the baking sheet for 15 minutes, then transfer them to a wire rack to cool completely before decorating.
Step 7: Making the Marbled Royal Icing
While your cookies are cooling, whip up the royal icing! Mix powdered sugar and meringue powder in a bowl, then add water and vanilla. Beat on low, then medium speed until stiff peaks form—usually about 4 minutes. You’ll then thin with water a little at a time until the icing flows smoothly but holds a figure-8 shape for about 8 seconds when drizzled—a neat little trick I use to get the consistency just right. Cover with plastic wrap to avoid crusting until you decorate.
Step 8: Coloring & Creating the Marbled Effect
Divide about 2/3 cup of the icing into small bowls and tint each with gel food coloring in your chosen shades—think varying tones of the same color for the best marble effect. Spoon these colors on top of the undyed icing in a shallow bowl, then use a toothpick to swirl the colors gently, creating that gorgeous marbled pattern. Here’s the fun part: dunk each cookie into the bowl to coat it, shake off the excess, then drizzle a bit more of the colored icing on top for extra flair. Let them dry completely for an hour or until firm.
Pro Tips for Making Marbled Sugar Cookies with Royal Icing Recipe
- Use Room Temperature Ingredients: I’ve found that when butter, cream cheese, and egg are all room temp, your dough creams much smoother and your cookies bake up more tender.
- Figure 8 Icing Test: Using a stopwatch to time how long your icing takes to “disappear” keeps the flooding consistency dead-on perfect for glazing every time.
- Chilling Chopsticks for Shaping: If your cookies start to lose their shape while cutting, return dough to the freezer for 5-10 minutes so it’s easier to cut crisply.
- Prevent Icing Crusting: Always cover your royal icing with plastic wrap pressed directly against the surface. Leaving it exposed will dry it out and ruin your marbled finish.
How to Serve Marbled Sugar Cookies with Royal Icing Recipe
Garnishes
For me, these cookies are stunning enough on their own, but sometimes I like to add a sprinkle of edible glitter or tiny silver dragees to accentuate the marble effect. I also love a light dust of sanding sugar before the icing dries for extra sparkle and texture. Keep garnishes subtle so that the marbled icing can truly shine.
Side Dishes
These cookies go wonderfully with a warm cup of tea, milky coffee, or even a cold glass of milk. For gatherings, I like to serve them alongside fresh fruit platters and a light cheese selection for a balanced treat spread that isn’t too sweet.
Creative Ways to Present
I’ve had so much fun arranging these cookies on decorative platters layered with doilies or fresh greenery for festive occasions. For birthdays, I placed them around a cake as an edible centerpiece, and during holidays, they made beautiful gifts packaged in clear boxes tied with ribbons. Don’t be afraid to play with presentation—the marbled icing makes them naturally photogenic!
Make Ahead and Storage
Storing Leftovers
Once your cookies are fully dried, I store them in an airtight container at room temperature. They stay perfectly fresh and maintain their texture for up to 2 days, which is usually not a problem because my family’s quick to devour them!
Freezing
If I need to make these ahead of time, I freeze the fully baked, cooled cookies without icing in a single layer on a tray, then transfer them to a freezer-safe container. When I’m ready, I thaw them at room temperature and decorate fresh with royal icing. This way, the cookies stay tender and don’t lose their shape.
Reheating
Since these are icing-up, they’re best enjoyed at room temperature. If you want them warm, I pop un-iced cookies in the oven at 300°F for about 5 minutes before icing. For iced cookies, allow the icing to set fully and skip reheating—it can soften the icing and ruin that satisfying crunch.
FAQs
-
Can I make the dough ahead of time?
Absolutely! You can prepare the dough and chill it for up to 24 hours before rolling and cutting. Just make sure to wrap it tightly in plastic wrap to prevent it from drying out.
-
What if I don’t have meringue powder for the royal icing?
You can use egg whites as a substitute, but be cautious of raw egg risks. Meringue powder is great because it’s safe, shelf-stable, and creates a perfect icing texture without the fuss.
-
How do I get the marbled effect without colors blending into a muddy mess?
The key is to drizzle the colored icings on the base icing gently and use a toothpick to create distinct swirls—don’t overmix the colors or the gorgeous separation will be lost.
-
Can I use this royal icing recipe for other cookie shapes and designs?
Definitely! The royal icing here dries hard and smooth, making it perfect for detailed piping or flooding on a variety of shapes and decorations beyond marbling.
Final Thoughts
I absolutely love how this Marbled Sugar Cookies with Royal Icing Recipe turns out every time—soft, flavorful cookies topped with a stunning, glossy finish that makes any occasion feel special. It’s a recipe I’ve come back to again and again, especially when I want to impress friends without the stress. I hope you’ll find the same joy I’ve found here, and that your kitchen fills with sweet, marbled magic as you make these yourself!
Print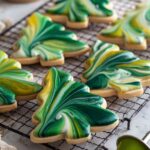
Marbled Sugar Cookies with Royal Icing Recipe
- Prep Time: 20 minutes
- Cook Time: 11 minutes
- Total Time: 2 hours 1 minute
- Yield: 36 cookies
- Category: Dessert
- Method: Baking
- Cuisine: American
Description
These Marbled Sugar Cookies feature a buttery cream cheese dough with a tender, soft texture, topped with a stunning marbled royal icing that creates an elegant and colorful finish. Perfect for special occasions or simply to satisfy your sweet tooth, these cookies combine classic flavors with an artistic presentation.
Ingredients
Cream Cheese Sugar Cookies
- 3/4 cup (1 1/2 sticks) unsalted butter, room temperature (170g)
- 1/2 cup or 4 oz. full fat cream cheese, room temperature (113g)
- 1 1/2 cups granulated sugar (300g)
- 1 large egg, room temperature (56g)
- 2 tsp vanilla extract or vanilla bean paste (8g)
- 1 tsp almond extract – optional (5g)
- 3 cups all-purpose flour (375g)
- 1 Tbsp cornstarch (8g)
- 1/2 tsp baking powder (2g)
- 1/2 tsp fine salt (3g)
Marbled Royal Icing
- 3 cups powdered sugar (375g)
- 3 Tbsp meringue powder (30g)
- 1/4 cup water, room temperature (60g)
- 2 tsp vanilla or almond extract (8g)
- Additional water to reach flooding consistency (approximately 3 Tbsp)
- Gel food coloring
Instructions
- Make the Cookie Dough: In a large bowl or stand mixer, beat softened butter and cream cheese on medium speed until smooth. Add granulated sugar and mix on medium-high speed until the mixture is light in color, about 2 minutes. Incorporate the egg, vanilla extract, and almond extract if using until well blended.
- Combine Dry Ingredients: In a separate bowl, whisk together flour, cornstarch, baking powder, and salt. Add this dry mixture to the wet ingredients in two additions, mixing on low speed just until combined. Scrape the bowl sides as needed. The dough will be sticky at this point.
- Chill the Dough: Divide dough into two halves, flatten each into a rectangle about 1/2 inch thick, wrap in plastic wrap, and refrigerate for 2 hours or freeze for 30 minutes. Preheat the oven to 350°F (175°C) about 30 minutes before rolling out the dough. Prepare baking sheets with silicone mats or parchment paper.
- Roll and Cut Cookies: Remove one dough portion from the fridge, keeping the other chilled. Unwrap and roll dough on floured plastic wrap to 1/3 inch thickness. Cut out shapes with floured cookie cutters, brush off excess flour, and place cookies 1 inch apart on baking sheets.
- Chill Cut-Out Cookies: Refrigerate cut cookies for 15 minutes or freeze for 5 minutes to help maintain shape during baking.
- Bake Cookies: Bake one sheet at a time on the top oven rack for 10–12 minutes, watching carefully to avoid browning edges. Allow cookies to cool on the baking sheet 15 minutes before transferring to wire racks to cool completely. Repeat with remaining dough and scraps.
- Prepare Royal Icing: Whisk powdered sugar and meringue powder together in a large bowl or stand mixer. Add water and vanilla extract, mixing on low to combine, then medium speed until stiff peaks form (about 4 minutes). Add additional water 1 Tbsp at a time until a flooding consistency is achieved, tested by the Figure 8 method — the icing should disappear in 8 seconds.
- Prevent Icing Crusting: Cover the royal icing directly with plastic wrap to prevent crusting until ready to use.
- Color the Icing: Divide about 2/3 cup of royal icing per color and tint with gel food coloring to create multiple shades within the same color family. Place each colored icing in small piping bags and seal.
- Create Marbled Effect: Place the remaining uncolored royal icing in a shallow bowl. Drizzle the colored icings over the surface and use a toothpick or scribe to drag lines through the colors forming a marbled pattern.
- Dip and Decorate Cookies: One at a time, dunk cooled cookies into the marbled royal icing, covering the surface. Shake off excess icing and place on a drying rack. Drizzle and swirl more colored icing on top to enhance the marbled effect. Keep the icing bowl covered and remove crust if it forms before continuing to dip more cookies.
- Dry and Store: Allow the dipped cookies to dry for at least 1 hour until firm to the touch. Store cookies in an airtight container at room temperature for up to 2 days.
Notes
- Ensuring the dough is adequately chilled before rolling helps cookies maintain their shape while baking.
- Use gel food coloring to avoid altering the icing consistency.
- The Figure 8 test is a reliable way to check royal icing consistency for flooding.
- Cookies can be kept at room temperature up to 2 days in an airtight container to maintain freshness.
- Almond extract in dough is optional but adds a subtle nutty flavor.
- Be careful not to overbake cookies, as they should remain light in color and tender.
- If icing crusts during use, skim off the top layer before dipping more cookies.
- Using plastic wrap on the rolling surface makes cleanup easier and keeps dough from sticking.
Nutrition
- Serving Size: 1 cookie
- Calories: 150 kcal
- Sugar: 15 g
- Sodium: 80 mg
- Fat: 7 g
- Saturated Fat: 4 g
- Unsaturated Fat: 2 g
- Trans Fat: 0 g
- Carbohydrates: 20 g
- Fiber: 0.5 g
- Protein: 2 g
- Cholesterol: 25 mg
