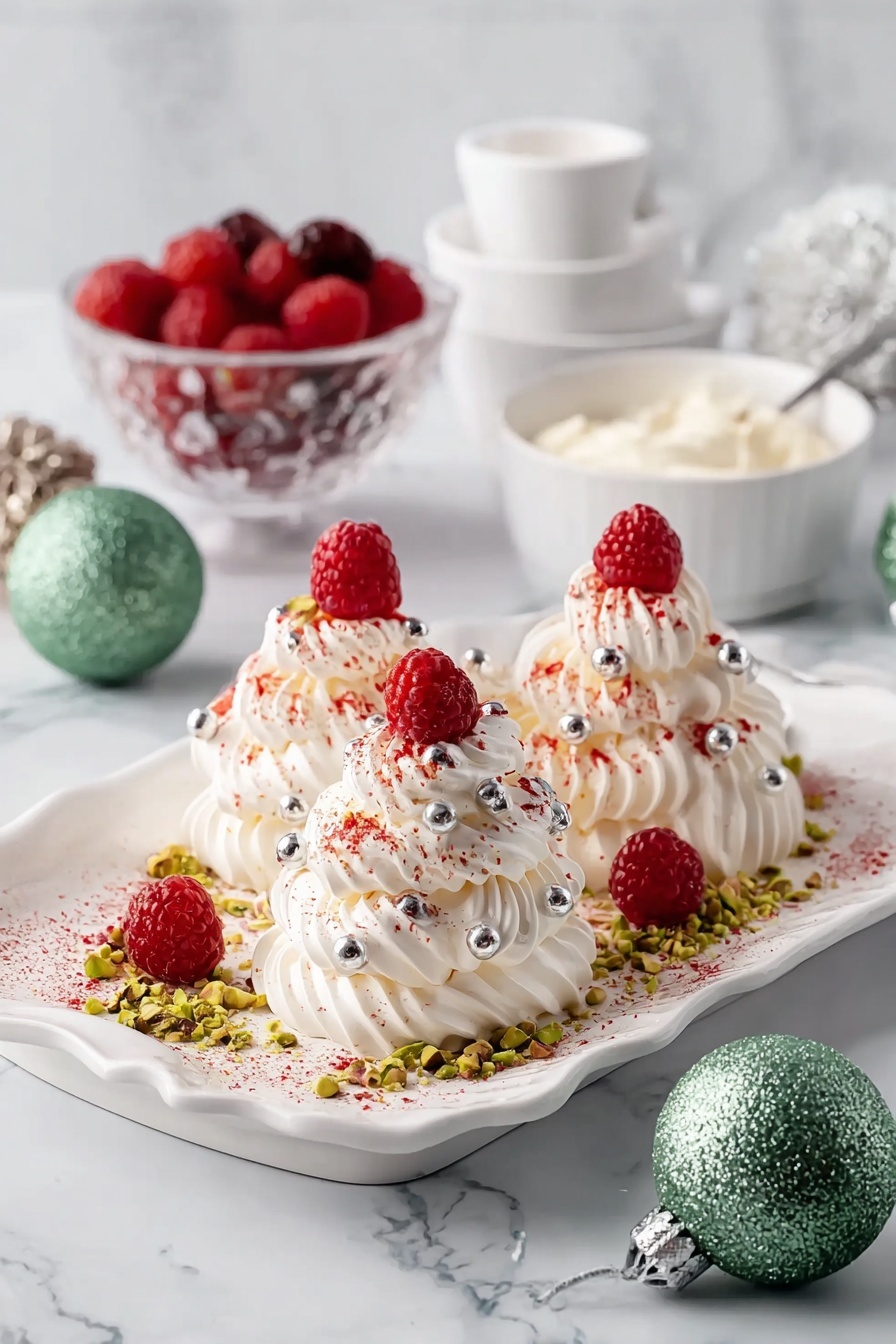
If you’re looking for a festive dessert that’s as charming as it is delicious, let me introduce you to my all-time favorite Mini Pavlova Christmas Trees Recipe. Imagine delicate, crispy-on-the-outside meringues shaped like little Christmas trees, topped with fluffy cream, vibrant berries, and a sprinkle of pistachio — it’s a showstopper every holiday season. Stick with me, because this recipe is fan-freaking-tastic, and I’m excited to share all my best tips so you can nail these cute treats at home!
Why You’ll Love This Recipe
- Festive and Fun: These miniature pavlova trees bring holiday cheer in every bite, perfect for Christmas parties or family gatherings.
- Light Yet Indulgent: The crispy meringue combined with rosewater-scented whipped cream and tart raspberries hits the perfect balance of sweet and refreshing.
- Impress Without Stress: I’ll show you simple techniques to pipe and bake these beauties so you’ll feel confident even if you’re new to meringues.
- Versatile Decoration: Customize your trees with your favorite nuts, berries, or edible glitter for a personal touch.

Ingredients You’ll Need
All the ingredients in this Mini Pavlova Christmas Trees Recipe come together to create a dessert that’s both visually stunning and delightfully tasty. I like that these are pantry-friendly basics with a few festive flairs like pistachios and rosewater to elevate the flavor.

- Free-range egg whites: Fresh and at room temperature for the best whipping volume and stability.
- Caster sugar: Fine sugar dissolves quickly into the egg whites, ensuring a smooth, glossy meringue.
- White vinegar: Helps stabilize the egg whites and gives that perfect marshmallowy texture inside.
- Cornflour: Adds structure to keep your pavlova crisp on the outside but soft inside.
- Pistachios: Finely chopped for a pretty, nutty garnish with a festive green pop.
- Thickened cream: Whipped to soft peaks to mimic fluffy snow on your mini trees.
- Icing sugar: Sweetens the whipped cream without graininess.
- Rosewater: Just a splash to add subtle floral notes — trust me, it’s worth it!
- Silver cachous, raspberries, freeze-dried raspberry powder, strawberries: For decoration that feels magical and fresh.
Variations
I love making this Mini Pavlova Christmas Trees Recipe my own depending on the occasion or who’s coming over. Feel free to get creative with toppings and flavors—you can easily adapt it to suit your style or dietary needs.
- Nut-Free Version: I swapped pistachios for toasted coconut flakes once when serving a friend with nut allergies, and it was just as festive and crunchy.
- Chocolate Twist: Drizzle dark melted chocolate over the finished trees or add a little cocoa powder to the whipped cream for a subtle chocolate vibe that your family adores.
- Berry Mix-Up: Try blueberries and pomegranate seeds instead of raspberries for a different but equally colorful presentation.
- Rosewater-Free: If you’re not a fan of floral flavors, vanilla extract works perfectly and is what I use for everyday occasions.
How to Make Mini Pavlova Christmas Trees Recipe
Step 1: Prep for Success — Mark and Grease Your Baking Sheets
Start by preheating your oven to 100°C (fan-forced) or 120°C conventional. I like to grease two large oven trays—this helps avoid any sticky messes when the meringue is baked. Then, take two sheets of baking paper and mark four 4.5cm circles on each, spacing them out. Flip the sheets over so the marks are on the underside, and lay them on your trays. This marking step makes piping your mini pavlovas easy and keeps them uniform—trust me, it’s a trick I learned the hard way!
Step 2: Beat Those Egg Whites and Gradually Add Sugar
Using an electric mixer, whip your room temperature egg whites until soft peaks form — you’ll know they’re ready when the peaks lift but still curl over gently. Then, add the caster sugar in gradually, one tablespoon at a time. This slow addition ensures the sugar dissolves fully, giving that dreamy glossy texture to your meringue. Keep beating until the mix feels smooth and shiny — you can test this by rubbing a little between your fingers; it shouldn’t feel gritty.
Step 3: Add Vinegar and Cornflour, Then Pipe Your Trees
Once your meringue is glossy, fold in the white vinegar and sifted cornflour gently but thoroughly. Now for the fun part: divide your meringue into two piping bags. The first has a 1cm plain nozzle, used to pipe small circular mounds onto the baking paper circles — these are your tree bases. The second bag gets a 0.5cm fluted nozzle, perfect for piping the delicate “branches.” Starting at the base of each mound, pipe three neat rows of vertical ribbons around each to build that iconic Christmas tree shape. It takes a few tries, but you’ll get into a rhythm quickly.
Step 4: Bake Slowly and Cool Carefully
Bake your trees for 50 minutes to an hour until the edges are crisp yet uncolored — that’s key! Overbaking turns them brown and bitter. Once done, turn off the oven but leave the door slightly ajar, letting the mini pavlovas cool gradually. This step helps prevent cracks and keeps them crisp outside with that lovely marshmallow center. Patience at this stage pays off.
Step 5: Prep Pistachio Crumbs and Whip the Cream
While the pavlovas cool, pop your pistachios into a small food processor and pulse until you get fine crumbs—perfect for sprinkling later. Next, whip your cream with icing sugar and rosewater until it just holds stiff peaks. Don’t overwhip here or it can become grainy. Reserve a little cream in a small piping bag with a plain nozzle; this helps decorate and hold your toppings in place.
Step 6: Assemble and Decorate Your Mini Pavlova Christmas Trees
Pipe tiny rounds of cream onto each meringue tree — this acts like “glue” for your silver cachous and fresh raspberries. Then, sprinkle freeze-dried raspberry powder and dusted pistachio crumbs over the tops for an extra festive touch. Serve with sliced strawberries and the remaining whipped cream for guests to add as they please. Your Mini Pavlova Christmas Trees will look like edible works of art!
Pro Tips for Making Mini Pavlova Christmas Trees Recipe
- Perfect Egg Whites: Separate your eggs when cold but let whites come to room temp before beating for maximum volume—I always set mine out 30 minutes ahead.
- Slow Sugar Addition: Adding sugar one tablespoon at a time avoids gritty meringue and ensures it’s glossy and smooth.
- Low and Slow Baking: Baking slowly at low heat preserves that crisp exterior without browning—a game changer I learned after a few burnt batches!
- Gentle Cooling: Leaving the oven door ajar to cool prevents cracks and sogginess, making your mini trees flawless every time.
How to Serve Mini Pavlova Christmas Trees Recipe

Garnishes
I stick with silver cachous and fresh raspberries because they add sparkle and pop of tartness that perfectly contrast the sweet cream and crunchy meringue. Freeze-dried raspberry powder isn’t just for show—it brings a subtle tang and vibrant look too. For a Christmas feast, these little details really impress my family and guests.
Side Dishes
Since these are mini desserts, I enjoy serving them alongside a big bowl of fresh seasonal fruit salad or a warm cup of spiced mulled wine to complement the sweetness. They’re also wonderful paired with a simple citrus sorbet or even a hot chocolate for the kids at the holiday table.
Creative Ways to Present
One Christmas, I arranged the mini pavlova trees on a large platter lined with powdered sugar “snow” and scattered edible gold stars. It felt like a winter wonderland! Try placing each tree inside a clear glass cloche or on individual festive plates to make them feel extra special at parties or as gifts.
Make Ahead and Storage
Storing Leftovers
These mini pavlova trees are best enjoyed fresh, but if you have leftovers, store them in an airtight container at room temperature for up to two days. Keep the whipped cream separate in the fridge to avoid soggy meringues. When ready to serve, add cream and toppings fresh for the best texture.
Freezing
I haven’t had great success freezing the assembled trees because the cream and berries don’t thaw well, but if you’re short on time, you can freeze the baked meringue shells alone in a sealed container for up to a month. Just thaw them at room temperature before adding cream and decoration.
Reheating
Meringue isn’t something you reheat normally—I find it holds best crisp and fresh straight from the oven and cooling phase. If your meringue softens a little, you can refresh it by popping it in a low oven (around 90°C) for 10 minutes, but only if it’s unassembled. Keep cream and fruit cold until serving.
FAQs
-
Can I make these Mini Pavlova Christmas Trees Recipe without rosewater?
Absolutely! Rosewater adds a lovely floral hint, but if you’re not a fan or don’t have it, vanilla extract is a perfect substitute. It keeps the whipped cream delicate and subtly sweet while being more familiar to most palates.
-
How do I avoid cracks in my pavlova meringue?
Cracks usually come from rapid cooling or temperature fluctuations. The best trick is to turn off the oven when baking is done and leave the door slightly open, letting your meringues cool slowly inside. This gentle process minimizes cracking and keeps them crisp.
-
Can I prepare these Mini Pavlova Christmas Trees Recipe in advance?
Yes, you can bake the meringue bases a day ahead and keep them stored airtight at room temperature. Whip the cream and assemble the trees shortly before serving for the freshest texture and best flavor.
-
What’s the best way to pipe the tree shape?
Use two piping bags—a larger plain nozzle for the base mounds and a smaller fluted nozzle for the branches. Pipe rows of small vertical ribbons starting from the base and working upward. Don’t worry if your first few aren’t perfect — practice makes perfect, and they all taste delicious!
Final Thoughts
I absolutely love how these Mini Pavlova Christmas Trees turn out — they’re the perfect balance of showy and approachable. When I first tried this recipe, I was so thrilled to find a dessert that looked festive but used simple ingredients I already had. My family goes crazy for them every Christmas, and they always spark compliments. If you’re looking for a gorgeous holiday treat that’s guaranteed to impress without stress, trust me, you’ll enjoy making and eating this Mini Pavlova Christmas Trees Recipe as much as I do. Give it a go—you’ll be so glad you did!
Print
Mini Pavlova Christmas Trees Recipe
- Prep Time: 20 minutes
- Cook Time: 1 hour
- Total Time: 1 hour 20 minutes
- Yield: 8 servings
- Category: Dessert
- Method: Baking
- Cuisine: Australian
Description
These Mini Pavlova Christmas Trees are a festive and elegant dessert perfect for holiday celebrations. Crispy on the outside and soft inside, the delicate meringue trees are piped to resemble Christmas trees, topped with whipped cream, silver cachous, fresh raspberries, and pistachio crumbs for a delightful combination of texture and flavor.
Ingredients
Meringue
- 6 free-range egg whites, at room temperature
- 1 1/2 cups caster sugar
- 1 tsp white vinegar
- 3 tsp cornflour
Decoration and Toppings
- 1/4 cup Sunbeam Australian pistachios
- 300ml thickened cream
- 1 tsp pure icing sugar
- 1 tsp rosewater
- Silver cachous
- Fresh raspberries
- Freeze-dried raspberry powder
- Strawberries, to serve
Instructions
- Preheat and prepare trays: Preheat your oven to 100°C fan-forced (120°C conventional). Grease two large oven trays, then place two baking paper sheets on them. On each sheet, mark four 4.5 cm circles spaced apart and turn the sheets over so the marks face down on the trays.
- Make the meringue base: Using an electric mixer, beat the egg whites until soft peaks form. Gradually add the caster sugar, one tablespoon at a time, ensuring it dissolves before the next addition. Incorporate the vinegar and cornflour, then beat until the mixture is glossy and well combined.
- Pipe meringue shapes: Spoon a quarter of the meringue mixture into a large piping bag fitted with a 1 cm plain nozzle. Pipe small mounds onto the circles marked on the trays. Then, transfer the remaining meringue into another piping bag with a 0.5 cm fluted nozzle. Beginning at the base of each mound, pipe three rows of small vertical layers around to form a tree shape.
- Bake the meringue: Bake the meringue trees in the preheated oven for 50 minutes to 1 hour, or until the edges are crisp without any coloration. Once baked, turn off the oven and allow the meringues to cool inside with the door slightly ajar to prevent cracking.
- Prepare pistachio crumbs: Place the pistachios in a small food processor and pulse until they become fine crumbs to use as garnish.
- Whip the cream: With an electric mixer, beat the thickened cream, icing sugar, and rosewater to just firm peaks. Put a quarter of the whipped cream into a piping bag with a small plain nozzle.
- Decorate the meringue trees: Pipe small cream rounds onto each meringue tree to act as an adhesive for the silver cachous. Decorate with silver cachous, fresh raspberries, and sprinkle freeze-dried raspberry powder and pistachio crumbs over the top.
- Serve: Present the meringue trees with fresh strawberries and the remaining whipped cream alongside for a beautiful and festive dessert.
Notes
- Make sure egg whites are at room temperature before beating for best volume and stability.
- Gradually adding sugar helps dissolve it completely, ensuring smooth meringue.
- Cooling the meringues in the oven with the door ajar helps prevent cracking by allowing gentle drying.
- You can substitute rosewater with vanilla extract if preferred.
- Use piping bags fitted with the correct nozzles for the best shaping effect.
- Store any leftover meringues in an airtight container to keep them crisp.
Nutrition
- Serving Size: 1 Pavlova Tree
- Calories: 210
- Sugar: 20g
- Sodium: 15mg
- Fat: 9g
- Saturated Fat: 5g
- Unsaturated Fat: 3g
- Trans Fat: 0g
- Carbohydrates: 28g
- Fiber: 1.5g
- Protein: 3g
- Cholesterol: 35mg


