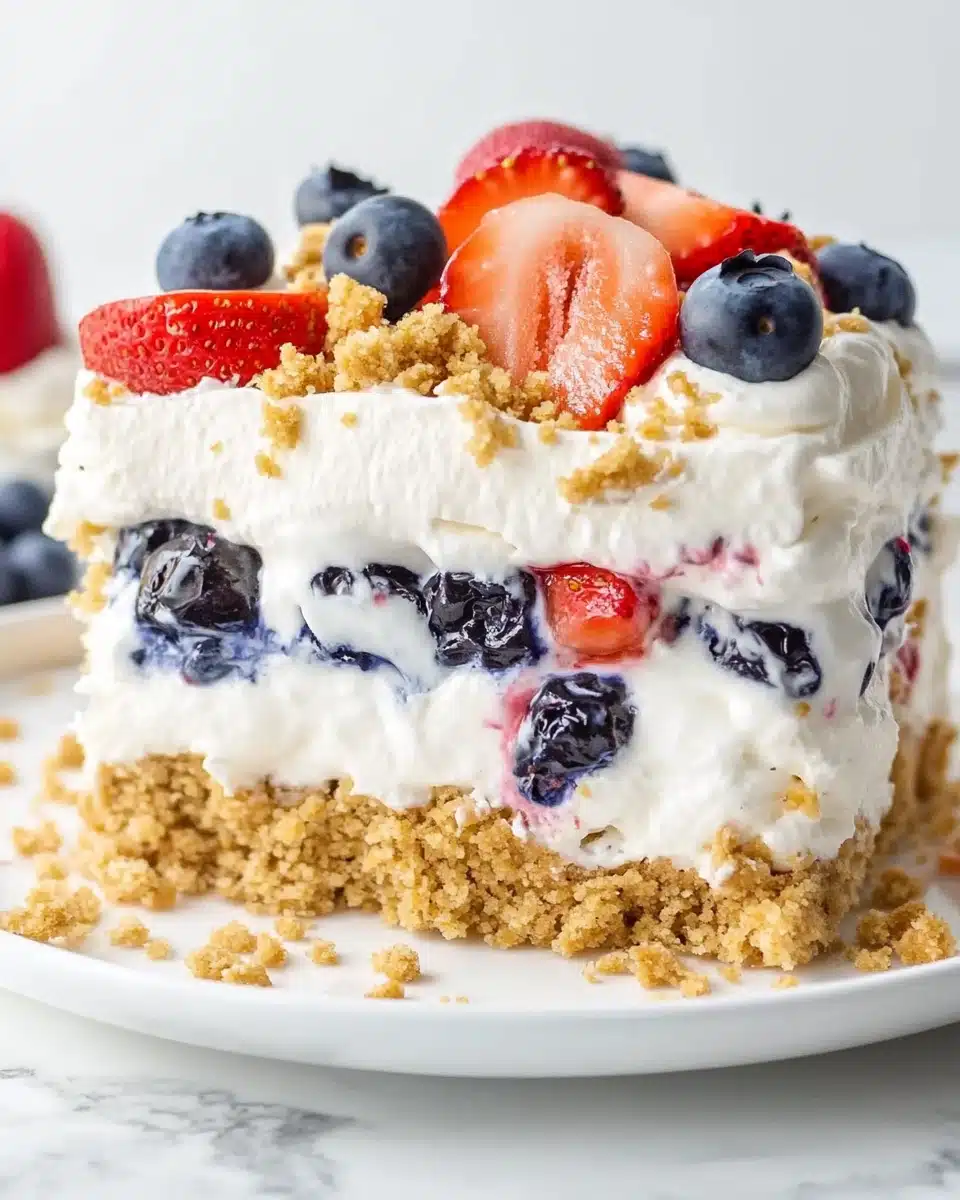
Get ready to fall in love with every dreamy layer of No-Bake Berry Lush—a vibrant, effortless dessert that’s as gorgeous as it is delicious. With silky cream cheese, jammy fresh berries, and a buttery vanilla wafer crust, this crowd-pleaser comes together in minutes and never disappoints!
Why You’ll Love This Recipe
- Stunning, No-Fuss Layers: You get impressive bakery-style layers without ever turning on the oven—just simple stacking and spreading!
- Celebrates Fresh Berries: Use your favorite fresh berries for a burst of beautiful color and juicy sweetness in every bite.
- Quick to Make, Impossible to Resist: From start to finish, No-Bake Berry Lush is ready in minutes and flies off the dessert table at any potluck or party.
- Make-Ahead Friendly: It’s just as luscious chilled overnight, making it a busy cook’s secret weapon for gatherings.
Ingredients You’ll Need
Let’s talk about what you’ll need for No-Bake Berry Lush! Every ingredient is intentional—each one adds flavor, texture, or a pop of color that makes this dessert shine. Don’t skip the basics, because these stars truly work together to create dessert bliss.
- Vanilla wafer cookies: These sweet, crisp cookies form the buttery crust—easy to crush and perfect for soaking up flavor.
- Butter: Melted butter binds the cookie crumbs together, giving you a rich, never-dry base.
- Cream cheese: The secret to that ultra-silky, tangy filling—be sure it’s softened for extra smoothness.
- Powdered sugar: Adds gentle sweetness to the filling without any grittiness, thanks to its fine texture.
- Vanilla extract: A little vanilla brings wonderful warmth and elevates the whole dessert.
- Whipped topping: This shortcut ingredient creates that dreamy, fluffy layer—so light, so luscious!
- Fresh berries: Pick your seasonal favorites, from strawberries to blueberries, for a jewel-like finish and juicy flavor.
Variations
No-Bake Berry Lush is endlessly versatile! Whether you’re catering to dietary needs or using what’s in the fridge, don’t hesitate to customize—this recipe is a playground for your favorite flavors and textures.
- Swap the Cookies: Try graham crackers or chocolate wafer cookies for a different flavor twist in the crust.
- Dairy-Free: Substitute dairy-free cream cheese and coconut whipped topping for a treat everyone can enjoy.
- Differing Fruit: Use sliced peaches, kiwi, or even mango for a tropical spin—or mix fruits for a rainbow-layered look!
- Mini Lush Cups: Assemble the layers in individual cups or jars for adorable, portable desserts perfect for parties.
How to Make No-Bake Berry Lush
Step 1: Make the Cookie Crust
Start by placing all those vanilla wafer cookies in a large ziptop bag. Grab a rolling pin and let off some steam—crush the cookies until they’re fine and sandy. Pour the crumbs into your 8-inch square baking pan, drizzle with melted butter, and toss to combine. Press the mixture evenly and firmly into the bottom to form a solid, buttery foundation.
Step 2: Mix the Cream Cheese Filling
In a big bowl, blend the softened cream cheese, powdered sugar, and vanilla until the mixture is velvety-smooth—no lumps allowed! Fold in one tub of whipped topping gently, so your filling turns fluffy and stays light. This becomes the creamy cloud that makes No-Bake Berry Lush irresistible.
Step 3: Prepare the Berries
Give your fresh berries a quick rinse and pat dry, then slice any larger berries (like strawberries) so they layer beautifully. This step ensures even bites and a burst of berry flavor in every forkful.
Step 4: Layer and Assemble Your Lush
Spread half the cream cheese mixture over the cookie crust. Scatter half the berries on top—don’t be shy with the berries! Repeat with the second half of the cream cheese mixture and more fresh berries, creating picture-perfect, mouthwatering layers.
Step 5: Top and Chill
Spoon half of the second whipped topping tub gently over the final berry layer. For a little crunch, crush a few extra cookies to sprinkle on top. Now, the hard part: chill your No-Bake Berry Lush for at least one hour—if you can wait! This lets the flavors meld and gives you perfect slices.
Pro Tips for Making No-Bake Berry Lush
- Ultra-Smooth Filling: Let your cream cheese fully soften before mixing to avoid lumps and ensure a cloud-like texture.
- Firm Crust, Every Time: Press the crumb mixture into the pan with a flat-bottomed glass for the most even, compact crust that won’t fall apart.
- Berry Prep Matters: Make sure your berries are dry before layering—excess moisture can make the dessert watery over time.
- Chill for Clean Slices: The longer your No-Bake Berry Lush chills, the neater your slices will be when serving—overnight is even better!
How to Serve No-Bake Berry Lush
Garnishes
Dress up each slice of No-Bake Berry Lush with a flourish of extra fresh berries, a mint sprig, or a little dusting of powdered sugar for that final “wow!” effect. If you’re feeling decadent, drizzle with a swirl of berry sauce or even white chocolate.
Side Dishes
Because this dessert is so light and fruity, it pairs beautifully with a platter of crisp shortbread cookies, a bowl of lemon sorbet, or chilled espresso to finish things off on a bright note.
Creative Ways to Present
Think outside the pan: serve No-Bake Berry Lush in mini glass jars for individual treats, layer it in tall parfait glasses for dramatic effect, or bring it to a picnic as a trifle in a big clear bowl for a show-stopping centerpiece!
Make Ahead and Storage
Storing Leftovers
Simply cover your pan tightly with plastic wrap, and refrigerate any leftover No-Bake Berry Lush for up to three days—the flavors keep getting better as they meld together!
Freezing
You can freeze No-Bake Berry Lush in an airtight container for up to one month; just know the texture of the whipped topping and berries may change. Enjoy it slightly thawed for a cool, almost ice cream-like treat.
Reheating
No reheating required—just let it stand at room temperature for 10–15 minutes if it’s too firm from the fridge, and it’ll be irresistibly creamy again!
FAQs
-
Can I use frozen berries for No-Bake Berry Lush?
Absolutely! Just make sure to thaw and drain them well to prevent excess moisture—otherwise, you might end up with a soggy dessert. Fresh berries will always offer the best texture, but frozen ones work in a pinch, especially out of season.
-
Is there a substitute for whipped topping?
Yes! You can absolutely use freshly whipped cream (sweetened to taste) instead of whipped topping for a more homemade flavor. Just be sure to whip it to stiff peaks so it holds up in the layers.
-
Can I make No-Bake Berry Lush ahead of time?
Definitely! No-Bake Berry Lush is actually even better when made ahead and chilled overnight in the fridge. This lets the flavors marry and the layers set up for perfect, pretty slices.
-
What berries work best in this dessert?
You can use any combination you love—strawberries, blueberries, raspberries, or blackberries all shine here. For the best presentation, include a variety of colors and slice larger berries for even layering.
Final Thoughts
If you haven’t tried No-Bake Berry Lush yet, you’re in for a treat that turns the simplest of ingredients into pure magic. I hope this recipe brings sweet summer joy (and plenty of happy “mmm!” sounds) to your table—don’t forget to snag the first slice for yourself!
Print
No-Bake Berry Lush Recipe
- Prep Time: 10 minutes
- Total Time: 1 hour 10 minutes
- Yield: Serves 6
- Category: Dessert
- Method: No-Bake
- Cuisine: American
- Diet: Vegetarian
Description
Indulge in the delightful flavors of summer with this easy No-Bake Berry Lush dessert. Layers of creamy goodness, fresh berries, and a cookie crumb base make this a refreshing and satisfying treat.
Ingredients
Cookie Crust:
- 35 vanilla wafer cookies
- 5 tablespoons butter, melted
Filling:
- 8 oz cream cheese, softened
- 1 cup powdered sugar
- 1 1/2 teaspoons vanilla extract
- 2 (8 oz) containers whipped topping, thawed
- 2 lbs fresh berries
Instructions
- Prepare Cookie Crust: Crush vanilla wafer cookies into crumbs and combine with melted butter. Press firmly into an 8-inch square baking pan.
- Make Filling: In a mixing bowl, beat cream cheese, powdered sugar, and vanilla until smooth. Fold in one container of whipped topping.
- Layer: Spread half of the cream cheese mixture over the cookie crumbs, add half of the berries. Repeat layers.
- Finish and Chill: Top with remaining whipped topping and crumbled cookies. Chill for at least 1 hour before serving.
Notes
- You can customize the berries based on your preference – try a mix of strawberries, blueberries, raspberries, or blackberries.
- For a variation, you can add a drizzle of chocolate or caramel sauce on top before serving.
Nutrition
- Serving Size: 1 serving
- Calories: 380
- Sugar: 25g
- Sodium: 240mg
- Fat: 24g
- Saturated Fat: 15g
- Unsaturated Fat: 7g
- Trans Fat: 0g
- Carbohydrates: 38g
- Fiber: 4g
- Protein: 4g
- Cholesterol: 60mg


