
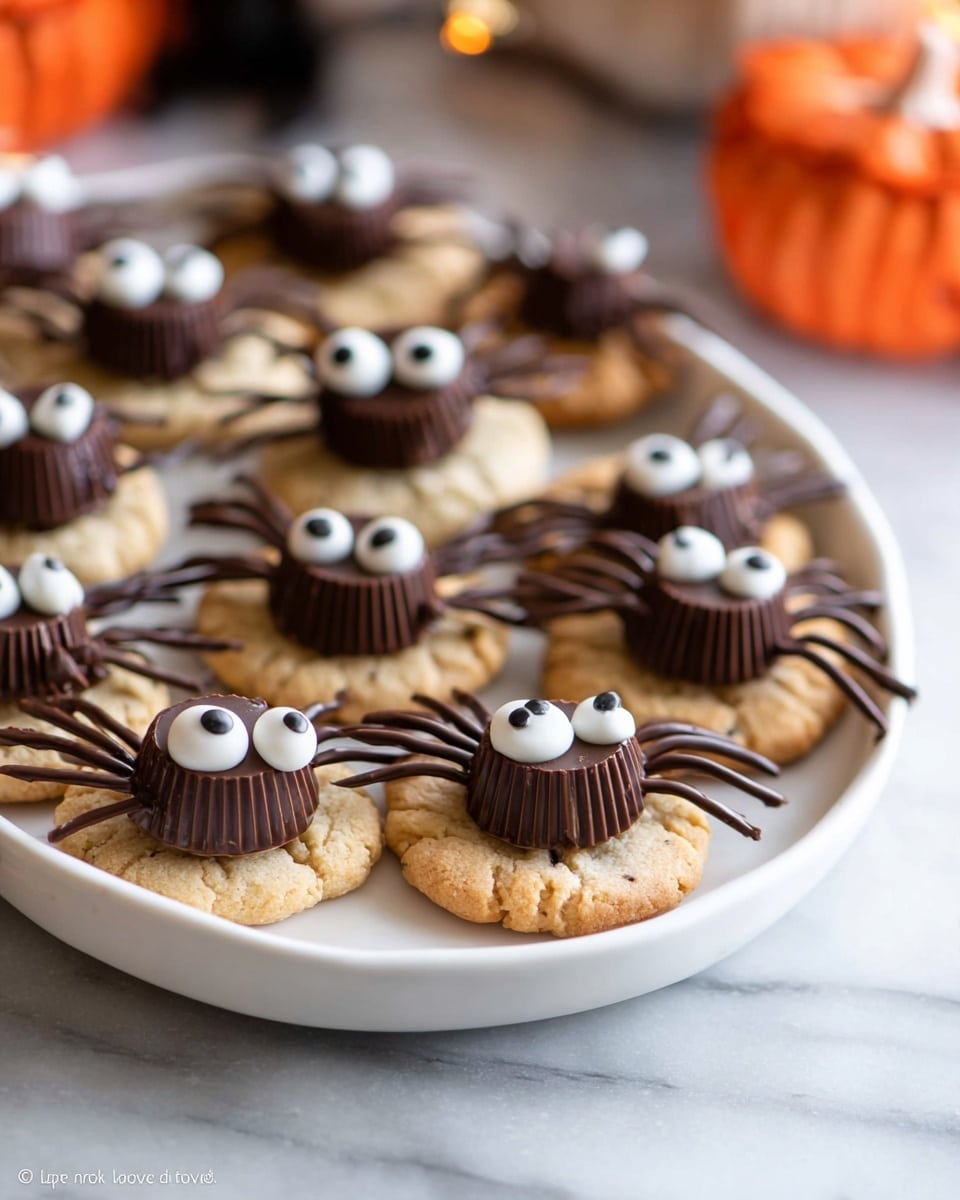
If you’re looking to wow your friends and family with an adorable yet delicious treat, you’ve got to try this Peanut Butter Spider Cookies Recipe. These cute critters combine the classic peanut butter cookie with melty chocolate, peanut butter cups, and an irresistible spider-leg design. I first made these for a Halloween party, and honestly, they stole the show. Keep reading, and I’ll walk you through every step so your batch comes out perfectly creepy and scrumptious every single time.
Why You’ll Love This Recipe
- Super Simple Assembly: You don’t need to bake from scratch unless you want to—store-bought cookies work perfectly, saving you loads of time.
- Fun and Festive Design: The little chocolate spider legs and candy eyes make these cookies so charming and perfect for holidays or kid parties.
- Delicious Peanut Butter-Chocolate Combo: The classic flavors we all love come together with a crunchy, creamy twist that’s addicting.
- Easy to Customize: You can swap candies or decorating styles to make these your own unique spin.

Ingredients You’ll Need
When it comes to making these Peanut Butter Spider Cookies, I like keeping things straightforward with pantry staples and easy-to-find candies that work harmoniously without overwhelming the flavors.
- Peanut Butter Cookies: Store-bought or homemade, these form the perfect sturdy base for your spiders. I usually grab a soft, chewy style to keep things tender.
- Mini Reese’s Peanut Butter Cups: These add that irresistible creamy peanut butter center and double down on the nutty flavor that everyone loves.
- Semi-Sweet Chocolate: Melted down for the “legs” and glue to stick everything together; the slight bitterness balances out the sweetness perfectly.
- Mini Candy Eyeballs (optional): They bring these spiders to life and add a playful touch that kids adore.
Variations
I love switching up this Peanut Butter Spider Cookies Recipe depending on the occasion or who I’m serving. It’s a versatile canvas for creativity, so don’t hesitate to make it your own!
- Peanut Butter-Free Version: Try substituting the peanut butter cups with chocolate-covered caramel candies for a nut-free treat that still has tons of flavor.
- Vegan Adaptation: Use dairy-free chocolate and vegan cookies to make this allergy-friendly and still delicious.
- Holiday Themes: Swap candy eyes for colored sprinkles or edible glitter to tailor it for birthdays or festive seasons beyond Halloween.
How to Make Peanut Butter Spider Cookies Recipe
Step 1: Melt the Chocolate Perfectly
The first thing I do is melt the semi-sweet chocolate gently, either on a double boiler or in the microwave. Try microwaving in 30-second bursts and stirring in between so it doesn’t burn—this is key to getting smooth, shiny chocolate for piping those spider legs. Once melted, transfer the chocolate to a small piping bag or a Ziploc bag with a tiny snip at one corner for easy control.
Step 2: Assemble the Spider Bodies
Take your peanut butter cookies and place them on a baking tray or a flat surface. Dab a small dot of melted chocolate in the center of each cookie, then gently press a mini Reese’s peanut butter cup right on top—it’s like the spider’s body. The melted chocolate acts like superglue to keep everything in place.
Step 3: Pipe the Chocolate Legs
Now comes the fun part! Using your chocolate piping bag, carefully draw 8 spider legs on each side of the peanut butter cup—4 legs per side. Don’t worry if your legs aren’t perfectly even; that adds to the charm! Work quickly enough so the chocolate doesn’t harden before you finish.
Step 4: Add the Eyes
If you’ve got mini candy eyeballs on hand, use a tiny bit of melted chocolate on the front of each peanut butter cup and gently press two eyes on top. This step really brings these spiders to life, and I promise it gets kids (and adults) grinning from ear to ear.
Pro Tips for Making Peanut Butter Spider Cookies Recipe
- Use Room Temp Cookies: I’ve learned that cookies that are too cold can crack when you press on them—so let them sit out for a bit before assembling.
- Don’t Overfill the Bag: I used to pipe messy legs until I realized a little chocolate goes a long way for neat, delicate lines.
- Work Quickly with Chocolate: Melted chocolate sets fast, so have everything prepped and ready to go for a smooth assembly process.
- Avoid Overcrowding: Allow space between cookies as they set, or the legs can stick together and ruin the spider effect.
How to Serve Peanut Butter Spider Cookies Recipe
Garnishes
I usually keep the garnish simple: those mini candy eyeballs are my go-to for adding personality. But sometimes, I dust a little powdered sugar “dust” for a spooky cobweb effect or sprinkle a few edible glitter pieces for kids’ parties. It’s a small touch that makes these cookies pop at any gathering.
Side Dishes
These cookies shine as a sweet snack, but if I’m serving them at a party, I like pairing them with creamy cold milk or a smooth hot chocolate. The rich peanut butter and chocolate flavors balance beautifully with the refreshing drink. For a fun twist, try a caramel apple cider on the side during fall events.
Creative Ways to Present
One time, I set these out on a platter surrounded by fake spider webs and plastic spiders for Halloween—it was a big hit! You can also place them on individual cupcake liners or arrange them crawling up a cake for a creepy-crawly effect. Presentation really brings out the fun factor in these cookies.
Make Ahead and Storage
Storing Leftovers
I keep leftover Peanut Butter Spider Cookies at room temperature in an airtight container for up to 5-6 days—that way the cookies remain chewy and the chocolate stays intact. Just be sure to layer them with parchment paper if stacking to avoid smudging the legs.
Freezing
These cookies freeze wonderfully if you want to make a bunch ahead. Stack them carefully between layers of parchment paper in a freezer-safe container or bag. When you’re ready, just thaw at room temperature for a couple of hours before serving. They maintain texture and flavor beautifully.
Reheating
If you want that just-baked warm feeling, pop the cookies in the microwave for about 10 seconds—enough to soften the peanut butter cup without melting the chocolate legs completely. It’s a great little trick to impress guests without reheating a whole batch.
FAQs
-
Can I use homemade peanut butter cookies for this recipe?
Absolutely! Homemade cookies add a personal touch and let you control flavors and texture. Just make sure your cookies are sturdy enough to support the peanut butter cups and chocolate legs without crumbling.
-
What if I don’t have mini candy eyeballs?
No worries! You can skip them entirely or create eyes using small dabs of white and dark chocolate. Piping small white dots then topping with tiny chocolate spots works like a charm and looks just as cute.
-
How do I prevent the chocolate legs from breaking?
Use good-quality semi-sweet chocolate and don’t apply the legs too thickly. Let the chocolate set completely at room temperature or in the fridge before moving the cookies to avoid snapping the delicate legs.
-
Can I make these cookies ahead of time?
Yes! You can assemble them a day in advance and store them in an airtight container. Just be cautious about stacking to preserve the spider legs. These cookies are perfect for prepping before parties.
Final Thoughts
I absolutely love how these Peanut Butter Spider Cookies come together so quickly but still steal the spotlight. When I first made them, I was amazed at how a few simple ingredients could become such a fun and tasty treat that everyone adored. Whether you’re prepping for a spooky celebration or just want an eye-catching cookie that tastes amazing, give this recipe a try—I promise it’ll become a family favorite and conversation starter at your next get-together!
Print
Peanut Butter Spider Cookies Recipe
- Prep Time: 5 minutes
- Cook Time: 5 minutes
- Total Time: 10 minutes
- Yield: 12 cookies
- Category: Dessert
- Method: No-Cook
- Cuisine: American
Description
These Peanut Butter Spider Cookies are a quick and fun Halloween treat featuring peanut butter cookies topped with Reese’s peanut butter cups and decorated with melted chocolate spider legs and candy eyeballs. Perfect for festive celebrations and easy to assemble, they bring a playful creepy-crawly vibe to your dessert table.
Ingredients
Cookies
- 12 peanut butter cookies (store-bought or homemade)
- 12 mini Reese’s peanut butter cups
Decorations
- 1/4 cup semi-sweet chocolate, melted
- Optional: 24 mini candy eyeballs
Instructions
- Melt the Chocolate: Melt the semi-sweet chocolate using a double boiler or microwave, stirring every 30 seconds until it becomes smooth and fully melted. Transfer the melted chocolate into a piping bag or a Ziploc bag with a small corner cut off for precise piping.
- Assemble the Spider Cookies: Place a small dot of melted chocolate in the center of each peanut butter cookie, then press a mini Reese’s peanut butter cup on top to act as the spider’s body.
- Create the Spider Legs: Using the piping bag filled with melted chocolate, pipe 8 spider legs around each peanut butter cup, placing 4 legs on each side to resemble a spider’s legs.
- Add Candy Eyes (Optional): Dab a bit of melted chocolate on the front of each Reese’s peanut butter cup and gently press 2 mini candy eyeballs on top to give your spider a spooky look.
- Storage: Let the chocolate set, then store the cookies at room temperature for 5-6 days or freeze them for up to 2 months to enjoy later.
Notes
- Using store-bought peanut butter cookies saves time and simplifies the recipe, but homemade cookies can add a personal touch.
- The melted chocolate should be handled carefully to prevent burning; stirring frequently while melting helps maintain smoothness.
- Mini candy eyeballs are optional but highly recommended for a festive and spooky effect.
- Make sure to store the decorated cookies in a cool, dry place to prevent the chocolate from melting or sweating.
- The recipe is quick and ideal for last-minute Halloween treats or snack table additions.
Nutrition
- Serving Size: 1 cookie
- Calories: 180
- Sugar: 12g
- Sodium: 100mg
- Fat: 10g
- Saturated Fat: 4g
- Unsaturated Fat: 5g
- Trans Fat: 0g
- Carbohydrates: 18g
- Fiber: 1g
- Protein: 3g
- Cholesterol: 5mg


