
If you’ve ever wanted to whip up a sweet treat that’s elegant yet super simple, you’re going to love this Peppermint Chocolate Bark Recipe. I absolutely adore how the creamy layers of white and dark chocolate combine with that festive peppermint punch—and let’s not forget the satisfying crunch from crushed candy canes. When I first tried this recipe, it quickly became a holiday staple in my kitchen, and I’m excited to share it with you so you can enjoy making (and eating) it at home!
Why You’ll Love This Recipe
- Easy to Make: You don’t need fancy tools or ingredients; just simple chocolate, peppermint, and a little time.
- Perfect for Gifting: This peppermint chocolate bark looks gorgeous and is a crowd-pleaser, making it a thoughtful homemade gift.
- Customizable Flavors: You can tweak the peppermint intensity or chocolate types to perfectly suit your taste.
- No-Bake Convenience: Since there’s no oven required, it’s great for quick holiday prep or last-minute treats.

Ingredients You’ll Need
Choosing the right chocolate and peppermint elements is key to getting that perfect balance of creamy, minty, and crunchy in this peppermint chocolate bark. I always pick high-quality chocolate bars because they melt smoothly and taste so much richer.

- White Chocolate: Use a good-quality white chocolate bar or chips to get a smooth, creamy base that contrasts perfectly with dark chocolate.
- Semi-Sweet or Bittersweet Chocolate: Pick one that you love eating on its own, as this adds a lovely depth and slight bitterness that balances the sweetness.
- Vegetable or Coconut Oil: A little oil helps the melted chocolate spread smoothly and gives a nice glossy finish.
- Peppermint Extract: Fresh and strong peppermint flavor is the heart of this recipe, so don’t skimp here! You can adjust based on your preference for mint.
- Candy Canes: The crushed candy canes add the magic crunchy bite and festive look—plus, the hint of real peppermint they bring really elevates the whole bark.
Variations
I love that this peppermint chocolate bark recipe is so versatile—you can switch things up depending on your mood or occasion. Don’t be afraid to experiment; that’s how I discovered some of my favorite tweaks!
- Dark Chocolate Only: If you prefer a more intense chocolate flavor, try using just bittersweet chocolate with the peppermint—the layers still taste amazing and feel decadent.
- Vegan Version: Use dairy-free chocolate and coconut oil to make a vegan-friendly peppermint bark, so everyone can enjoy it.
- Add Nuts: I sometimes sprinkle chopped pistachios or almonds over the top for a crunchy, nutty twist that’s unexpected but delicious.
- Mini Candy Canes: For a softer crunch, swap out regular candy canes for mini peppermint chips or crushed peppermint candies.
How to Make Peppermint Chocolate Bark Recipe
Step 1: Prep Your Pan Like a Pro
Start by lining an 8 or 9-inch square baking pan with parchment paper or aluminum foil, making sure to smooth out any wrinkles. This makes it super easy to lift the bark out when it’s set. If you have a lined baking sheet instead, that works too—you can spread the bark thinner for more pieces per batch.
Step 2: Melt and Flavor the First White Chocolate Layer
Now, grab half your white chocolate and put it into a heatproof bowl. Add half a teaspoon of vegetable or coconut oil, which helps with that smooth, glossy finish. Melt the chocolate gently in the microwave in 20-second bursts, stirring well after each to prevent burning—this trick saves you from scorched chocolate disasters! Stir in a quarter teaspoon of peppermint extract once it’s silky smooth.
Pour this mixture into your prepared pan and spread it evenly with an offset spatula or the back of a spoon. I like to keep this layer thin but fully covering the base. Pop the pan into the fridge for about 10 to 15 minutes—just enough time for it to almost firm up but not completely set, which helps the layers stick together better.
Step 3: Add the Semi-Sweet Chocolate Layer
Repeat the melting process with your semi-sweet chocolate—again adding oil for smoothness—and stir in the remaining quarter teaspoon of peppermint extract. Pour the melted chocolate over the cooled white chocolate layer and spread gently. Return to the fridge for another 10 to 15 minutes until it’s nearly set. This layering is what gives the bark those stunning swirls and flavor contrasts you’ll love.
Step 4: Finish with White Chocolate and Candy Canes
Finally, melt the last batch of white chocolate with the remaining half teaspoon of oil (skip the peppermint here to keep the flavors balanced) and pour it carefully on top. Smooth it out and then sprinkle with your crushed candy canes immediately—this is the moment that makes your bark truly festive and delicious.
To crush candy canes, I like to put them in a sealed plastic bag and gently crack them with a rolling pin or meat mallet. Don’t crush too finely; those little chunks add such a lovely crunch and peppermint punch.
Step 5: Chill, Slice, and Enjoy!
Pop your bark into the fridge for at least an hour until completely firm. When it’s done, lift out the parchment or foil, and break it into pieces the size you want. If your bark has chilled a long time, let it sit at room temperature for 10 to 15 minutes so it’s easier to break without the layers separating. Trust me, this little patience makes a big difference!
Pro Tips for Making Peppermint Chocolate Bark Recipe
- Gentle Chocolate Melting: Always melt chocolate in short bursts and stir often to avoid burning and get that glossy finish.
- Peppermint Balance: Don’t add peppermint extract to the last white chocolate layer; this keeps the flavor fresh and balanced rather than overpowering.
- Chill Wisely: Remove bark from fridge a bit before breaking to prevent cracking or layer separation.
- Use Good Chocolate: The chocolate quality really shines here—choose bars you enjoy eating plain for the best taste and melt.
How to Serve Peppermint Chocolate Bark Recipe

Garnishes
I usually keep it simple with crushed candy canes on top because I love that classic peppermint crunch and look. But if you want to dress it up, a light dusting of edible glitter or a sprinkle of festive colored sugar can add a touch of sparkle for parties or gifts.
Side Dishes
This bark is fantastic on its own, but I like to serve it alongside fresh peppermint tea or rich coffee. For holiday gatherings, pair it with other small sweets like gingerbread cookies or spiced nuts to create a delightful Christmas dessert platter.
Creative Ways to Present
One of my favorite presentation ideas is to break the bark into irregular pieces and place them in clear cellophane bags tied with colorful ribbon—instantly adorable and gift-ready. Another fun idea is layering the bark into a glass jar with alternating candy cane pieces for a beautiful striped effect.
Make Ahead and Storage
Storing Leftovers
I store any leftover peppermint chocolate bark in an airtight container in the fridge. It stays fresh and firm for about three weeks, and I find that keeping it cold preserves that perfect crunch and smooth chocolate texture.
Freezing
If I want to make a batch in advance, I freeze the bark in a sealed container wrapped in parchment paper. When frozen, it keeps well for up to three months. Just thaw it in the fridge overnight before serving to avoid condensation.
Reheating
Since this is a no-bake treat, reheating isn’t really necessary or recommended, as it can soften the bark too much. Instead, I let frozen or refrigerated pieces come to room temperature before enjoying, which brings out the best texture and flavor.
FAQs
-
Can I use candy cane pieces other than crushed candy canes?
Absolutely! You can use peppermint chips, mint-flavored chocolates, or even crushed peppermint candies if you don’t have candy canes on hand. Just keep in mind that the texture may vary slightly, but the festive peppermint flavor comes through beautifully.
-
Why does my peppermint bark sometimes separate into layers?
This usually happens if the previous layer sets completely before adding the next one, or if the bark is broken while too cold. To avoid this, I remove the bark from the fridge when it’s just about set—still slightly tacky—which helps layers stick together firmly.
-
Can I omit the peppermint extract?
You can, but keep in mind that peppermint extract is what gives this bark its signature flavor. Without it, you’ll just have layered chocolate bark. For a twist, try swapping peppermint with orange or almond extract for different festive flavors.
-
Is it okay to use chocolate chips instead of chocolate bars?
Chocolate chips work fine, but bars tend to melt more smoothly because they usually contain less stabilizers. If you use chips, melt gently and stir often, and try to choose premium-quality chips for the best texture.
Final Thoughts
This peppermint chocolate bark recipe holds a special place in my heart—it’s one of those treats I turn to when I want something quick but impressive. Whether you’re making it for yourself, a party, or to give as a gift, this bark delivers every time with its creamy, minty layers and festive crunch. Give it a try—you’ll find it almost impossible to stop breaking off just one more piece!
Print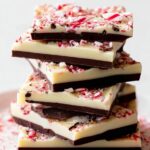
Peppermint Chocolate Bark Recipe
- Prep Time: 30 minutes
- Cook Time: 15 minutes
- Total Time: 1 hour 45 minutes
- Yield: About 1 batch (approximately 24 pieces)
- Category: Dessert
- Method: No-Cook
- Cuisine: American
- Diet: Vegetarian
Description
This peppermint bark is a festive and simple treat featuring layers of creamy white chocolate and rich semi-sweet chocolate infused with peppermint flavor and topped with crushed candy canes for a refreshing crunch. Perfect for holiday gifting or enjoying as a seasonal dessert.
Ingredients
Chocolate Layers
- 12 ounces (339g) white chocolate, coarsely chopped and divided
- 6 ounces (170g) semi-sweet or bittersweet chocolate, coarsely chopped
- 1 and 1/2 teaspoons vegetable oil or coconut oil, divided
- 1/2 teaspoon peppermint extract, divided
Topping
- 2–3 regular-size candy canes (24–36g total), crushed
Instructions
- Prepare the Pan: Line the bottom and sides of an 8-inch or 9-inch square baking pan with parchment paper or aluminum foil, smoothing out any wrinkles. Alternatively, you can use a lined baking sheet. Set aside.
- Make the Bottom White Chocolate Layer: Place 6 ounces of white chocolate in a small heatproof bowl or liquid measuring cup. Add 1/2 teaspoon of oil. Melt the chocolate in the microwave in 20-second increments, stirring vigorously after each until smooth and fully melted. Stir in 1/4 teaspoon peppermint extract. Pour the melted white chocolate into the prepared pan and spread into a thin, smooth layer with an offset spatula or spoon. Refrigerate for 10–15 minutes until almost set, but not fully hardened to prevent layer separation.
- Add the Semi-Sweet Chocolate Layer: Place the semi-sweet chocolate in a small heatproof bowl or liquid measuring cup. Add 1/2 teaspoon oil. Melt using the same microwave method as above until smooth. Stir in the remaining 1/4 teaspoon peppermint extract. Pour this melted semi-sweet chocolate over the white chocolate layer and spread evenly into a smooth layer. Return the pan to the refrigerator for 10–15 minutes until almost set.
- Top with Final White Chocolate Layer: Place the remaining white chocolate in a heatproof bowl or measuring cup with the last 1/2 teaspoon oil. Melt using the microwave method as before. Pour over the semi-sweet chocolate layer and spread smoothly. This layer has no peppermint extract.
- Add Crushed Candy Cane Topping: Evenly sprinkle crushed candy canes over the top white chocolate layer. To crush, place unwrapped candy canes in a sealed zip-top bag and crush with a rolling pin or meat mallet until broken into small pieces.
- Chill Until Set: Refrigerate the pan for about 1 hour or until the bark is completely firm. For best results, if chilled longer than 3–4 hours, let the bark sit at room temperature for 10–15 minutes before breaking or slicing to prevent layer separation.
- Serve and Store: Remove the bark from the pan by lifting the foil or parchment. Break or cut into desired pieces. Store leftovers covered in the refrigerator for up to 3 weeks. Bark can also be kept at room temperature for a few days during cooler months but may soften slightly.
Notes
- This peppermint bark is incredibly simple to make and combines creamy white chocolate with flavorful semi-sweet chocolate and refreshing peppermint.
- Melting the chocolate in short increments prevents overheating and ensures smooth texture.
- Do not let the layers fully set before adding the next one to avoid them separating.
- Crushing candy canes carefully allows for a crunchy, festive topping.
- Refrigeration is key to firm up the bark, but let it warm up slightly before cutting if chilled long.
Nutrition
- Serving Size: 1 piece (approx. 20g)
- Calories: 110
- Sugar: 13g
- Sodium: 10mg
- Fat: 6g
- Saturated Fat: 4g
- Unsaturated Fat: 2g
- Trans Fat: 0g
- Carbohydrates: 14g
- Fiber: 0.5g
- Protein: 1g
- Cholesterol: 5mg


