
Oh, I’m so excited to share this Popcorn Chicken – Better Than KFC! Recipe with you! I absolutely love how these little crispy bites turn out tender inside with just the perfect crunch outside. If you’ve ever wished you could recreate that addictive KFC popcorn chicken taste right in your own kitchen, this recipe is your golden ticket.
What I find especially wonderful about this Popcorn Chicken – Better Than KFC! Recipe is how easy it is to make yet yields amazing results — perfect for casual dinners, game days, or when you just want a snack that’s super satisfying. Trust me, once you try it, your family and friends will go crazy, and you’ll be reaching for this recipe over takeout every time.
Why You’ll Love This Recipe
- Incredible Crunch: The coating is super crispy without being greasy, giving you that restaurant-quality bite every time.
- Simple Ingredients: You’ll find everything you need at your local store — no weird secret spices required.
- Perfectly Juicy Chicken: The marination and frying technique lock in moisture so it’s tender and flavorful inside.
- Family-Favorite: I’ve seen picky eaters and kids gobble this up with zero complaints—anyone will dig in!

Ingredients You’ll Need
The ingredients here work together like a charm to create that irresistible taste and texture you crave. Fresh chicken, a well-seasoned coating, and the rice flour or cornstarch combo make all the difference.
- Bite-sized Chicken Pieces: I use skinless, boneless chicken thighs—they stay moist and tender better than breasts.
- Buttermilk: This tangy soak adds flavor and helps tenderize the chicken wonderfully.
- Flour: Plain all-purpose flour forms the base of the crispy coating.
- Cornstarch or Rice Flour: These add extra crispiness to the crust—don’t skip this part!
- Seasonings (Salt, Pepper, Paprika, Garlic Powder): Simple spices pack a punch and mimic that KFC flavor profile we all love.
- Oil for Frying: A neutral oil with a high smoke point, like vegetable or canola oil, is best for frying evenly.
Variations
I love making this Popcorn Chicken – Better Than KFC! Recipe my own with little tweaks here and there — feel free to play with the seasoning or coatings to suit your taste buds perfectly.
- Spicy Kick: Add some cayenne pepper or chili powder to the flour mixture if you want a little heat — my husband and I always go for this.
- Gluten-Free: Swap out the all-purpose flour for a gluten-free blend and be sure to use rice flour or cornstarch for the crunch.
- Oven-Baked Version: For a lighter option, bake rather than fry—just spray the pieces with oil and bake at high heat to keep the crust crispy. It’s a handy trick for weeknights.
- Herb-Infused: Add dried oregano, thyme, or rosemary to the breading mix for an aromatic twist I discovered that my family loved.
How to Make Popcorn Chicken – Better Than KFC! Recipe
Step 1: Marinate the Chicken
Start by cutting the chicken into bite-sized chunks—aim for pieces about 1 to 1.5 inches so they cook quickly and get crispy all over. I like to soak them in buttermilk for at least 2 hours (overnight works even better). This not only tenderizes the chicken but also helps the coating stick like magic. You’ll notice how juicy the chicken stays thanks to this step!
Step 2: Prepare the Coating Mixture
While the chicken is soaking, mix together your flour, cornstarch (or rice flour), and seasonings in a large bowl. Don’t skimp on the spices—I like paprika, garlic powder, salt, pepper, and a little onion powder for that deep, flavorful crust. This seasoning blend is key to nailing that KFC-style taste at home.
Step 3: Coat the Chicken Pieces
Remove the chicken pieces from the buttermilk and let excess drip off, then toss them in your seasoned flour mixture. To make sure you get maximum crunch, do a double coat: dip them back into the buttermilk briefly, then back into the flour mix again. My trick? Put the coated chicken on a rack for a few minutes before frying so the coating sticks really well and doesn’t fall off in the oil.
Step 4: Fry to Golden Perfection
Heat your oil to about 350°F (175°C) in a deep pot or fryer. Don’t overcrowd the pan—fry in batches so the temperature stays steady and the chicken cooks evenly. Each batch usually takes 3-4 minutes; you’ll want to flip them halfway for a golden all-around crust. I always use a thermometer to keep the oil temperature steady and a slotted spoon to lift out the chicken pieces.
Step 5: Drain and Serve
Once golden brown and crispy, transfer the popcorn chicken to a paper towel-lined plate to drain excess oil. I let them rest just a minute or two—it’s tough to wait, I know! Serve these piping hot with your favorite dips (I’m all about ranch and honey mustard), and watch how quickly they disappear.
Pro Tips for Making Popcorn Chicken – Better Than KFC! Recipe
- Keep the Oil Temperature Steady: I learned the hard way that too hot oil burns the coating too fast, and too cool oil makes it soggy. Use a thermometer to hit that sweet 350°F.
- Double-Coating is Key: This extra step creates the satisfying crunch that makes this popcorn chicken truly better than KFC’s.
- Don’t Overcrowd the Pan: Frying small batches at a time prevents the oil temperature from dropping and keeps each piece perfectly crispy.
- Rest After Frying: Let your chicken rest briefly on a cooling rack instead of paper towels to avoid soggy bottoms.
How to Serve Popcorn Chicken – Better Than KFC! Recipe
Garnishes
I like to sprinkle freshly chopped parsley or a little grated parmesan on top to brighten the flavors. A squeeze of fresh lemon juice adds a lovely zing that cuts through the richness beautifully.
Side Dishes
Popcorn chicken is perfect alongside crispy fries, creamy coleslaw, or even a fresh green salad to balance out the meal. When I’m feeling indulgent, I serve it with mac and cheese or baked beans — comfort food winning all around.
Creative Ways to Present
For parties, I arrange the popcorn chicken around a bowl of dipping sauces on a wooden board, garnished with colorful veggies for a fun finger food platter. Another favorite is serving them in mini lettuce cups with a drizzle of spicy mayo for a bite-sized twist.
Make Ahead and Storage
Storing Leftovers
I store leftover popcorn chicken in an airtight container in the fridge for up to 3 days. Just make sure to cool them first to prevent sogginess. When you’re ready to enjoy, reheating properly brings back a lot of that original crisp.
Freezing
I’ve had great success freezing the cooked popcorn chicken in single layers on a baking sheet before transferring to freezer bags. This way, the pieces don’t stick together and reheat beautifully. They last up to 2 months in the freezer, perfect for busy days.
Reheating
When reheating, I prefer the oven or an air fryer to keep that crunchy texture alive — just heat at 375°F for about 8-10 minutes. Avoid microwaving as it makes the coating soggy. My family never complains when I reheat popcorn chicken this way!
FAQs
-
Can I use chicken breasts instead of thighs for this Popcorn Chicken – Better Than KFC! Recipe?
Absolutely! You can use chicken breasts, but they tend to be leaner and can dry out faster. To keep them juicy, marinate longer in buttermilk and avoid overcooking. Thighs just naturally stay tender and flavorful with this recipe.
-
Is it possible to bake the popcorn chicken instead of frying?
Yes! Baking is a lighter alternative. Coat the chicken as usual, then arrange on a greased baking sheet, spray with oil, and bake at 425°F for about 20-25 minutes, turning halfway through. While it won’t be quite as crispy as fried, it’s delicious and easier.
-
What dipping sauces pair best with this popcorn chicken?
Ranch, honey mustard, spicy mayo, and BBQ sauce are all great companions. I like mixing a little hot sauce into ranch for an extra zing!
-
How do I keep the coating from falling off while frying?
Make sure to shake off extra buttermilk before coating, do the double dredge for a thicker layer, and let the coated pieces rest a few minutes before placing them in hot oil. Frying at the right temperature also helps seal the coating quickly.
Final Thoughts
This Popcorn Chicken – Better Than KFC! Recipe has truly become one of my go-to comfort foods because it delivers that crave-worthy crispy texture and juicy chicken every time. I hope you enjoy making it as much as I do — it’s perfect for feeding a crowd or just treating yourself. Give it a try this weekend, and I promise it’ll surpass your expectations just like it did mine!
Print
Popcorn Chicken – Better Than KFC! Recipe
- Prep Time: 10 minutes
- Cook Time: 12 minutes
- Total Time: 22 minutes
- Yield: 6 servings
- Category: Main Course
- Method: Grilling
- Cuisine: American
Description
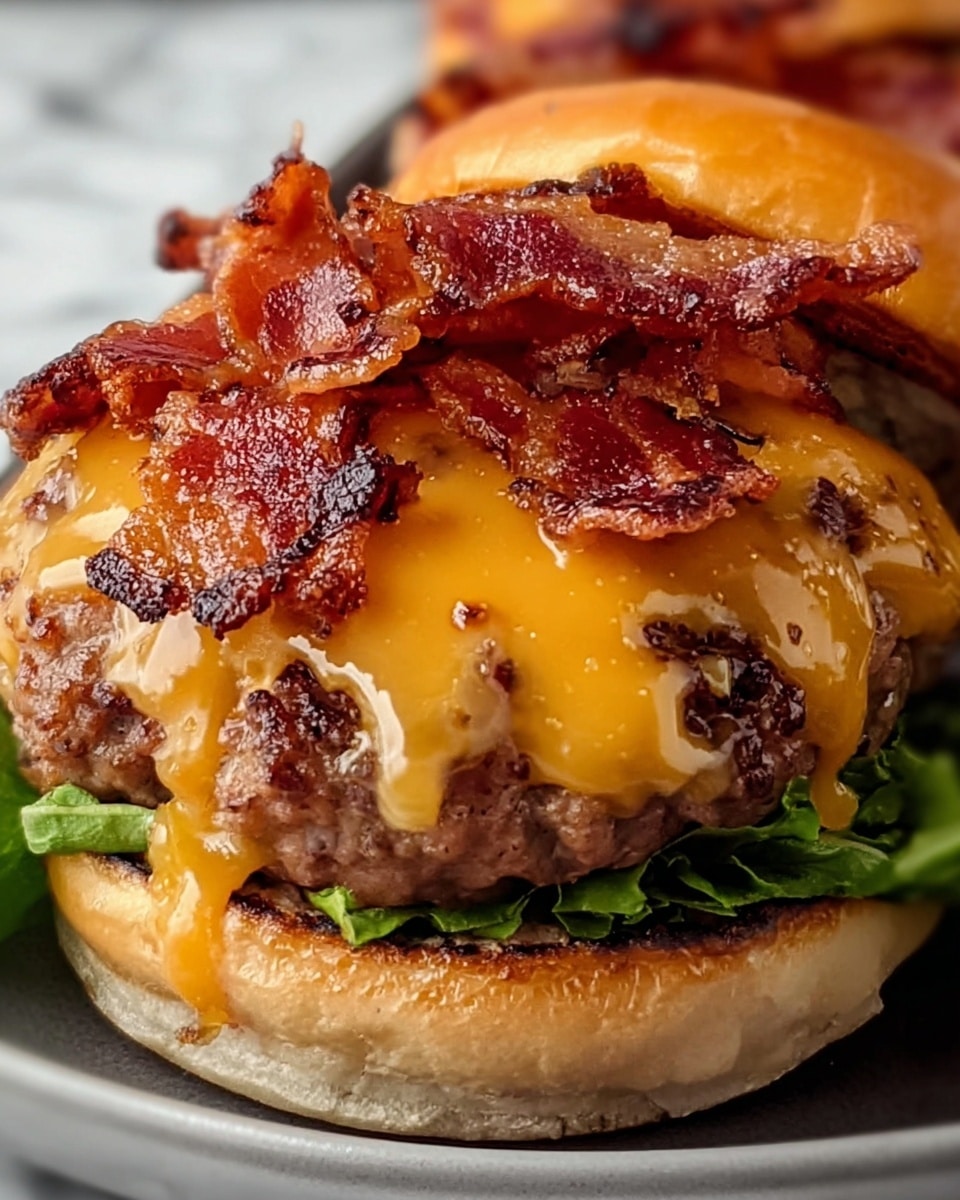
Crack Burgers are a flavorful and juicy burger recipe that combines ground chuck with sour cream, ranch dressing mix, bacon, and cheddar cheese for an irresistible taste. Perfectly grilled to your preferred doneness, these burgers are quick to prepare and make for a delicious meal served on buns with your favorite toppings.
Ingredients
Main Ingredients
- 1 1/2 lb ground chuck
- 3 Tbsp sour cream
- 2 Tbsp ranch dressing mix
- 1/3 cup cooked and crumbled bacon
- 1 cup shredded cheddar cheese
- Hamburger buns
- Lettuce, tomato, mustard, mayo (for topping)
Instructions
- Combine Ingredients: In a large bowl, combine the ground chuck, sour cream, ranch dressing mix, crumbled bacon, and shredded cheddar cheese. Mix until well combined using your hands or a sturdy spoon, being careful not to overmix to avoid tough burgers. Ensure the ingredients are evenly distributed for a consistent flavor.
- Form Patties: Shape the mixture into 6 evenly sized hamburger patties. Use a burger press or the lid of a container to help form the patties. Press a small dimple in the center of each patty to prevent puffing during cooking. Wet your hands with cold water to prevent sticking and keep patties uniform in thickness for even cooking.
- Grill Patties: Preheat a grill pan, outdoor grill, or skillet over medium heat. Grill the patties carefully, flipping once, until cooked to your desired doneness: 130-135°F for medium-rare, 140-145°F for medium, or 160°F for well-done. Avoid pressing down on the patties to retain juiciness. Let the burgers rest a few minutes after cooking to allow juices to redistribute.
- Serve: Place the cooked patties on your favorite hamburger buns and add toppings such as lettuce, tomato, mustard, and mayo. Optionally, toast the buns for extra texture and add other condiments like pickles, onions, or avocado to enhance the flavor.
Notes
- Do not overmix the meat to prevent tough burgers.
- Press a dimple in each patty to avoid uneven cooking and puffing.
- Wet hands before forming patties to prevent sticking.
- Use a meat thermometer to ensure proper doneness.
- Let burgers rest after cooking for juicier results.
- Toast buns for a crispier texture.
- Customize toppings for unique flavor variations.
Nutrition
- Serving Size: 1 burger (without bun and toppings)
- Calories: 420 kcal
- Sugar: 1 g
- Sodium: 580 mg
- Fat: 30 g
- Saturated Fat: 12 g
- Unsaturated Fat: 15 g
- Trans Fat: 1 g
- Carbohydrates: 5 g
- Fiber: 0.5 g
- Protein: 32 g
- Cholesterol: 95 mg
