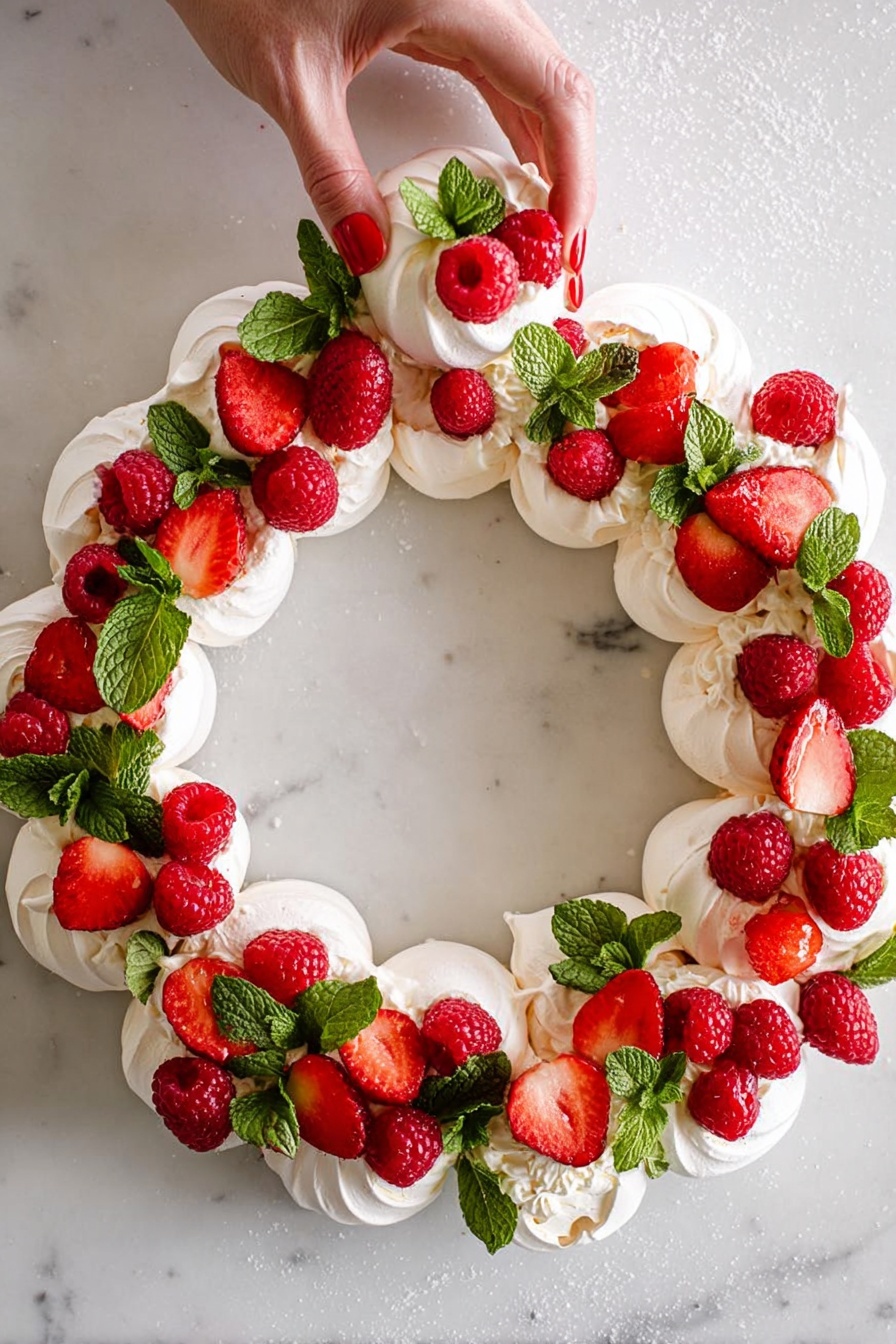
If you’re like me and love desserts that feel both fancy and fun to share, you’re going to adore this Pull Apart Pavlova Wreath with Fresh Fruit Recipe. It’s a refreshing twist on the classic pavlova, perfect for gatherings where everyone can grab a little piece—and believe me, it disappears fast! The airy meringue bites topped with whipped cream and vibrant fresh fruit make for an irresistible combo that’s as beautiful to look at as it is delicious to eat. Keep reading; I’ll share all my best tips to help you nail it perfectly every time.
Why You’ll Love This Recipe
- Shareable & Fun: The pull-apart style makes serving easy and interactive, perfect for parties and family gatherings.
- Light & Fresh: You get the classic crunch of meringue balanced with refreshing whipped cream and vibrant fresh fruit.
- Impressive & Easy: It looks stunning on your table but is surprisingly simple to put together, even if you’re new to meringues.
- Customizable: You can switch up the fruit and garnish to suit the season or your personal taste.

Ingredients You’ll Need
The ingredients for this Pull Apart Pavlova Wreath with Fresh Fruit Recipe are straightforward and highlight simple, fresh flavors. The key is using good-quality eggs and fresh fruit for the best texture and taste.
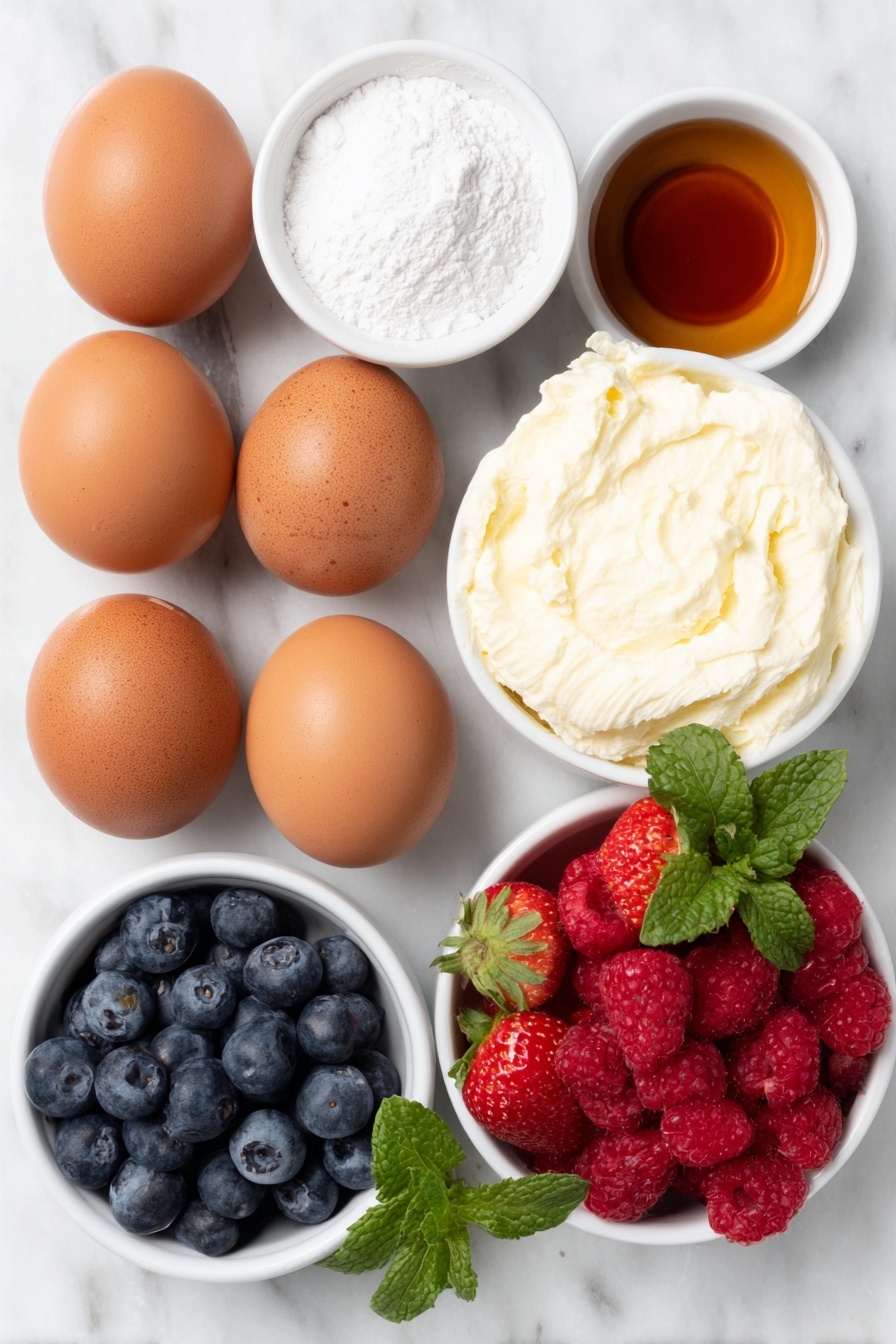
- Egg whites: I always use extra-large eggs because they give just the right volume for the meringue.
- Icing sugar (powdered sugar): Sift it well to avoid lumps and ensure a velvety smooth meringue.
- Cornstarch: This helps keep the meringue crisp on the outside and tender on the inside—trust me, it’s a game-changer.
- Vanilla extract: Adds just the right warm flavor without overpowering the sweetness.
- Heavy cream (whipping cream): Use fresh, cold cream for the best whipping results and that luscious texture you crave.
- Fresh fruit: Berries are my go-to here—strawberries, blueberries, raspberries—but feel free to mix it up with seasonal fruits.
- Fresh mint: A sprig here and there adds a lovely pop of color and a subtle freshness.
Variations
One of the reasons I love making this Pull Apart Pavlova Wreath with Fresh Fruit Recipe is how easy it is to tailor it to your preferences. You can swap fruits, adjust sweetness, and keep it light or indulgent depending on the occasion.
- Fruit Choices: I once made this for a summer cookout with kiwi, mango, and passionfruit—it felt tropical and fresh, and my guests loved the twist.
- Dairy-Free Version: You can substitute coconut cream for whipping cream if you’re avoiding dairy; just chill it thoroughly before whipping.
- Lemon Zest: Adding a little lemon zest into the whipped cream gives that fresh zing that complements the fruit beautifully.
- Chocolate Drizzle: For something extra special, drizzle melted dark chocolate over the wreath—makes it feel festive and decadent.
How to Make Pull Apart Pavlova Wreath with Fresh Fruit Recipe
Step 1: Prep Your Oven and Parchment
Start by preheating your oven to a low 90°C (195°F)—this low-and-slow baking is what helps make the pavlova perfectly crisp outside and marshmallowy inside. Line two baking sheets with parchment paper so your meringues don’t stick. I find that using fresh parchment each time keeps everything clean and prevents cracking when you peel them off.
Step 2: Whip the Egg Whites to Stiff Peaks
Place your egg whites in the bowl of a stand mixer fitted with the whisk attachment. Beat on medium speed until foamy—that’s when you know air’s starting to incorporate. Slowly add the sifted icing sugar while continuing to beat. Keep going until the whites become bright white, glossy, and form stiff peaks when you lift the beaters. This can take up to 8 minutes, so patience pays off here. Remember, stiff peaks mean you can tip the bowl upside down without the meringue falling out!
Step 3: Add Cornstarch and Vanilla, Then Pipe
Gently fold in the cornstarch and vanilla extract to combine everything evenly. Then, either pipe or spoon small mounds about 5cm wide onto your prepared baking sheets, leaving enough space (around 5cm) between each for air circulation. I like to use a teaspoon to make a shallow dent in the center of each one—that’s where the cream and fruit will sit later, giving you the perfect little nest.
Step 4: Bake and Cool Slowly
Bake your meringues for exactly 60 minutes, then switch the oven off but don’t open the door right away. Let them cool entirely in the oven—this slow cooling helps prevent cracks and keeps the insides soft. It usually takes about 2 hours for the meringues to cool completely, so this part requires some patience, but trust me, it’s worth it.
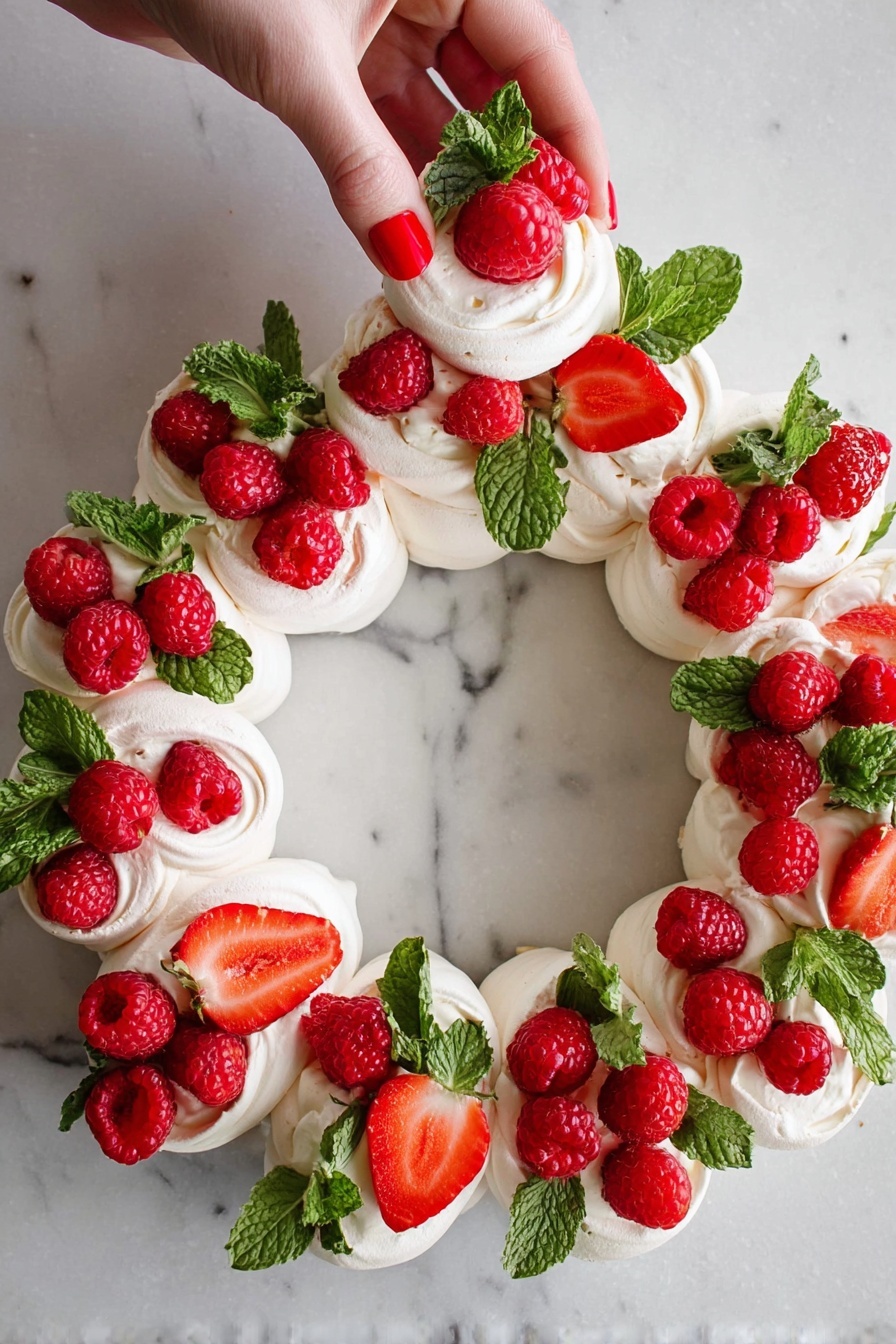
Step 5: Whip the Cream and Assemble
Once cool, whip your heavy cream together with icing sugar and a splash of vanilla until you reach medium-stiff peaks—that lovely texture that holds but still feels soft. Arrange the meringues on a large serving platter in a circular wreath shape. Spoon a generous dollop of cream onto each meringue, then top with fresh fruit and a little sprig of mint for a pop of color and freshness. Easy, elegant, and utterly delicious.
Pro Tips for Making Pull Apart Pavlova Wreath with Fresh Fruit Recipe
- Use Room Temperature Egg Whites: I learned this trick early on—bringing egg whites to room temp helps them whip up with more volume and stability.
- Sift Your Sugar Twice: Clumps can weigh down meringue; two quick siftings make your texture silky and smooth.
- Don’t Open the Oven While Baking: Resist the urge! Opening the door too soon can cause your pavlova to collapse or crack.
- Pipe Uniform Meringues: For even baking, try to keep your meringue dollops consistent in size—this avoids some cooking faster than others.
How to Serve Pull Apart Pavlova Wreath with Fresh Fruit Recipe
Garnishes
I usually finish with a mixture of ripe berries—blueberries, raspberries, and sliced strawberries work beautifully. A few fresh mint leaves scattered on top add freshness and a little herbal note that brightens up each bite. Sometimes I add a light dusting of extra icing sugar for that ‘snow-kissed’ look when serving.
Side Dishes
This wreath is fantastic on its own, but I love pairing it with a crisp fruit salad or a tangy citrus sorbet. If you want something a bit richer, a small cheese platter complements the sweetness well—think mild cheeses that won’t overpower the pavlova.
Creative Ways to Present
For holiday celebrations, I’ve tried decorating the wreath with edible flowers and pomegranate seeds to add a festive flair. Another fun idea is to use different shaped piping nozzles for the meringues, creating a textured wreath that looks as fancy as it tastes. I even made mini wreaths for a bridal shower, which were a huge hit and looked adorable.
Make Ahead and Storage
Storing Leftovers
If you happen to have leftovers (which is rare!), keep the meringue and whipped cream separate. Store your baked meringues in an airtight container at room temperature—humidity will make them soggy otherwise. Whipped cream is best kept in the fridge covered tightly. Assemble just before serving to maintain that perfect crunch.
Freezing
I’ve found that freezing the baked meringue pieces alone works well. Just store them in a sealed container and thaw at room temperature before assembling. I don’t recommend freezing the assembled wreath because fresh cream and fruit won’t hold up well after thawing.
Reheating
Since pavlova is best enjoyed fresh, reheating isn’t really necessary or recommended. If you want to warm the meringues slightly, a few seconds under a warm oven (around 100°C/210°F) can bring back some crispness, but be careful not to melt them. Always add cream and fruit fresh.
FAQs
-
Can I make the meringue base ahead of time for the Pull Apart Pavlova Wreath with Fresh Fruit Recipe?
Absolutely! You can prepare the meringue bases up to two days in advance and store them in an airtight container at room temperature. Just make sure they are completely cool before storing to keep them crisp and prevent moisture buildup.
-
What’s the best way to get stiff peaks when whipping egg whites for pavlova?
The key is to start with room temperature egg whites and a clean, dry bowl. Gradually add sifted icing sugar while whipping at medium-high speed until the mixture is shiny and holds stiff peaks. Avoid any yolk contamination as fats can prevent proper whipping.
-
Can I use frozen fruit in the Pull Apart Pavlova Wreath with Fresh Fruit Recipe?
Frozen fruit can work in a pinch but tends to release extra moisture, which can make the pavlova soggy. If you use frozen fruit, thaw it completely and drain off any excess liquid before adding it to the cream-topped pavlova.
-
Why does my pavlova become chewy instead of crisp?
This often happens when humidity is high or the pavlova is underbaked. Baking low and slow, then cooling inside the oven without opening the door, helps achieve the classic crisp exterior and marshmallow interior texture.
Final Thoughts
I absolutely love how this Pull Apart Pavlova Wreath with Fresh Fruit Recipe brings people together—literally, around the table, sharing each bite. When I first made it, I was amazed at how simple ingredients could come together into such a stunning centerpiece. It’s perfect for festive occasions or just because you want to treat yourself and your loved ones without fuss. I encourage you to try it out—you’ll find that the process is as joyful as the end result, and trust me, once you serve it, people won’t stop asking for the recipe.
Print
Pull Apart Pavlova Wreath with Fresh Fruit Recipe
- Prep Time: 25 minutes
- Cook Time: 1 hour
- Total Time: 3 hours 25 minutes
- Yield: 15 servings
- Category: Dessert
- Method: Baking
- Cuisine: Australian
- Diet: Vegetarian
Description
This Pull Apart Pavlova Wreath is a stunning and festive dessert perfect for special occasions. Light and airy meringue nests are baked to perfection, then topped with whipped cream, fresh berries, and mint to create a beautiful edible wreath. Its delicate texture and refreshing flavors make it an irresistible treat.
Ingredients
For the Meringue
- 6 extra-large egg whites
- 2 cups icing sugar / powdered sugar, sifted
- 2 tbsp cornstarch
- 1 tsp vanilla extract
For the Pavlova Wreath
- 3 cups heavy cream / whipping cream
- 1 cup icing sugar / powdered sugar, sifted
- 1 tsp vanilla extract
- Fresh fruit (berries, such as strawberries, blueberries, raspberries)
- Fresh mint leaves for garnish
Instructions
- Preheat Oven and Prepare Baking Sheets: Preheat your oven to 90°C (195°F). Line two baking sheets with parchment paper to prevent the meringues from sticking.
- Beat Egg Whites: In the bowl of a stand mixer fitted with the whisk attachment, beat the egg whites until they become foamy. This aerates the whites to help form stiff peaks.
- Add Icing Sugar: Gradually add in the sifted icing sugar while continuing to beat the egg whites. Beat until the mixture is bright white, voluminous, and forms stiff peaks when the beaters are lifted. This step can take up to 8 minutes.
- Incorporate Cornstarch and Vanilla: Add the cornstarch and vanilla extract to the meringue mixture and whip just until combined, which helps stabilize the meringue.
- Pipe or Spoon Meringue: Using a piping bag or spoon, place small mounds of meringue about 5cm in diameter onto the prepared baking sheets. Leave approximately 5cm of space between each meringue.
- Create Indents in Meringues: Use a teaspoon to make a shallow dent in the center of each meringue mound; this will hold the whipped cream topping later.
- Bake and Cool Meringues: Bake the meringues in the preheated oven for 60 minutes. After baking, turn the oven off and allow the meringues to cool completely inside the oven for about 2 hours. This slow cooling helps prevent cracks.
- Arrange Meringues: Once cool, carefully remove the meringues from the parchment and arrange them in a wreath formation on a large serving platter or board.
- Whip Cream: Whip the heavy cream with icing sugar and vanilla extract until medium-stiff peaks form. This will be used to top the meringues.
- Assemble the Wreath: Spoon or pipe the whipped cream onto each meringue nest, then decorate generously with fresh berries and mint leaves for a fresh look and flavor.
- Serve: Serve immediately to enjoy the contrast between the crisp meringue, smooth cream, and fresh fruit.
Notes
- Ensure egg whites are free of any yolk as even a small amount of fat can prevent whipping properly.
- Sifting the icing sugar helps to create a smooth meringue texture.
- Use room temperature egg whites to achieve better volume when whipping.
- Cool the meringues slowly in the oven after baking to prevent cracking.
- Fresh berries such as strawberries, blueberries, raspberries, or blackberries work best for garnish.
- For added flavor, you can zest some lemon or lime into the whipped cream.
- This dessert is best assembled just before serving to keep the meringue crisp.
Nutrition
- Serving Size: 1 serving
- Calories: 180 kcal
- Sugar: 20 g
- Sodium: 20 mg
- Fat: 8 g
- Saturated Fat: 5 g
- Unsaturated Fat: 2 g
- Trans Fat: 0 g
- Carbohydrates: 25 g
- Fiber: 1 g
- Protein: 3 g
- Cholesterol: 40 mg


