
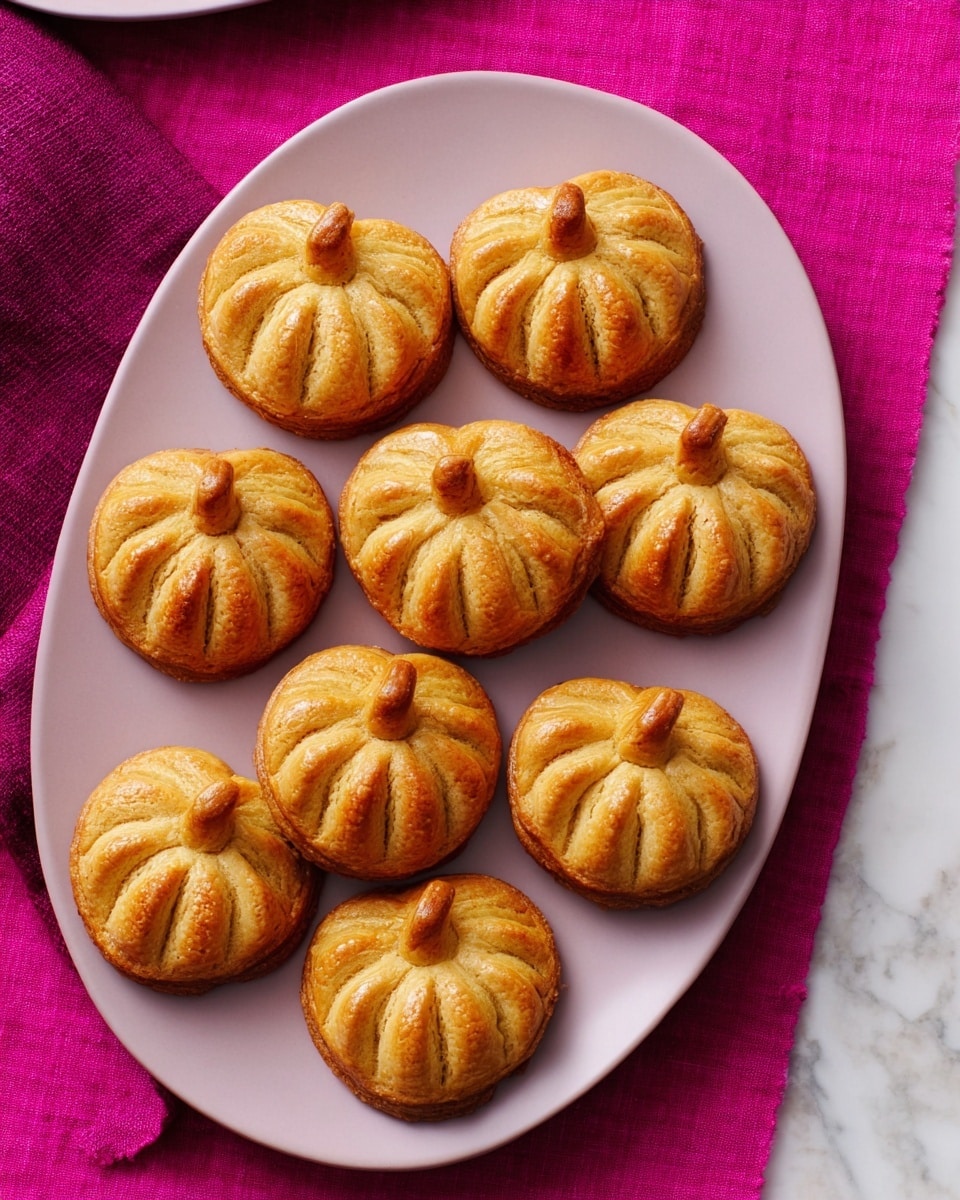
If you’re ready for a fall treat that’s adorable, delicious, and seriously satisfying, look no further than this Pumpkin Hand Pies Recipe. These little pies are like pumpkin pie’s cute cousin—handheld, buttery, perfectly spiced, and begging to be shared. When I first tried making them, I couldn’t believe how simple they were and how much my family went crazy over them. Trust me, once you bite into one, you’ll find it’s tough to stop at just one!
Why You’ll Love This Recipe
- Perfect Fall Flavor: The mix of pumpkin, warm spices, and cream cheese creates a filling that’s cozy and irresistible.
- Handheld Convenience: These pies are perfectly portioned for on-the-go snacking or dessert at your next gathering.
- Make-Ahead Friendly: You can prepare the dough and filling days in advance, making party prep stress-free.
- Fun to Assemble: The pumpkin-shape cutouts and fork-crimped edges add a cute, rustic touch anyone can achieve.

Ingredients You’ll Need
The ingredients here come together to make a flaky, buttery crust and a pumpkin filling that’s decadently smooth with just the right balance of sweet and spice. Fly by your local grocery store’s baking aisle to gather these essentials, and choose good quality butter—it makes all the difference in flaky crust.
- All-purpose flour: This is your base for flaky dough; don’t substitute with whole wheat or gluten-free without adjusting.
- Granulated sugar: Adds just a touch of sweetness to the crust for balance.
- Kosher salt: Enhances all the flavors, key to any good dough and filling.
- Unsalted butter: Using cold butter helps create those flaky layers we all love in pie crust.
- White vinegar: A little trick I learned to keep the crust tender by inhibiting gluten formation.
- Ice-cold water: Keeps the dough cool and pliable.
- Pumpkin puree: Use pure pumpkin, not pumpkin pie filling, for the best flavor and control over sweetness.
- Dark brown sugar: Brings deep molasses notes that pair beautifully with pumpkin.
- Ground cinnamon, ginger, allspice, nutmeg: The classic warm spices that bring pumpkin to life.
- Pure vanilla extract: Adds a sweet, floral depth to the filling.
- Cream cheese: This is the secret ingredient that gives the filling a rich, creamy texture.
- Egg yolks: Help set the filling and add richness.
- Beaten egg (for brushing): Creates that gorgeous golden sheen on top when baked.
Variations
I love mixing things up by tweaking the filling or the spices depending on the season or who I’m baking for. Feel free to make these pumpkin hand pies your own by changing up just a little or going all in with a creative spin.
- Spiced Up: I sometimes add a pinch of cayenne or freshly ground black pepper to the filling for a subtle spicy kick that wakes up the flavors.
- Dairy-Free: Swap cream cheese with a plant-based soft cheese and use vegan butter to accommodate dairy-free diets—I tried this with great results but found chilling the dough even more important.
- Maple Twist: Replace some brown sugar with pure maple syrup for a deeper, woodsy sweetness that’s perfect for Thanksgiving.
- Nuts and Seeds: Add chopped pecans or toasted pumpkin seeds to the filling for crunch and texture; my kids loved this unexpected surprise!
How to Make Pumpkin Hand Pies Recipe
Step 1: Whip Up the Flaky Dough
Start by pulsing your flour, sugar, and salt in a food processor until combined—it’s faster and keeps everything cold. Then add in cold, cubed butter, pulsing until the mixture looks like coarse crumbs with some pea-sized pieces. Trust me, those little chunks of butter are what create the flakiness. Next, add your vinegar and ice-cold water gradually, pulsing just enough until dough forms but doesn’t get too wet or sticky. Overmixing is a common mistake; if your dough feels sticky, try adding a bit more flour instead of more water. Divide this dough into three disks, wrap tightly in plastic, and pop them in the fridge—this chilling step is crucial for easier rolling and flaky crust.
Step 2: Prepare That Luscious Pumpkin Filling
While the dough chills, whisk together the pumpkin puree, brown sugar, spices, and salt in a small saucepan. Gently cook over medium heat for about 6 to 8 minutes, stirring occasionally, to evaporate some moisture and concentrate the flavors. Then take it off the heat and stir in vanilla and cream cheese until smooth—this step always surprises my family with how rich and velvety it turns out. Finally, mix in the egg yolks which help the filling set properly during baking. Let it cool completely before filling your pies; nobody wants a soggy crust!
Step 3: Cut Out Your Cute Pumpkin Shapes
Preheat your oven to 375°F. Roll out one disk of dough at a time on a lightly floured surface to about 1/8 inch thickness. This thinness helps the pie crisp up nicely without being doughy. Use around 3 ½ inch pumpkin-shaped cutters—if you don’t have a pumpkin cutter, any small circle cutter works fine, but the pumpkin shape is so fun and festive! Don’t forget to cut vertical slits into half of the cutouts; these will be the vents on the pie tops to let steam out. Keep cutouts chilled in the fridge while you assemble; it’s easier to handle cold dough.
Step 4: Assemble and Seal the Hand Pies
Place your bottom crust shapes onto a parchment-lined baking sheet. Spoon about 2 tablespoons of the cooled pumpkin filling into the center of each, leaving a small border. Lightly brush the edges with beaten egg—this acts like glue! Top with the vented crust pieces and press edges firmly with a fork to seal, preventing leaks during baking. I learned the hard way that skipping this step means filling oozes out and makes a mess. Repeat for all pies, then brush the tops with remaining egg for that classic golden shine.
Step 5: Bake Until Golden and Gorgeous
Bake your pies at 375°F for 23 to 25 minutes until golden brown and puffed. Keep an eye on them towards the end—if they start to get too dark, tent loosely with foil. The smell at this point? Absolute heaven. Let them cool a bit before diving in so the filling sets fully. You’ll love how the crust stays crisp but tender, and the filling is creamy and warmly spiced.
Pro Tips for Making Pumpkin Hand Pies Recipe
- Keep Ingredients Cold: Cold butter and water are your best friends for that flaky crust texture.
- Don’t Skip Chilling Time: Letting the dough rest for at least an hour makes rolling out way easier and prevents shrinking during baking.
- Watch Your Filling Moisture: Cooking the pumpkin filling until slightly thick prevents soggy bottoms.
- Seal Edges Properly: Using beaten egg and a fork to crimp edges keeps pies intact and neat when baked.
How to Serve Pumpkin Hand Pies Recipe
Garnishes
I usually dust mine lightly with powdered sugar for a pretty finish, but a drizzle of warm caramel or a dollop of whipped cream is heavenly if you’re feeling fancy. If you’re serving kids, a tiny sprinkle of cinnamon sugar on top before baking adds a nice crunch and extra spice.
Side Dishes
These hand pies pair wonderfully with a hot cup of coffee, chai latte, or even a chilled vanilla ice cream scoop for dessert. For a fall brunch, I often serve them alongside scrambled eggs and fresh fruit to balance sweet and savory.
Creative Ways to Present
For parties, I’ve arranged these pumpkin hand pies on a wooden board scattered with autumn leaves and mini pumpkins—instant gorgeous fall centerpiece. You can also tie ribbons around them individually and place in small baskets as delightful edible favors.
Make Ahead and Storage
Storing Leftovers
Store leftover pies in an airtight container at room temperature for up to two days. They stay surprisingly moist but still crisp. After that, refrigeration helps keep them safe, but the crust may soften a bit.
Freezing
I love freezing these hand pies before baking when I’m prepping for a big gathering. Just assemble them, flash freeze on a baking sheet, then transfer to a freezer bag. When ready, bake straight from frozen—just add a few extra minutes to the baking time. This hack saves me so much time on busy days.
Reheating
To bring back that fresh-baked magic, reheat pies in a 350°F oven for about 8 to 10 minutes. Microwaving is faster but softens the crust, which honestly isn’t my favorite. Using the oven keeps the flakiness intact and warms the filling just right.
FAQs
-
Can I use canned pumpkin pie filling instead of pumpkin puree?
It’s best to use pure pumpkin puree for this recipe because canned pumpkin pie filling is already sweetened and spiced, which can throw off the flavor balance and texture. Using plain pumpkin gives you control over seasoning and sweetness.
-
What if I don’t have a food processor to make the dough?
No worries! You can make the dough by hand using a pastry cutter or two knives to cut cold butter into the flour, sugar, and salt until crumbly. Just be patient and keep everything as cold as possible.
-
How can I prevent the pumpkin hand pies from getting soggy?
Cooking the pumpkin filling to reduce moisture is key, as is chilling the dough before baking. Also, make sure not to overfill the pies and always seal edges well. Baking at the recommended temperature until golden ensures a crisp crust.
-
Can I make these pumpkin hand pies ahead of time?
Absolutely! The dough can be made and refrigerated for up to two days, and the filling can be prepared in advance as well. You can also assemble the pies and freeze them for baking later.
Final Thoughts
This Pumpkin Hand Pies Recipe is one of those cozy, feel-good desserts that make everyone feel special. It’s easy enough to whip up on a weeknight but impressive enough to bring out for guests or holiday celebrations. I always love seeing the smiles when the golden pies come out of the oven, and I hope you’ll enjoy making and sharing them just as much. Give it a try—you might just find your new fall favorite!
Print
Pumpkin Hand Pies Recipe
- Prep Time: 40 mins
- Cook Time: 35 mins
- Total Time: 1 hr 15 mins
- Yield: 14 hand pies
- Category: Dessert
- Method: Baking
- Cuisine: American
- Diet: Vegetarian
Description
Delight in these charming Pumpkin Hand Pies, perfect for fall or any cozy occasion. Flaky homemade pastry envelopes a spiced, creamy pumpkin filling enhanced with cream cheese and warm spices. These handheld treats are perfect for sharing and bring comforting autumn flavors with a buttery crust and a perfectly baked golden finish.
Ingredients
Dough
- 3 3/4 cups all-purpose flour
- 3 Tbsp. granulated sugar
- 1 1/2 tsp. kosher salt, plus 1/4 tsp. kosher salt
- 1 1/2 cups (3 sticks) unsalted butter, cold
- 3 Tbsp. white vinegar
- 3 Tbsp. ice-cold water
Filling
- 1 15-oz. can pumpkin puree
- 1/4 cup packed dark brown sugar
- 3/4 tsp. ground cinnamon
- 1/2 tsp. ground ginger
- 1/4 tsp. ground allspice
- 1/4 tsp. ground nutmeg
- 1/2 tsp. pure vanilla extract
- 4 oz. cream cheese, cut into small pieces
- 2 large egg yolks
Finishing
- 1 beaten egg, for brushing
Instructions
- Prepare the Dough: In a food processor, combine the flour, granulated sugar, and 1 1/2 teaspoons of kosher salt. If your food processor is 7-cups or smaller, remove half the flour mixture to make the dough in two batches. Pulse in the cold, cubed butter until the mixture resembles coarse crumbs.
- Add Liquids and Form Disks: Add the vinegar and ice-cold water, pulsing just until the dough comes together but remains crumbly and can hold when squeezed. Add water 1 teaspoon at a time if needed—do not overmix. Shape the dough into three 1-inch-thick disks, wrap tightly in plastic, and refrigerate for at least 1 hour or up to 2 days.
- Make the Pumpkin Filling: In a small saucepan, whisk together the pumpkin puree, dark brown sugar, ground cinnamon, ginger, allspice, nutmeg, and the remaining 1/4 teaspoon salt. Cook over medium heat, stirring occasionally for 6 to 8 minutes to evaporate moisture. Remove from heat, stir in vanilla extract and cream cheese until smooth, then beat in the egg yolks. Transfer the filling to a bowl and let cool completely.
- Roll and Cut Dough: Preheat the oven to 375°F (190°C). Working with one dough disk at a time on a floured surface, roll out dough to 1/8-inch thickness. Use a 3 1/2-inch pumpkin-shaped cutter to cut 28 shapes. Place cut shapes in the refrigerator as you work. On half of the cutouts, make 3 vertical slits to allow steam to escape (these will be the top crusts).
- Assemble the Hand Pies: Arrange 7 uncut pumpkin shapes on a parchment-lined baking sheet. Spoon 2 tablespoons of filling onto each, leaving a 1/2-inch border. Lightly brush the edges with beaten egg. Cover with slitted pumpkin shapes and press edges firmly with a fork to seal. Repeat with remaining dough and filling.
- Brush and Bake: Brush the tops of the pies with the remaining beaten egg for a shiny golden finish. Bake in the preheated oven for 23 to 25 minutes until golden brown and cooked through. Remove from the oven and cool slightly before serving.
Notes
- Ensure the butter is very cold to achieve a flaky crust.
- If the dough becomes too soft while rolling, chill it again before continuing.
- You can prepare the dough up to 2 days in advance and keep it refrigerated.
- Use a pumpkin-shaped cookie cutter or substitute with a round or oval cutter if unavailable.
- Store leftovers in an airtight container in the refrigerator for up to 3 days; reheat gently before serving.
Nutrition
- Serving Size: 1 hand pie
- Calories: 330
- Sugar: 12g
- Sodium: 260mg
- Fat: 21g
- Saturated Fat: 13g
- Unsaturated Fat: 7g
- Trans Fat: 0.3g
- Carbohydrates: 28g
- Fiber: 2g
- Protein: 4g
- Cholesterol: 65mg
