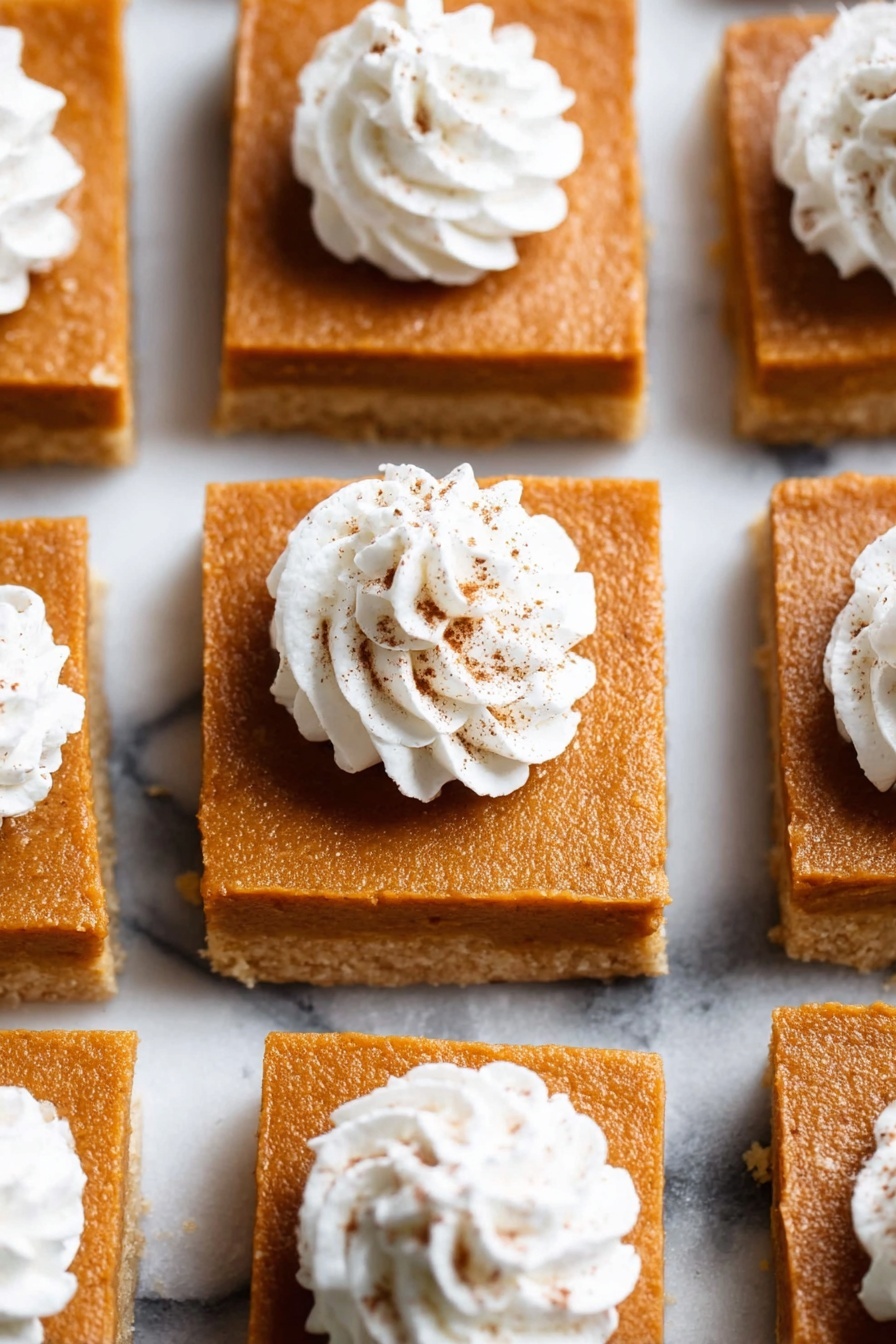
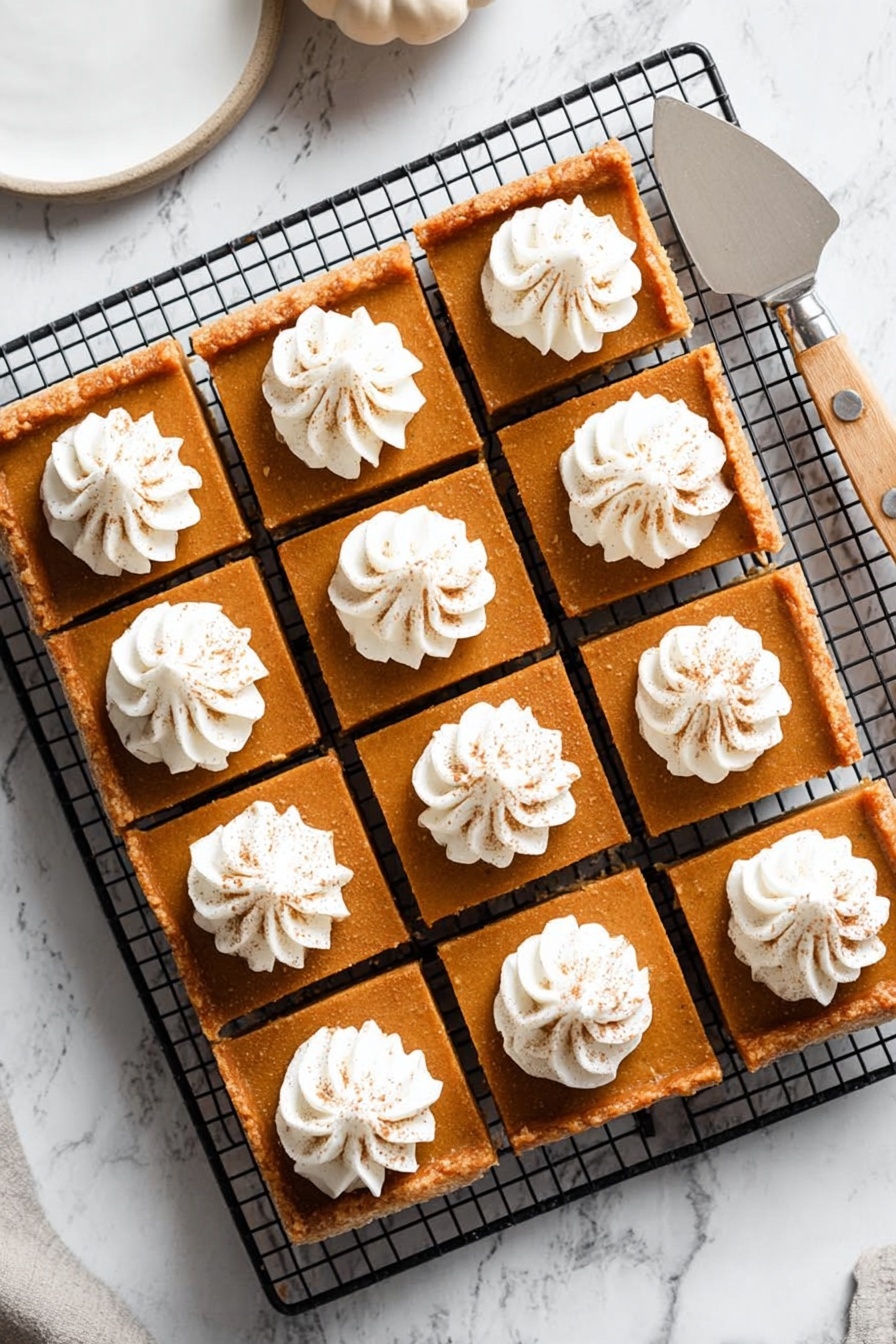
If you’re craving that classic fall flavor but want something a little easier to slice and share than a traditional pie, you’re going to adore this Pumpkin Pie Bars Recipe. It’s like pumpkin pie and shortbread had a delicious love child—creamy, spiced pumpkin filling on a tender, buttery crust that’s easier to cut into perfect squares (and less messy!). I absolutely love how this recipe balances richness with just the right amount of sweetness and spice, making it an instant family favorite every time I bake it.
Why You’ll Love This Recipe
- Simple and approachable: You don’t need to be a pro baker to pull this off, I promise—it’s straightforward and foolproof.
- Perfect texture combo: That buttery shortbread crust with smooth, spiced pumpkin filling is pure magic together.
- Great for gatherings: It slices beautifully into bars, making it a crowd-pleaser at potlucks, holiday dinners, or even casual dessert times.

Ingredients You’ll Need
Each ingredient plays a key role in building that perfect pumpkin pie bar. The buttery shortbread crust is rich, and the pumpkin filling is creamy and spiced just right. Here are some notes to keep in mind when shopping!
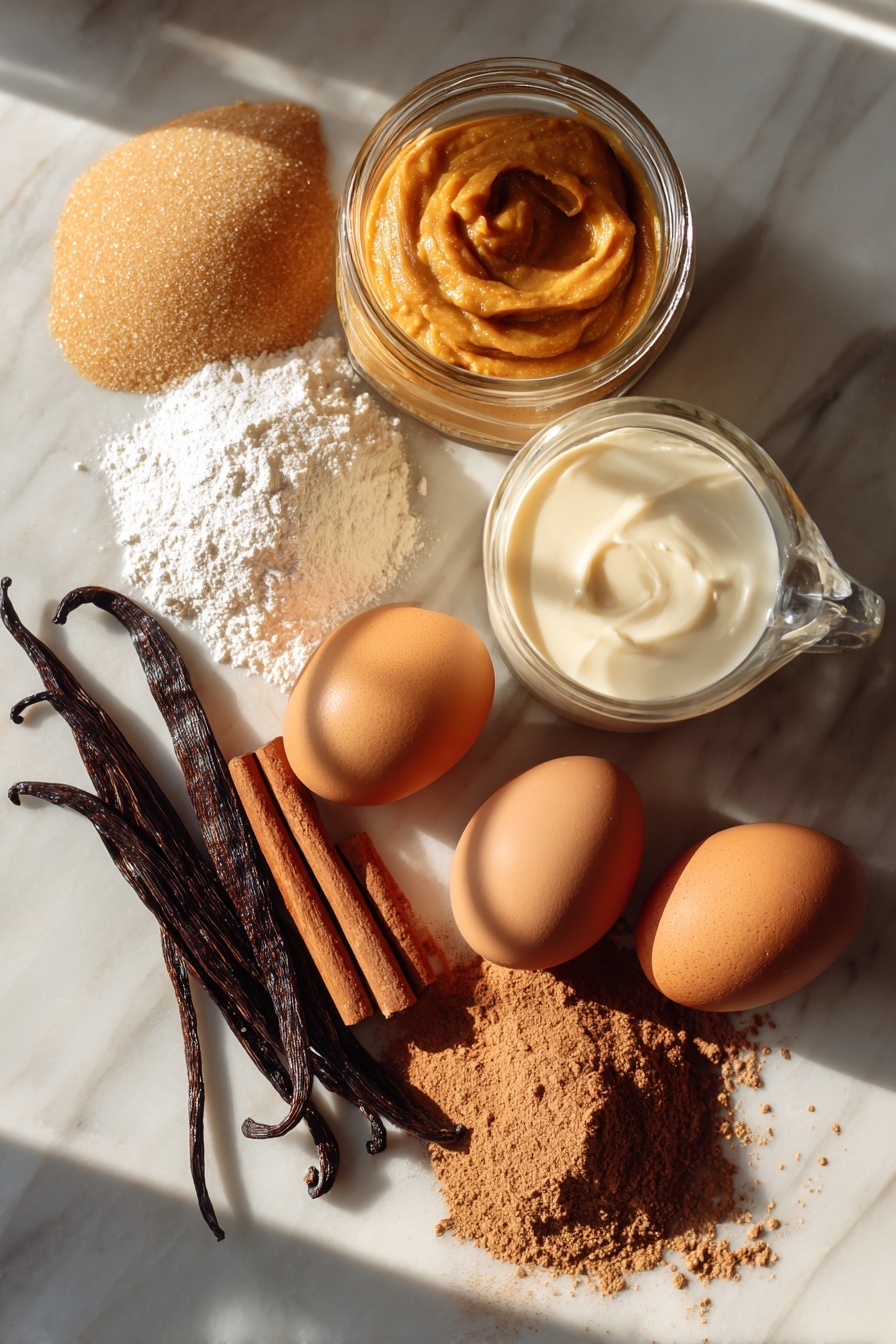
- Unsalted butter: Room temperature butter creams up nicely with sugar for a tender crust.
- Granulated sugar: Adds sweetness and helps with that crispy texture in the crust and filling.
- Light brown sugar: Brings a subtle molasses flavor that enriches both crust and filling.
- Eggs: Make sure they’re at room temp for better incorporation.
- Vanilla extract: Just a splash for warmth and depth of flavor.
- All-purpose flour: Spoon and level for accuracy to ensure the crust isn’t too tough.
- Baking powder: Helps the crust rise slightly without being cakey.
- Ground cinnamon: Adds warmth to your crust and pairs beautifully with the pumpkin.
- Kosher salt: Enhances all the flavors without being overpowering.
- Pumpkin puree: Use pure pumpkin, NOT pumpkin pie filling, to control sugar and spices yourself.
- Heavy cream: Gives the filling its creamy, luscious texture.
- Light brown and granulated sugar: Both used in filling for perfect sweetness balance.
- Cornstarch: This helps the filling set so your bars hold together nicely when sliced.
- Pumpkin pie spice and cinnamon: Together, they bring the classic pumpkin pie flavor you know and love.
- Whipped cream topping ingredients (heavy whipping cream and powdered sugar): For a light, airy finish that balances out the rich filling.
Variations
I love that this Pumpkin Pie Bars Recipe is flexible. Over the years, I’ve tweaked it to suit different tastes and dietary needs, so feel free to play with it—you can’t really go wrong!
- Gluten-free version: I swapped in a 1-to-1 gluten-free baking flour blend for the all-purpose flour and my family still couldn’t tell the difference.
- Vegan adaptation: Use vegan butter and a flax egg instead of regular eggs; the texture is slightly different but still delicious.
- Spice it up: I sometimes throw in a pinch of nutmeg or ground ginger to the pumpkin filling for extra warmth and complexity.
- No whipped cream topping: For a simpler approach, dust the bars with cinnamon sugar before baking instead of adding cream.
How to Make Pumpkin Pie Bars Recipe
Step 1: Prep and Press the Shortbread Crust
Start by preheating your oven to 350°F and lining a 9×9 inch pan with parchment paper that hangs over the edges—trust me, this makes lifting the bars out a breeze later on. Using a stand mixer fitted with the paddle attachment, cream your room-temperature butter with both sugars until light and fluffy—this usually takes about 3 minutes. Scrape down the sides so everything blends evenly. Then add in your egg and vanilla for flavor. When adding the dry ingredients, mix just until the dough pulls away from the bowl; overmixing can make your crust tough, and we want tender shortbread here. Press the dough evenly into the pan using the bottom of a measuring cup for a smooth finish. Bake for about 15 minutes until the edges show a slight golden brown hue and the center is just set but not raw. I’ve found watching the color is key here—you don’t want it too brown or underdone.
Step 2: Whisk Up That Pumpkin Filling
While your crust cools slightly, bump up your oven to 400°F. In a large bowl, whisk together pumpkin puree, heavy cream, eggs, brown and granulated sugars, and vanilla until smooth and well combined. Then add cornstarch, pumpkin pie spice, cinnamon, and salt – these last few ingredients really elevate the flavors and help the texture. Whisk again until everything is fully incorporated. This step is where the magic happens as your filling becomes velvety and luscious.
Step 3: Bake Like a Pro
Pour the filling gently over your pre-baked shortbread crust and place the whole pan on a baking sheet to catch any drips. Bake initially at 400°F for 15 minutes to help set the edges, then reduce the temp to 350°F and bake for another 40 minutes or so. You’ll know it’s done when the edges look set and the center still has a slight jiggle—don’t worry, it’ll firm up as it cools. Overbaking can dry out your filling, so err on the side of gentle doneness. Once out of the oven, let it cool for about an hour before refrigerating for at least 3 hours or overnight so the filling fully sets.
Step 4: Whip Up That Creamy Topping
As your bars chill, whip your heavy cream with powdered sugar until firm peaks form—a quick job using a mixer but incredibly rewarding. I keep mine chilled until right before serving so the whipped cream holds its shape beautifully. When ready, spread or dollop on the bars with a dusting of nutmeg if you like that extra hint of spice.
Pro Tips for Making Pumpkin Pie Bars Recipe
- Use parchment paper with overhang: This is the best trick for removing the bars in one beautiful slab without breaking.
- Don’t overmix your dough: It helps keep the shortbread crust tender and crumbly, which contrasts perfectly with the creamy filling.
- Watch your bake times: That slight jiggle in the center means you nailed the texture; overbaking dries out the filling.
- Chill thoroughly: Refrigerate for several hours or overnight for clean slicing and the best flavor melding.
How to Serve Pumpkin Pie Bars Recipe
Garnishes
I’m a fan of topping these bars with fresh whipped cream right before serving—it just lightens the rich filling. Sometimes I sprinkle a little freshly grated nutmeg or cinnamon on top for that extra cozy vibe. If you want to get fancy, a drizzle of caramel sauce or chopped toasted pecans add wonderful texture and flavor contrast.
Side Dishes
These bars shine as a standalone dessert, but if you want to turn it into a full fall-themed spread, I love pairing them with a simple cup of spiced apple cider or hot coffee. For a brunch or afternoon tea, they’re great alongside a light green salad with cranberries, or even a scoop of vanilla ice cream if you fancy an indulgent treat.
Creative Ways to Present
For holiday gatherings, I like to cut the bars into small bite-sized squares and serve them on a beautiful wooden board with edible flowers or fresh mint for color. Another fun twist is layering a few bars with layers of whipped cream and crushed ginger snaps in a trifle bowl—guaranteed to wow your guests!
Make Ahead and Storage
Storing Leftovers
Store your Pumpkin Pie Bars Recipe in an airtight container in the fridge, where they’ll stay fresh for up to 4 days. I like to cut them into squares and layer parchment between to keep them neat and easy to grab for snacks or dessert.
Freezing
If you want to make these in advance for a party, I recommend freezing the bars before you add the whipped cream topping. Wrap them tightly with plastic wrap and foil to prevent freezer burn. When thawed at room temperature, they’ll taste just as good as fresh.
Reheating
I don’t typically reheat these bars since they’re best served chilled, but if you prefer them slightly warmed, a quick 10–15 second zap in the microwave works—just watch that the whipped cream doesn’t melt too much. Otherwise, popping them in the fridge for a few hours is the way to go for the best texture.
FAQs
-
Can I use fresh pumpkin instead of canned pumpkin puree for this Pumpkin Pie Bars Recipe?
Yes! You can use fresh pumpkin, but make sure to roast it until soft and then puree it until smooth. Also, fresh pumpkin has higher water content, so you might need to cook it down a bit or strain excess moisture for the best texture in these bars.
-
How do I prevent the crust from getting soggy under the pumpkin filling?
Pre-baking the shortbread crust helps set it firmly, and baking the filled bars at a higher temperature initially seals the crust’s edges to prevent sogginess. Also, allowing the bars to chill thoroughly before slicing helps stabilize everything.
- Can I make the whipped cream topping ahead of time?
Whipped cream tastes best fresh, but you can make it a few hours ahead and keep it chilled tightly covered in the fridge. I wouldn’t recommend making it days in advance as it can lose volume and turn watery.
- Is it okay if the center of the bars jiggle a bit when done baking?
Absolutely! A slight jiggle means the filling is perfectly set but still creamy. It will firm up as it cools and refrigerates, so don’t overbake trying to get it completely solid in the oven.
Final Thoughts
This Pumpkin Pie Bars Recipe has truly become one of my go-to desserts for the fall season and beyond. It’s got all the flavors of pumpkin pie with a texture that’s easier to handle and make ahead, perfect for busy hosts or home bakers looking to impress. I remember the first time I made it for a holiday party—the compliments kept rolling in! So if you want a dessert that tastes like a warm hug, sliced and ready to share, give this one a try. You won’t regret it.
Print
Pumpkin Pie Bars Recipe
- Prep Time: 15 minutes
- Cook Time: 55 minutes
- Total Time: 70 minutes
- Yield: 16 squares
- Category: Dessert
- Method: Baking
- Cuisine: American
Description
Delicious and creamy Pumpkin Pie Bars featuring a buttery shortbread crust topped with a spiced pumpkin filling and finished with a light whipped cream topping. Perfect for fall gatherings and holiday celebrations, these bars combine classic pumpkin pie flavors in an easy-to-serve bar format.
Ingredients
Shortbread Crust
- 1/2 cup (113 g) unsalted butter, room temperature
- 1/4 cup (50 g) granulated sugar
- 1/4 cup (50 g) light brown sugar, packed
- 1 egg, room temperature
- 1 teaspoon vanilla extract
- 1 1/2 cups plus 2 tablespoons (205 g) all-purpose flour, spooned and leveled
- 1/2 teaspoon baking powder
- 1/2 teaspoon ground cinnamon
- 1/8 teaspoon kosher salt
Pumpkin Filling
- 1 15–ounce can pumpkin puree (not pumpkin pie filling)
- 1 1/4 cups (10 ounces) heavy cream
- 3 large eggs
- 1/2 cup (100 g) light brown sugar, packed
- 1/3 cup (66 g) granulated sugar
- 2 teaspoons vanilla
- 1 tablespoon cornstarch
- 1 teaspoon pumpkin pie spice
- 1 teaspoon cinnamon
- 1 teaspoon salt
Whipped Cream Topping
- 1 cup heavy whipping cream
- 2 tablespoons powdered sugar
Instructions
- Prepare Shortbread Crust: Preheat the oven to 350°F. Line a 9 x 9 inch baking pan with parchment paper, allowing the sides to extend over the edges by 2 inches for easy removal. In a stand mixer fitted with the paddle attachment, cream the butter and sugars for 3 minutes until light and fluffy. Scrape the bowl sides.
- Add Egg and Vanilla: Add the egg and vanilla extract to the creamed mixture and mix until fully combined.
- Mix Dry Ingredients: Combine flour, baking powder, cinnamon, and salt in a separate bowl. Add these dry ingredients to the wet mixture and mix just until the dough pulls away from the bowl sides. Avoid over mixing.
- Shape and Bake Crust: Press the dough evenly into the prepared pan using the bottom of a measuring cup to press into corners and smooth the top. Bake at 350°F for about 15 minutes until edges are slightly golden and center is barely set. Remove and set aside to cool slightly.
- Increase Oven Temperature: Raise the oven temperature to 400°F while preparing the filling.
- Make Pumpkin Filling: In a large bowl, whisk together pumpkin puree, heavy cream, eggs, brown sugar, granulated sugar, and vanilla until smooth. Add cornstarch, pumpkin pie spice, cinnamon, and salt, whisking well to combine.
- Assemble and Bake: Pour the pumpkin filling over the pre-baked crust. Place the pan on a large baking sheet for stability. Bake at 400°F for 15 minutes, then reduce heat to 350°F and bake for an additional 40 minutes until edges are set and the center still slightly jiggles.
- Cool and Chill: Remove from oven and cool on a wire rack for 45 to 60 minutes. Then refrigerate for at least 3 hours or overnight to fully set the bars.
- Prepare Whipped Cream Topping: Using a stand or hand mixer fitted with a whisk attachment, whip the heavy cream and powdered sugar on medium-high speed until firm peaks form, about 2 minutes. Keep chilled until serving.
- Serve: Top chilled pumpkin bars with whipped cream swirls and a sprinkle of nutmeg. Slice into 16 squares and serve.
Notes
- Store bars tightly covered in the refrigerator for up to 4 days. Serve chilled for best texture and flavor.
- The bars may be frozen without the whipped cream topping. Freeze bars first, then defrost at room temperature before serving and adding fresh whipped cream.
Nutrition
- Serving Size: 1 bar (assuming 16 bars per recipe)
- Calories: 280
- Sugar: 18 g
- Sodium: 150 mg
- Fat: 18 g
- Saturated Fat: 10 g
- Unsaturated Fat: 7 g
- Trans Fat: 0.2 g
- Carbohydrates: 27 g
- Fiber: 2 g
- Protein: 3 g
- Cholesterol: 75 mg
