
If you’re looking for a fun and festive appetizer that’s guaranteed to get smiles at your next holiday gathering, the Rudolph Cheese Ball Recipe is an absolute winner. I absolutely love how this turns a simple cheese ball into a playful centerpiece inspired by everyone’s favorite red-nosed reindeer. It’s perfect for bringing a little whimsy and cheer to your party table without spending hours in the kitchen.
When I first tried this Rudolph Cheese Ball Recipe, I was surprised at how easy it was to throw together but still impress everyone with its flavor and presentation. The combination of creamy cheddar and zesty horseradish mustard feels both comforting and a little unexpected, making it a crowd-pleaser for folks who usually just nibble on plain cheese dips. You’ll find that this recipe not only looks adorable but also tastes fantastic alongside crackers and crunchy snacks.
Why You’ll Love This Recipe
- Festive and Fun: The Rudolph design adds a playful touch that guests love to talk about and snap photos of.
- Easy to Make: With simple ingredients and straightforward steps, you’ll have it ready in no time.
- Bold Flavors: The horseradish mustard and Worcestershire sauce add zing that balances creamy cheese perfectly.
- Versatile Serving: Goes great with crackers, pretzels, chips, or veggie sticks for crowd-pleasing appetizers.

Ingredients You’ll Need
This Rudolph Cheese Ball Recipe combines classic creamy and sharp cheeses with punchy seasonings, while the pecan coating adds a delightful crunch. These ingredients work perfectly together to create a rich, textured appetizer that’s as tasty as it is cute.
- Cream Cheese: Make sure it’s softened to room temperature for easy mixing and smooth texture.
- Sharp Cheddar Cheese: Sharp cheddar gives bold flavor—feel free to shred it yourself for freshness!
- Horseradish Mustard: Adds a spicy kick, but you can adjust based on your heat preferences.
- Worcestershire Sauce: Brings a little umami depth that complements the cheese wonderfully.
- Garlic Powder and Onion Powder: These pantry staples give a subtle savory punch without overpowering.
- Crushed Pecans: For a crunchy coating that contrasts nicely with the creamy interior.
- Cherry Tomato: Perfect bright ‘red nose’ for Rudolph’s signature look.
- Black Olives: Used for the eyes, add fun character to your cheese ball.
- Twisted Pretzels: Easy-to-handle antlers that add whimsical flair.
Variations
I love that you can easily customize the Rudolph Cheese Ball Recipe to fit your taste or dietary needs without losing any of its festive charm. Don’t hesitate to play around with the base or decorations to make it feel personalized for your crowd.
- Spicy Variation: I once added a bit of cayenne pepper for extra heat, which my family absolutely loved during a chilly winter party.
- Nut-Free Option: Swap crushed pecans with crushed crackers or seeds if you need to avoid nuts—still crunchy and delicious!
- Cheese Blend: Mixing in some smoked gouda or pepper jack adds a new layer of flavor that’s fun to experiment with.
- Vegetarian Worcestershire: Use a vegetarian Worcestershire sauce to keep this recipe fully vegetarian-friendly.
How to Make Rudolph Cheese Ball Recipe
Step 1: Mix the Cheeses and Seasonings
Start by combining the softened cream cheese, shredded sharp cheddar, horseradish mustard, Worcestershire sauce, garlic powder, and onion powder in a large bowl. I like to use a hand mixer or sturdy spoon to blend everything until it’s evenly mixed and smooth. You’ll want to avoid lumps, so take your time—this initial blending really sets the stage for a creamy, flavorful cheese ball.
Step 2: Shape and Chill the Cheese Ball
Once the mixture is combined, transfer it onto a large piece of plastic wrap. Using the wrap helps you shape the cheese into a neat, round ball without getting your hands too messy. Pop it into the fridge for at least an hour — this step is crucial because chilling firms it up, making it easier to roll in the coating and decorate later.
Step 3: Coat with Crushed Pecans
After the cheese ball has chilled and is firm, it’s time to roll it in the crushed pecans. I find it easiest to place the nuts in a shallow bowl or plate, then gently roll the cheese ball so the nuts stick evenly all around. Press lightly with your hands to make sure the coating adheres well. This is one of my favorite parts because the nuts add a lovely texture contrast — your guests will notice that crunch!
Step 4: Decorate Your Rudolph Cheese Ball
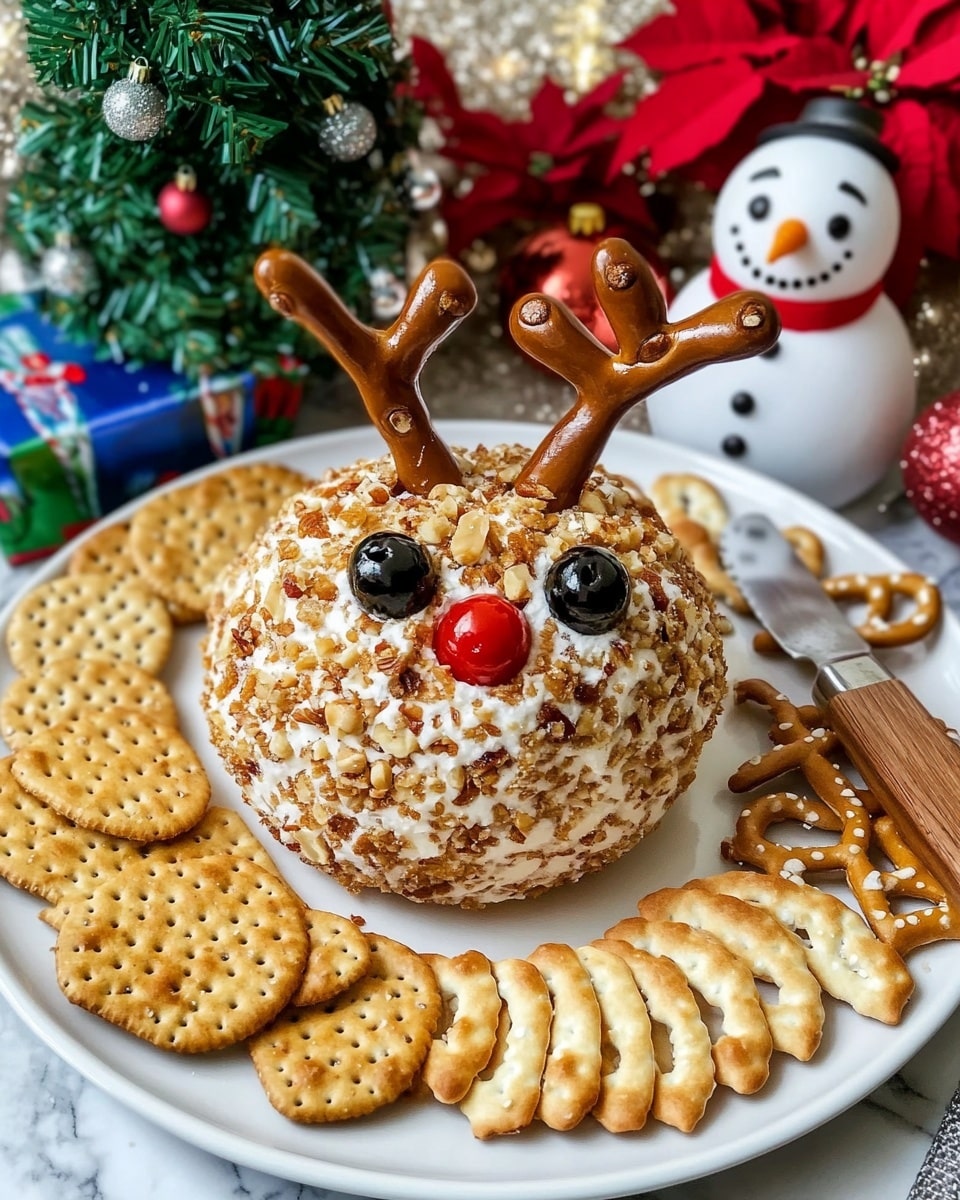
This is the fun step where your cheese ball really comes to life. Use two black olives as the eyes, a bright red cherry tomato for the shiny nose, and a couple of twisted pretzels for antlers. Pro tip: use your fingers to gently press small indents in the cheese ball so the olives and tomato sit securely without rolling off. It’s those little touches that make serving this so joyful and eye-catching on your table.
Pro Tips for Making Rudolph Cheese Ball Recipe
- Use Room Temperature Cream Cheese: It blends smoother with cheddar and spices, preventing lumps in your mixture.
- Chill Thoroughly: Don’t rush the refrigeration step; a well-chilled cheese ball holds its shape and makes decorating way easier.
- Crush Pecans Finely: Coarse nuts can fall off; finer crumbs stick better and ensure a uniform crunch.
- Indentations Help Secure Decor: Press gently before adding olives and tomato so they don’t slide around during serving.
How to Serve Rudolph Cheese Ball Recipe
Garnishes
I personally stick with the classic olive eyes, cherry tomato nose, and pretzel antlers—it’s simple and instantly recognizable. Sometimes I sprinkle a little extra crushed pecans or paprika on the serving plate for color and texture. If you want, fresh parsley or rosemary sprigs around the base can add a piney holiday vibe that guests really enjoy.
Side Dishes
We love pairing this Rudolph Cheese Ball Recipe with an assortment of crackers—everything from buttery water crackers to crunchy multigrain varieties. Pretzels, of course, mimic the antlers and add extra crunch, while sliced veggies like cucumber, bell peppers, and carrots keep things fresh and colorful. This variety keeps everyone happy and the spread looking inviting.
Creative Ways to Present
For holiday parties, I’ve arranged the cheese ball on a festive wooden board surrounded by red and green grapes, rosemary sprigs, and tiny ornaments to turn it into a winter wonderland scene. Another time, I placed individual mini cheese balls in clear cups with pretzel sticks as “antlers” sticking out—guests loved both the creativity and the personal portion size. These little presentation tricks make your Rudolph Cheese Ball not just an appetizer but a holiday conversation starter!
Make Ahead and Storage
Storing Leftovers
After your party, wrap any leftover Rudolph Cheese Ball tightly in plastic wrap and store it in the fridge. It keeps well for about 3-4 days. I always label it so I remember to use it for a quick snack or sandwich spread later in the week—waste not, right?
Freezing
Freezing isn’t my go-to for this cheese ball because textures can change once thawed, making it a bit crumbly. But if you need to freeze, wrap tightly in plastic and place in an airtight container. Thaw overnight in the fridge before serving and expect a slight difference in texture, but the flavor will still be great.
Reheating
I actually prefer to serve the Rudolph Cheese Ball cold, so reheating isn’t really necessary. If you want a softer texture, you can leave it at room temperature for 15-20 minutes before serving. Avoid microwaving, as it risks melting the cheese and losing the festive shape and crunch.
FAQs
-
Can I make the Rudolph Cheese Ball Recipe ahead of time?
Absolutely! In fact, making it the day before helps the flavors meld beautifully. Just refrigerate and decorate right before serving for best presentation.
-
What can I use instead of crushed pecans?
If you have nut allergies or want a different texture, crushed crackers, pretzel crumbs, or toasted breadcrumbs make great alternatives that keep the crunch.
-
Can I use other cheeses in this recipe?
Definitely! While sharp cheddar is classic, experimenting with smoked gouda, pepper jack, or even a bit of parmesan can add unique twists to your Rudolph Cheese Ball.
-
How do I keep the decorations from falling off?
Using your fingers to press indentations where the olives and cherry tomato will go creates a little ‘seat’ for them to stay put, which I’ve found really helps during serving and transport.
Final Thoughts
This Rudolph Cheese Ball Recipe has become a favorite in my holiday rotation because it combines simplicity with festive fun in a way that guests of all ages appreciate. I know you’ll enjoy how quickly it comes together and how much it lights up any party spread. Give it a try—you’ll probably find yourself making it year after year just like I do!
Print
Rudolph Cheese Ball Recipe
- Prep Time: 5 minutes
- Cook Time: 0 minutes
- Total Time: 1 hour 5 minutes
- Yield: 16 servings
- Category: Appetizer
- Method: No-Cook
- Cuisine: American
Description
This festive Rudolph Cheese Ball is a delightful appetizer perfect for holiday parties. Creamy cream cheese blended with sharp cheddar and a kick of hot horseradish mustard, coated in crunchy crushed pecans, and decorated to resemble Rudolph the Red-Nosed Reindeer. It’s easy to prepare, makes a fun centerpiece, and pairs wonderfully with crackers, pretzels, chips, or veggie sticks.
Ingredients
Main Ingredients
- 8 oz Cream Cheese, softened to room temperature
- 2 cups Sharp Cheddar Cheese, shredded
- 2 tbsp Silver Springs Beer’n Brat Hot Horseradish Mustard or any variety of hot horseradish mustard
- 1 tbsp Worcestershire Sauce
- 1/2 tsp Garlic Powder
- 1/2 tsp Onion Powder
- 1/2 cup Crushed Pecans (for coating)
For Decorating
- 1 Cherry Tomato (red nose)
- 2 Black Olives (eyes)
- 2 Twisted Pretzels (antlers)
Instructions
- Mix the Cheese Base: In a large mixing bowl, combine the softened cream cheese, shredded sharp cheddar cheese, hot horseradish mustard, Worcestershire sauce, garlic powder, and onion powder. Mix thoroughly until the mixture is smooth and evenly blended.
- Shape and Chill: Transfer the combined cheese mixture onto a piece of plastic wrap. Use the plastic wrap to help form the mixture into a round ball shape. Wrap tightly and place in the refrigerator for at least 1 hour to allow the cheese ball to firm up and hold its shape.
- Coat with Pecans: Remove the chilled cheese ball from the refrigerator and unwrap it. Roll the cheese ball gently in the crushed pecans, pressing slightly to make sure the nuts adhere well and coat the entire surface evenly.
- Decorate the Cheese Ball: Use your fingers to make small indents on the cheese ball for placing the decorative components. Insert two black olives to serve as eyes, a cherry tomato for the red nose, and twisted pretzels on top to represent antlers, creating Rudolph’s festive face.
- Serve: Present the Rudolph Cheese Ball on a serving platter accompanied by crackers, pretzels, chips, or vegetable sticks for dipping. Enjoy this festive and delicious appetizer with your guests!
Notes
- For best results, ensure the cream cheese is fully softened to room temperature before mixing to avoid lumps.
- The hot horseradish mustard can be substituted with any variety you prefer for different heat levels.
- This cheese ball can be made a day ahead; just cover tightly and refrigerate until ready to serve.
- Feel free to customize the coating by using crushed almonds, walnuts, or even paprika for a color variation.
- Use fresh vegetables or different types of crackers as dippers to suit dietary preferences.
Nutrition
- Serving Size: 2 tablespoons
- Calories: 120
- Sugar: 1 g
- Sodium: 180 mg
- Fat: 10 g
- Saturated Fat: 4 g
- Unsaturated Fat: 5 g
- Trans Fat: 0 g
- Carbohydrates: 2 g
- Fiber: 0.5 g
- Protein: 5 g
- Cholesterol: 25 mg


