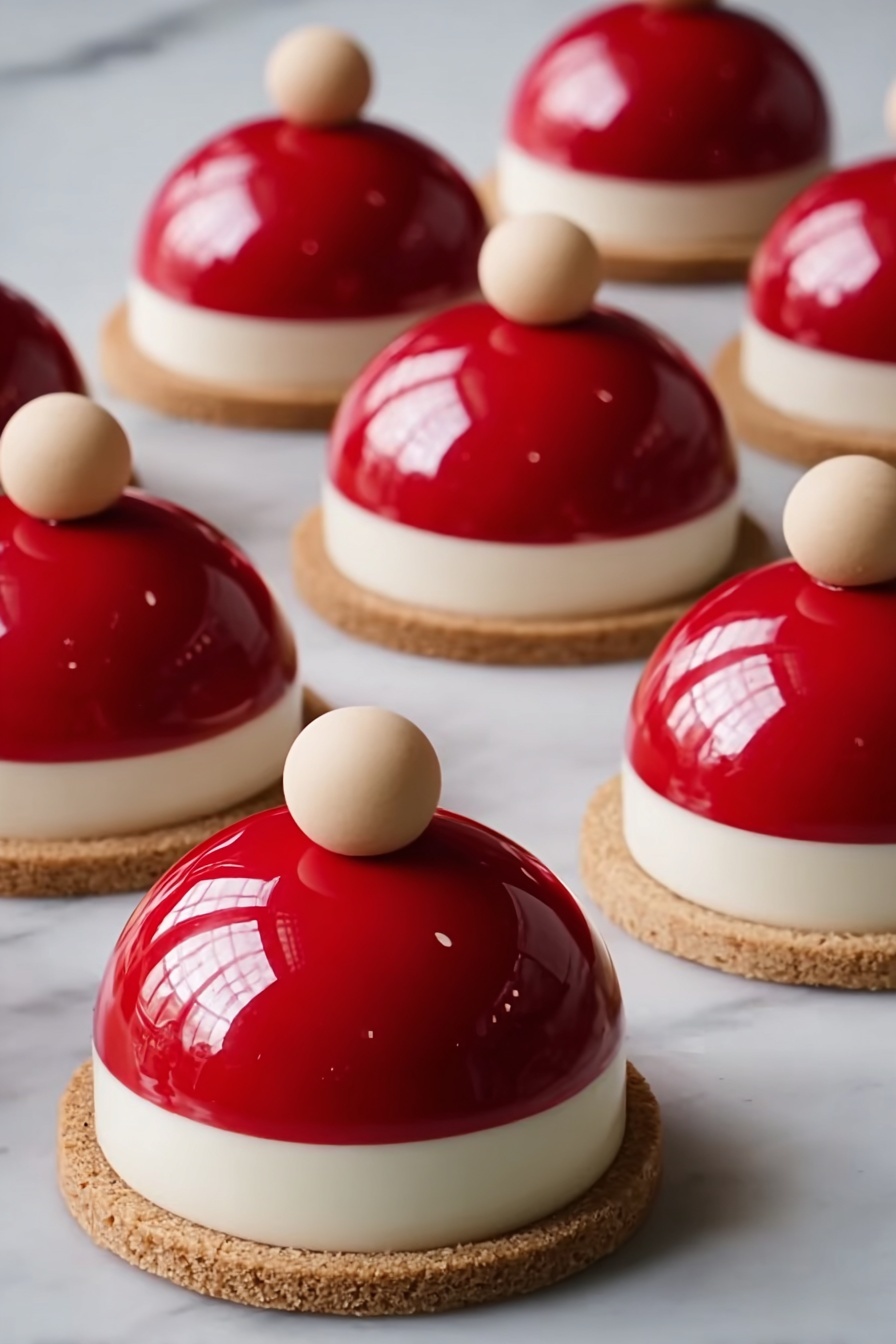
If you’re looking to wow your friends and family this holiday season with something that’s as visually stunning as it is delicious, then you’re in the right place. I’m so excited to share my Santa Claus Dome Cakes Recipe — these adorable little desserts are a feast for the eyes and the palate, combining smooth vanilla mousse, fresh strawberries, and a glossy red mirror glaze. Trust me, once you try this recipe, it’ll become a Christmas tradition that you’ll keep coming back to year after year.
Why You’ll Love This Recipe
- Visual Wow Factor: The shiny red mirror glaze gives these domes a beautiful, festive look that’s perfect for holiday celebrations.
- Light and Creamy: The vanilla mousse is silky and delicate, perfectly balanced by the fresh strawberries inside.
- Playful Presentation: The combination of the dome shape with the sable cookie base creates a fun texture contrast you and your guests will appreciate.
- Make Ahead Friendly: These can be frozen and glazed just before serving, making your holiday prep stress-free.

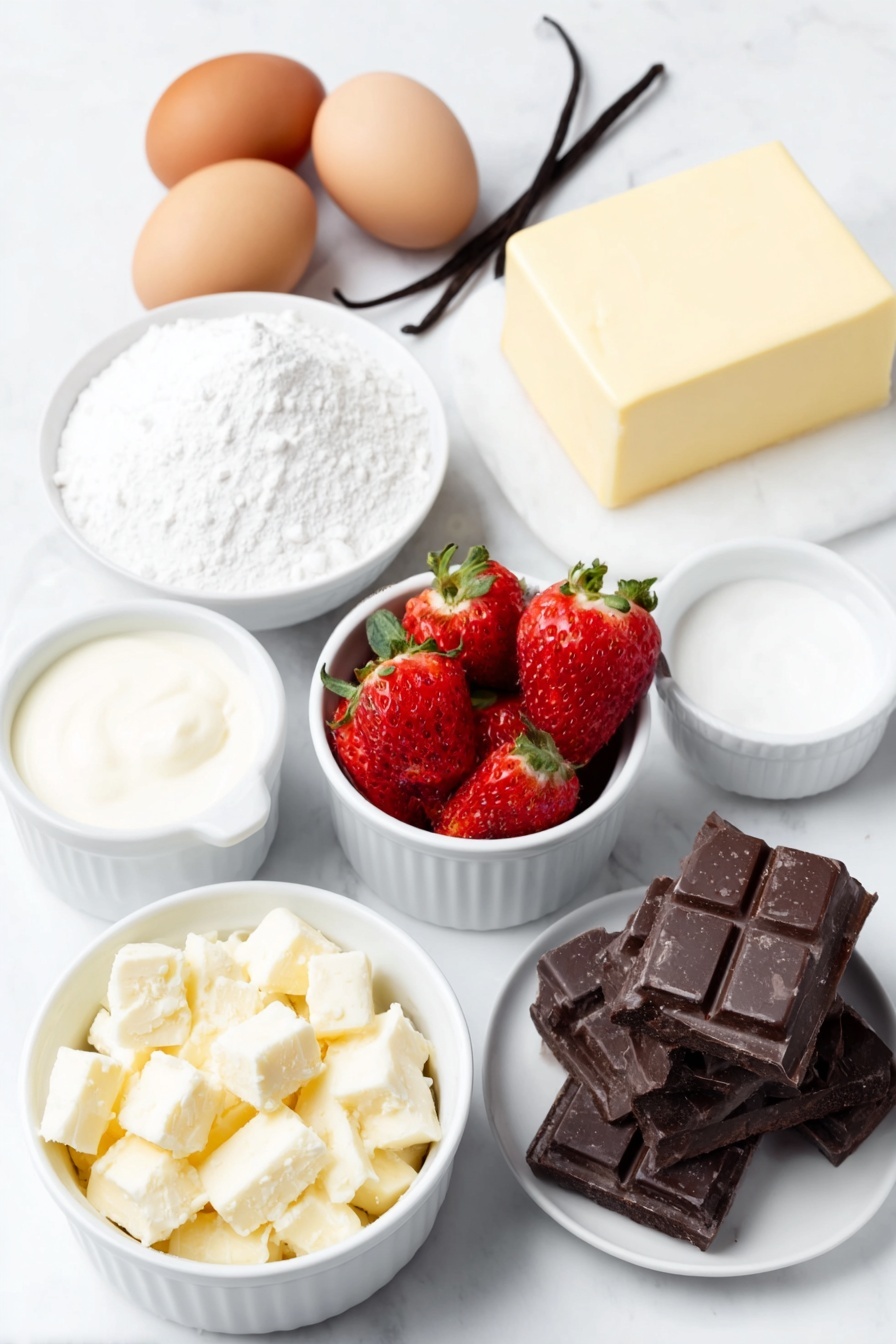
Ingredients You’ll Need
The magic behind this Santa Claus Dome Cakes Recipe is in the harmony of simple, quality ingredients. Each component—from the creamy mousse to the crisp sable cookie and the vibrant mirror glaze—works together for that ultimate festive bite. When shopping, aim for fresh strawberries and pure vanilla for the best flavor.
- Heavy cream: Use cold heavy cream for perfect whipping every time.
- Whole milk: This keeps the mousse light and creamy without being too rich.
- Vanilla bean or pure vanilla extract: Fresh vanilla bean adds the best aroma, but extract works well if you’re short on time.
- Egg yolks: These give the custard base a rich, luscious texture.
- Granulated sugar: For sweetness and structure in the mousse and glaze.
- Powdered gelatin: Essential for setting the mousse and making that glossy mirror glaze.
- Fresh strawberries: Small, sweet ones without the stems are perfect to nestle inside the mousse domes.
- Unsalted butter: Room temperature for the sable cookie base to ensure it’s creamy when mixed.
- Powdered sugar: Makes the sable dough silky and tender.
- All-purpose flour: The foundation of the sable cookie for a buttery crunch.
- Salt: Just a pinch to balance the sweetness and enhance flavors.
- Glucose syrup: This makes the glaze shiny and smooth—look for it in baking aisles or online.
- Sweetened condensed milk: Adds a creamy richness to the glaze.
- White chocolate: Finely chopped for the glaze and decorations.
- Red gel food coloring: For that vibrant Santa red glaze.
Variations
I love making these domes just as is, but the Santa Claus Dome Cakes Recipe is super versatile—feel free to get creative and tailor it to your taste or dietary needs. Here’s how I’ve played around with this dessert to keep it fresh and exciting.
- Berry swap: I once used raspberries or blueberries in place of strawberries for a different fruity pop, and that was a huge hit with my family.
- Dairy-free alternative: Try using coconut cream instead of heavy cream and a plant-based milk to make a vegan version — just be sure to check your gelatin source or swap it for agar-agar.
- Chocolate twist: Adding a little melted dark chocolate to the mousse changes the flavor profile beautifully without overwhelming the freshness.
- Miniature domes: For parties, I made bite-sized domes using smaller molds and got rave reviews for the portion control and cuteness.
How to Make Santa Claus Dome Cakes Recipe
Step 1: Bloom the Gelatin for the Mousse
Start by combining 6 grams of powdered gelatin with 30 milliliters of cold water in a small bowl. Let it sit for about 10 minutes until it becomes fully bloomed—that means it’ll look soft and expanded. This step is important because it ensures the gelatin dissolves smoothly later, without lumps.
Step 2: Heat the Milk and Infuse Vanilla
Pour whole milk into a saucepan and add your vanilla bean (split and scraped) or vanilla extract. Warm the milk gently over medium heat—watch carefully and remove it from the heat just before it reaches a boil. You want the vanilla to infuse the milk, which gives your mousse a gorgeous fragrance.
Step 3: Prepare the Egg Yolk Mixture
In a mixing bowl, whisk together the egg yolks and granulated sugar until the mixture turns pale and slightly thick. This is your custard’s base and takes a bit of elbow grease to get the right consistency, but it’s worth it for that creamy texture.
Step 4: Cook the Custard Base
Slowly pour the warm milk into the egg yolk mixture, whisking constantly to combine without scrambling the eggs. Pour this mixture back into the saucepan and cook over low heat, stirring gently until it reaches 82°C (about 180°F). You’ll notice it thickens slightly, just enough to coat the back of a spoon—this is the perfect custard stage.
Step 5: Incorporate Gelatin and Cool
Remove the custard from heat and stir in the bloomed gelatin until completely dissolved. This is key to setting your mousse properly. Then, let the custard cool down to room temperature before moving on—rushing this part can cause texture issues later.
Step 6: Fold in Whipped Cream
Whip your cold heavy cream to soft peaks—don’t overdo it or the mousse will be too stiff. Gently fold the whipped cream into the cooled custard using a spatula in slow, sweeping motions to keep everything light and airy.
Step 7: Fill Molds with Mousse & Strawberries
Spoon a little mousse into your silicone dome molds, just enough to cover the bottom. Press a whole small strawberry, stem removed, into the center, then cover with more mousse until the mold is filled. Smooth out the surface with a spatula or your finger for a nice finish.
Step 8: Freeze the Mousse Domes
Pop the dome molds into the freezer and let them set overnight or at least for 8 hours. This step is essential if you want your domes to maintain their shape during glazing and slicing.
Step 9: Make the Sablé Cookie Base
While the domes freeze, prepare the cookie base: cream together room-temperature unsalted butter and powdered sugar until smooth and fluffy. Add the egg yolk and vanilla extract, then stir in flour and a pinch of salt until it comes together as a soft dough.
Step 10: Roll and Chill the Dough
Roll the dough between two sheets of parchment paper to about 4 mm thickness. Chill it in the fridge for about 30 minutes—this makes it easier to cut clean rounds and keeps the cookie crisp after baking.
Step 11: Bake the Cookie Bases
Cut out rounds slightly larger than your dome molds and place them on a parchment-lined baking sheet. Bake at 170°C (340°F) for 12–14 minutes until just lightly golden. Let cool completely before assembly.
Step 12: Bloom Gelatin for the Mirror Glaze
Combine 10 grams powdered gelatin with 60 milliliters water and let it bloom for 10 minutes just like with the mousse gelatin. This will give that glossy, firm finish on your domes.
Step 13: Heat Syrup Base for Glaze
In a saucepan, bring sugar, glucose syrup, and water to a boil, cooking until the thermometer hits 103°C (217°F). This precise temperature ensures your glaze sets beautifully without being too runny or too stiff.
Step 14: Finish and Color the Glaze
Remove the syrup from heat and whisk in sweetened condensed milk and the bloomed gelatin until smooth and fully incorporated. Pour over the chopped white chocolate; let it sit for a minute, then blend everything with an immersion blender for a perfect silky texture. Add red gel food coloring drop by drop until you reach a vibrant Santa hat red color. Cool the glaze to 32–35°C (90–95°F) before pouring it over your frozen domes—this temperature helps the glaze set in a beautiful, shiny coat.
Pro Tips for Making Santa Claus Dome Cakes Recipe
- Use Silicone Dome Molds: They make unmolding your domes a breeze without any cracks or breaks.
- Control the Glaze Temperature: Pour the glaze only when it’s between 32–35°C to get that mirror finish without melting the mousse.
- Freeze Thoroughly: Don’t rush glazing—overnight freeze ensures your domes stay perfectly shaped and ready.
- Be Gentle Folding the Cream: Fold slowly to keep the mousse airy and fluffy, which balances with the cookie base beautifully.
How to Serve Santa Claus Dome Cakes Recipe

Garnishes
I like to finish these domes with a simple white chocolate ring and a small white chocolate ball on top—I melt and pipe my own decorations for that homemade charm. It gives a nice snowy look that really sells the Santa hat vibe. Fresh mint leaves or a dusting of powdered sugar are also lovely touches if you want to go simpler.
Side Dishes
These dome cakes shine as a centerpiece, so I keep the sides light with a crisp peppermint-infused salad or a small scoop of vanilla bean ice cream. A hot cup of mulled wine or spiced tea pairs beautifully as well to balance the sweetness.
Creative Ways to Present
I’ve also arranged a platter of these domes nestled in fresh pine sprigs and dusted with edible glitter for holiday parties. For kids, placing a tiny Santa figurine next to each one turns dessert into a whimsical experience that everyone loved at our last Christmas gathering.
Make Ahead and Storage
Storing Leftovers
If you have any leftovers (which is rare in my house!), keep the dome cakes in an airtight container in the freezer. They hold up well for several days without losing their texture or shine.
Freezing
Because the mousse domes freeze well, I often make them a couple of days in advance. After glazing, leave them frozen until you’re ready to serve. Just be sure to thaw them in the fridge for a few hours before eating for that perfect melt-in-your-mouth consistency.
Reheating
These cakes aren’t meant to be reheated like traditional cakes. Instead, just let them thaw gently in the fridge, and the mousse will return to its smooth, creamy texture. Avoid room temperature thawing to keep your glaze intact.
FAQs
-
Can I make the Santa Claus Dome Cakes Recipe without gelatin?
Gelatin is essential in this recipe to help the mousse set and to provide that glossy mirror glaze. However, if you prefer a vegetarian alternative, you can use agar-agar, but be mindful that it can change the texture slightly and needs different preparation (usually boiling). Experiment in small batches first to get the right firmness.
-
How long does the mirror glaze take to set?
The mirror glaze sets quite quickly once poured over frozen domes—usually within 10 to 15 minutes in the fridge. Just make sure the domes are completely frozen before glazing to avoid melting.
-
Can I prepare the sable cookie base in advance?
Absolutely. You can bake the sable cookies a day or two ahead and store them in an airtight container at room temperature. They maintain their crispness beautifully and make assembling your domes even easier.
-
What size mold should I use for the domes?
I recommend silicone molds about 6 to 7 cm in diameter to get that perfect individual portion size. This size balances the mousse, strawberry center, and cookie base well, making each bite delightful.
-
How do I prevent the mousse from being too runny?
Make sure to bloom your gelatin properly and incorporate it fully into the warm custard base before folding in whipped cream. Also, chilling and freezing the domes thoroughly before glazing is crucial for structure.
Final Thoughts
Making the Santa Claus Dome Cakes Recipe became one of my favorite holiday rituals because it brings together stunning looks, luscious flavors, and a bit of festive magic in every bite. It can be a bit of a project, but I honestly love how this turns out—it’s like gifting your loved ones a little work of edible art. Give it a try, take your time, and don’t be afraid to personalize it. I can’t wait for you to experience the joy these domes bring to your table and see the smiles when they’re served.
Print
Santa Claus Dome Cakes Recipe
- Prep Time: 1 hour 30 minutes
- Cook Time: 15 minutes
- Total Time: 13 hours 45 minutes
- Yield: 6 domes
- Category: Dessert
- Method: Freezing and Baking (primary cooking method is freezing to set mousse domes combined with baking for cookie bases)
- Cuisine: French-inspired
Description
Santa Claus Dome Cakes are delightful individual desserts featuring creamy vanilla mousse spheres with a fresh strawberry center, set atop crisp sablé cookie bases and finished with a shiny red mirror glaze and elegant white chocolate decorations. Perfect for festive celebrations, these elegant dome-shaped treats combine smooth textures and bright holiday colors in every bite.
Ingredients
Vanilla Mousse
- 300 ml heavy cream (cold)
- 250 ml whole milk
- 1 vanilla bean or 2 tsp pure vanilla extract
- 3 egg yolks
- 80 g granulated sugar
- 6 g powdered gelatin (about 2 tsp) + 30 ml cold water
- 6–8 fresh strawberries (small, stem removed)
Sablé Cookie Base
- 120 g unsalted butter (room temperature)
- 80 g powdered sugar
- 1 egg yolk
- 200 g all-purpose flour
- Pinch of salt
- 1 tsp vanilla extract
Red Mirror Glaze
- 150 g sugar
- 150 g glucose syrup
- 75 ml water
- 100 g sweetened condensed milk
- 150 g white chocolate (finely chopped)
- 10 g powdered gelatin + 60 ml water
- Red gel food coloring
Decorations
- 100 g white chocolate for the ring and ball
Instructions
- Bloom the Gelatin for the Mousse: Combine 6 g powdered gelatin with 30 ml cold water in a small bowl and let sit for 10 minutes until fully bloomed.
- Heat the Milk and Infuse Vanilla: In a saucepan, heat the whole milk and vanilla (bean or extract) over medium heat until warm but not boiling. Remove from heat once warmed through.
- Prepare the Egg Yolk Mixture: In a separate bowl, whisk the egg yolks and granulated sugar until pale and slightly thickened.
- Cook the Custard Base: Slowly pour the warm milk over the egg mixture while whisking constantly. Return the mixture to the saucepan and cook over low heat, stirring gently, until it reaches 82°C (180°F) and thickens slightly.
- Incorporate Gelatin and Cool: Remove the custard from heat, stir in the bloomed gelatin until fully dissolved, and let cool to room temperature.
- Fold in Whipped Cream: Whip the cold heavy cream to soft peaks, then gently fold it into the cooled custard base until smooth and fully combined.
- Fill Molds with Mousse and Strawberries: Spoon a small amount of mousse into each silicone dome mold, press one whole strawberry into the center, and cover with additional mousse until the mold is filled. Smooth the tops.
- Freeze the Mousse Domes: Transfer the molds to the freezer and freeze overnight until completely solid.
- Make the Sablé Cookie Dough: Cream the butter and powdered sugar together in a bowl until smooth. Add the egg yolk and vanilla, then mix in the flour and salt until a dough forms.
- Roll and Chill the Dough: Roll the dough between two sheets of parchment paper to a 4 mm thickness. Chill in the refrigerator for 30 minutes.
- Bake the Cookie Bases: Cut rounds slightly larger than your dome molds and place them on a baking sheet lined with parchment. Bake at 170°C (340°F) for 12–14 minutes until lightly golden. Cool completely.
- Bloom the Gelatin for the Glaze: In a small bowl, combine 10 g powdered gelatin with 60 ml water and let bloom for 10 minutes.
- Heat Syrup Base for Glaze: In a saucepan, bring sugar, glucose syrup, and water to a boil and cook until it reaches 103°C (217°F).
- Finish the Glaze: Remove the syrup from heat and stir in sweetened condensed milk and the bloomed gelatin until fully dissolved. Pour over chopped white chocolate and let sit for 1 minute.
- Blend and Color the Glaze: Use an immersion blender to blend the mixture until smooth. Add red gel food coloring until it reaches a bright Santa hat red. Let cool to 32–35°C (90–95°F) before using.
- Glaze the Frozen Mousse Domes: Remove the mousse domes from molds and quickly pour the cooled mirror glaze over them to coat evenly. Let glaze set.
- Assemble and Decorate: Place each glazed dome onto a sablé cookie base. Melt white chocolate and pipe or sculpt rings and small balls to decorate as festive accents on top of the domes.
Notes
- Make sure to fully bloom gelatin to avoid lumps in the mousse and glaze.
- The mousse domes must be fully frozen before glazing to get a smooth mirror finish.
- Use silicone molds for easy unmolding of mousse domes.
- Rolling dough between parchment paper prevents sticking and makes handling easier.
- Color the mirror glaze gradually until desired bright red is achieved for a vibrant Santa look.
- Use fresh, small strawberries for best presentation inside the mousse.
- Chilling the sablé dough before baking ensures crisp cookies with good structure.
- For best results, serve the domes slightly chilled but not frozen solid after glazing.
Nutrition
- Serving Size: 1 dome
- Calories: 420 kcal
- Sugar: 35 g
- Sodium: 70 mg
- Fat: 25 g
- Saturated Fat: 15 g
- Unsaturated Fat: 8 g
- Trans Fat: 0 g
- Carbohydrates: 40 g
- Fiber: 2 g
- Protein: 6 g
- Cholesterol: 110 mg


