
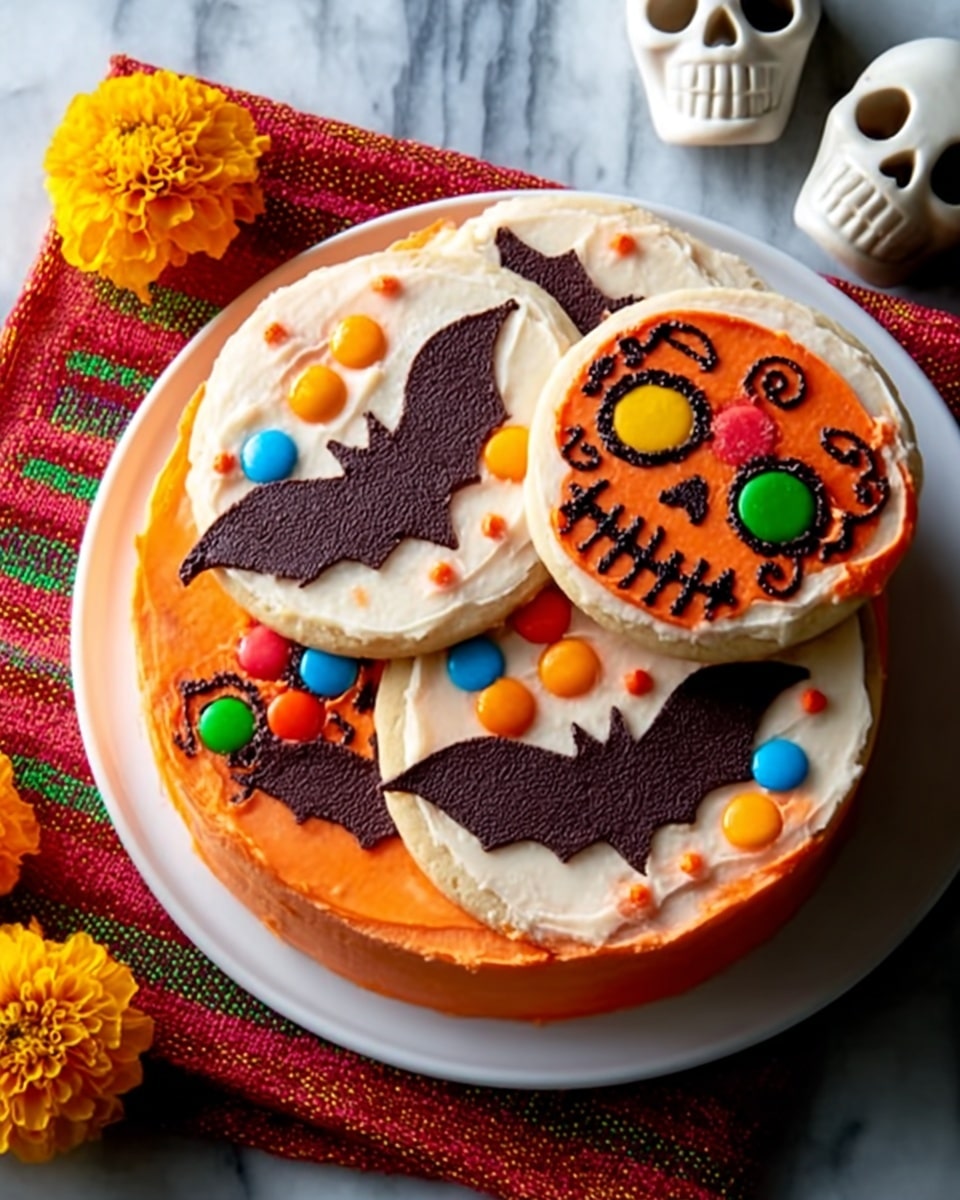
If you’re looking for a Halloween treat that’s both fun and effortless, you’re going to adore this So-Easy-It’s-Spooky Bat Cake Recipe. I absolutely love how this cake combines simple ingredients with a show-stopping bat design that will wow everyone—perfect for a spooky celebration without any of the fuss. Stick with me, and I’ll share all the tips to make it turn out perfectly every time.
Why You’ll Love This Recipe
- Super Simple Prep: You use a store-bought cake mix, which means minimal fuss and maximum fun.
- Eye-Catching Design: The bat silhouette is impressive but easy to do with just a cardboard template and some powdered sugar or cocoa.
- Delicious Flavor Combo: The contrast between the chocolate and orange frostings makes this cake taste as amazing as it looks.
- Family Favorite: My kids always get excited to help with decorating and gobble up every last crumb!

Ingredients You’ll Need
Getting the ingredients right is the first step toward a cake that tastes as good as it looks. The devil’s food or orange cake mix lays a rich, moist base, while the homemade frostings bring in the classic Halloween flavors. Here’s what I use and why.
- Devil’s food or orange cake mix: The devil’s food mix gives you that deep chocolate flavor, but orange adds a festive twist if you want a bright pop of color.
- Orange food coloring: Optional, but I love using it in the orange cake to get that vibrant Halloween glow.
- Confectioners’ sugar: This is the backbone of both frostings—keep it sifted to avoid clumps and get that silky-smooth finish.
- Butter: Softened butter creates the perfect creamy base for both frostings, so don’t forget to let it sit out beforehand.
- Vanilla extract: Just a little enhances the overall flavor without stealing the show.
- Baking cocoa: Use dutch-processed cocoa for richer chocolate frosting and dusting.
- 2% milk: Helps achieve the perfect spreading consistency for your frostings—don’t swap it for skim or whole unless you’re ready to tweak the texture.
- Peanut butter cups: Chopped and sprinkled between layers for a little surprise crunch and flavor boost.
- Dutch-processed cocoa or confectioners’ sugar: For dusting your bat silhouette for that flawless spooky finish.
Variations
I love making this So-Easy-It’s-Spooky Bat Cake Recipe my own—I encourage you to do the same! Whether you tweak flavors or switch up decorations, it’s all about making it yours and having fun.
- Flavor swap: Once I made this with a spice cake mix and cream cheese frosting, which gave a cozy, autumn vibe that was a huge hit with my family.
- Diet-friendly: For a gluten-free version, use a gluten-free cake mix and double-check your frostings; they adapt easily.
- Decor twist: Instead of peanut butter cups, try mini candy corn or Halloween sprinkles between layers for a colorful surprise.
- Difficulty level: If you want a no-decorate version, just crumb-coat the cake with chocolate frosting and dust the top with cocoa—still spooky but quicker!
How to Make So-Easy-It’s-Spooky Bat Cake Recipe
Step 1: Bake Your Cake Mix Perfectly
Start by preparing your cake mix according to the package instructions—this doesn’t get any simpler. If you opt for the orange cake, don’t forget to stir in that orange food coloring to get that festive hue. I always use two 9-inch round pans so the layers are even, which is key for stacking your bat shape later. Once baked, cool your cakes completely—warm cake = frosting mess, trust me on this.
Step 2: Make Your Frostings
The frosting is where the magic happens. If you went with devil’s food cake, whip up the orange frosting by beating together confectioners’ sugar, softened butter, vanilla, a splash of orange food coloring, and just enough milk to get a creamy, spreadable consistency. For orange cake, mix the chocolate frosting ingredients, sifting cocoa beforehand for smoothness. I like to taste-test here—feel free to tweak the sweetness or thickness, you’re in control.
Step 3: Level and Layer Your Cake
Use a serrated knife to gently trim any domed tops off your cakes so that your layers stack evenly. Place one cake layer on your serving plate, spread about a cup of frosting on top, then sprinkle the chopped peanut butter cups all over for little bursts of buttery goodness. Carefully place the second layer upside down to create a flat top for your bat design.
Step 4: Frost the Outside and Chill
Spread your remaining frosting evenly over the top and sides of your cake. This is where your cake starts to really come together visually. Pop it into the fridge for at least 30 minutes to let the frosting firm up; this makes the final decorating step a breeze.
Step 5: Add the Bat Silhouette
Create a bat template from cardstock—don’t worry, I usually find one online and print it out. Wrap it tightly in foil to keep it clean. Once your cake is chilled, carefully lay the template on top. Using a fine-mesh strainer, dust either Dutch-processed cocoa or confectioners’ sugar over the template. Slowly lift the pattern straight up (no shaking!) to reveal your spooky bat image. This bit feels like magic every time!
Pro Tips for Making So-Easy-It’s-Spooky Bat Cake Recipe
- Use Room Temperature Ingredients: Having your butter and milk at room temp makes frosting smooth and easy to spread without tearing the cake.
- Chill Before Decorating: Refrigerate your frosted cake for at least 30 minutes so the surface sets—dusting the bat silhouette won’t smudge.
- Cut Template Carefully: When cutting your bat shape, use small, precise scissors and take your time for clean edges.
- Lift Template Gently: Remove the foil pattern slowly and straight up to avoid smudging the powdered sugar or cocoa design.
How to Serve So-Easy-It’s-Spooky Bat Cake Recipe
Garnishes
I love adding little Halloween touches like edible glitter or a ring of mini candy pumpkins around the base of the cake for an extra festive vibe. Sometimes I’ll pipe small orange or black frosting dots along the edge to make it look polished—it’s an easy way to up your presentation game without extra work.
Side Dishes
This bat cake pairs beautifully with simple sides like a warm cup of spiced cider or a fresh fruit salad to balance the richness. For a party, I often set it next to a platter of pumpkin-shaped sugar cookies or some spooky popcorn for a full Halloween spread.
Creative Ways to Present
One year, I arranged the bat cake on a black cake stand surrounded by faux spider webs and little plastic spiders for a fun creepy-cute display. You can also set it on a platter with battery-operated fairy lights underneath for a glowing effect—your guests will love the vibe!
Make Ahead and Storage
Storing Leftovers
I wrap leftover cake tightly in plastic wrap and then place it in an airtight container in the fridge. It usually stays fresh for up to 4 days, which is plenty of time for me to sneak a slice or two when no one’s watching!
Freezing
To freeze, I slice the cake into individual portions, wrap each piece (frosting and all) in plastic wrap, then put them in a freezer bag. When you’re ready to enjoy, let the slices thaw overnight in the fridge—it freezes surprisingly well and tastes just like fresh!
Reheating
When reheating frozen slices, I let them soften at room temperature for a bit, then microwave in short bursts (about 10 seconds) to warm without melting the frosting. This keeps the texture moist while still maintaining that cake-and-frosting magic.
FAQs
-
Can I make this So-Easy-It’s-Spooky Bat Cake Recipe without peanut butter cups?
Absolutely! The peanut butter cups add a nice surprise texture and flavor, but you can swap them out for any chopped chocolate candies, nuts, or even fruit bits. It’s easy to customize depending on your family’s preferences or allergies.
-
Is the card stock bat template reusable?
Yes! Wrapping the template in foil protects it from frosting and moisture, so you can clean off any residue and reuse it for years. I store mine in a folder with other holiday decorations.
-
What if I don’t have two 9-inch round pans?
You can bake the cake in one pan and slice it horizontally into two layers once cooled. Just take your time cutting to keep the layers even. Alternatively, cupcake-sized versions of this recipe are a fun, portable option for parties.
-
Can I prepare the cake a day ahead?
Definitely! I often bake and frost the cake the day before and refrigerate it overnight. Just bring it back to room temperature before serving for the best flavor and texture.
-
What’s the best way to get a sharp line with the bat stencil?
Use a fine-mesh sieve to dust the cocoa or powdered sugar evenly, and don’t shake it too hard. Lift the stencil straight up without wiggling to keep the edges crisp—patience really makes this step shine.
Final Thoughts
Making this So-Easy-It’s-Spooky Bat Cake Recipe has become a staple in my Halloween celebrations—it’s quick enough to whip up after a busy day but impressive enough to wow guests and kids alike. I love sharing how simple it is to create something that looks professionally done with just a few homemade touches. If you give it a try, I bet you’ll find it just as rewarding (and delicious!) as I have. Happy baking and spooky decorating!
Print
So-Easy-It’s-Spooky Bat Cake Recipe
- Prep Time: 25 minutes + chilling time
- Cook Time: 25 minutes
- Total Time: 50 minutes + 30 minutes chilling
- Yield: 16 servings
- Category: Dessert
- Method: Baking
- Cuisine: American
Description
This So-Easy-It’s-Spooky Bat Cake is a fun and festive dessert perfect for Halloween or any spooky occasion. Featuring a devil’s food or orange cake base with vibrant orange or rich chocolate frosting, this cake is decorated with a striking bat silhouette created by sifting cocoa or powdered sugar over a bat-shaped stencil. The addition of chopped peanut butter cups between layers adds a surprise twist of flavor and texture. The recipe offers simple steps and yields a moist, flavorful cake that serves 16 people.
Ingredients
Cake
- 1 devil’s food or orange cake mix (regular size)
- 1 teaspoon orange food coloring (optional, for orange cake)
Orange Frosting
- 4-2/3 cups confectioners’ sugar
- 1 cup butter, softened
- 2 teaspoons vanilla extract
- Orange food coloring, as needed
- 6 to 7 tablespoons 2% milk
Chocolate Frosting
- 4 cups confectioners’ sugar
- 2/3 cup baking cocoa, sifted
- 1 cup butter, softened
- 2 teaspoons vanilla extract
- 6 to 7 tablespoons 2% milk
Additional Decorations
- 10 peanut butter cups, finely chopped
- Dutch-processed cocoa or confectioners’ sugar (for dusting)
- Card stock for bat pattern
- Foil (to wrap bat pattern)
Instructions
- Prepare Cake: Follow the package directions to prepare and bake the cake mix using two 9-inch round baking pans. If making the orange cake version, add 1 teaspoon of orange food coloring to the batter. Bake as directed, then cool the cakes completely according to the package instructions.
- Create Bat Pattern: Draw or print a bat silhouette on a piece of card stock and carefully cut it out. Wrap the bat pattern in foil to keep it sturdy and allow for easy handling during dusting.
- Make Frosting: For devil’s food cake, prepare the orange frosting by beating together confectioners’ sugar, softened butter, vanilla extract, orange food coloring, and enough 2% milk to achieve a smooth, spreadable consistency. For orange cake, prepare the chocolate frosting by combining confectioners’ sugar, sifted baking cocoa, softened butter, vanilla extract, and 2% milk until smooth and spreadable.
- Trim and Assemble: Using a long serrated knife, level the tops of the cooled cakes if they have domed. Place one cake layer on a serving plate. Spread about 1 cup of the chosen frosting evenly over the top, then sprinkle the chopped peanut butter cups over the frosting layer. Position the second cake layer on top, inverted so the bottom is facing up.
- Frost the Cake: Use the remaining frosting to cover the top and sides of the assembled cake thoroughly. Smooth the frosting to create an even surface.
- Chill: Refrigerate the frosted cake for about 30 minutes to allow the frosting to set and firm up for decorating.
- Decorate with Bat Silhouette: Once chilled, place the foil-wrapped bat pattern gently onto the top center of the cake. Using a fine-mesh strainer, sift Dutch-processed cocoa or confectioners’ sugar evenly over the cake surface and bat stencil. Carefully lift the bat pattern straight up to reveal the bat shape in contrast to the dusted background.
Notes
- Use either devil’s food or orange cake mix depending on your desired flavor and frosting pairing.
- Adjust the amount of food coloring in frosting to get a vivid orange hue.
- Leveling the cake layers ensures an even stacking and a professional look.
- Chilling the cake before decorating helps the powdered cocoa or sugar adhere cleanly.
- Wrap the bat stencil in foil to prevent cake crumbs from sticking and to make lifting easier.
- For a richer flavor, use Dutch-processed cocoa when dusting rather than confectioners’ sugar.
- Ensure the peanut butter cups are finely chopped to evenly distribute texture without large chunks.
Nutrition
- Serving Size: 1 slice (1/16 of cake)
- Calories: 360 kcal
- Sugar: 38 g
- Sodium: 210 mg
- Fat: 18 g
- Saturated Fat: 10 g
- Unsaturated Fat: 6 g
- Trans Fat: 0.5 g
- Carbohydrates: 47 g
- Fiber: 2 g
- Protein: 4 g
- Cholesterol: 50 mg


