
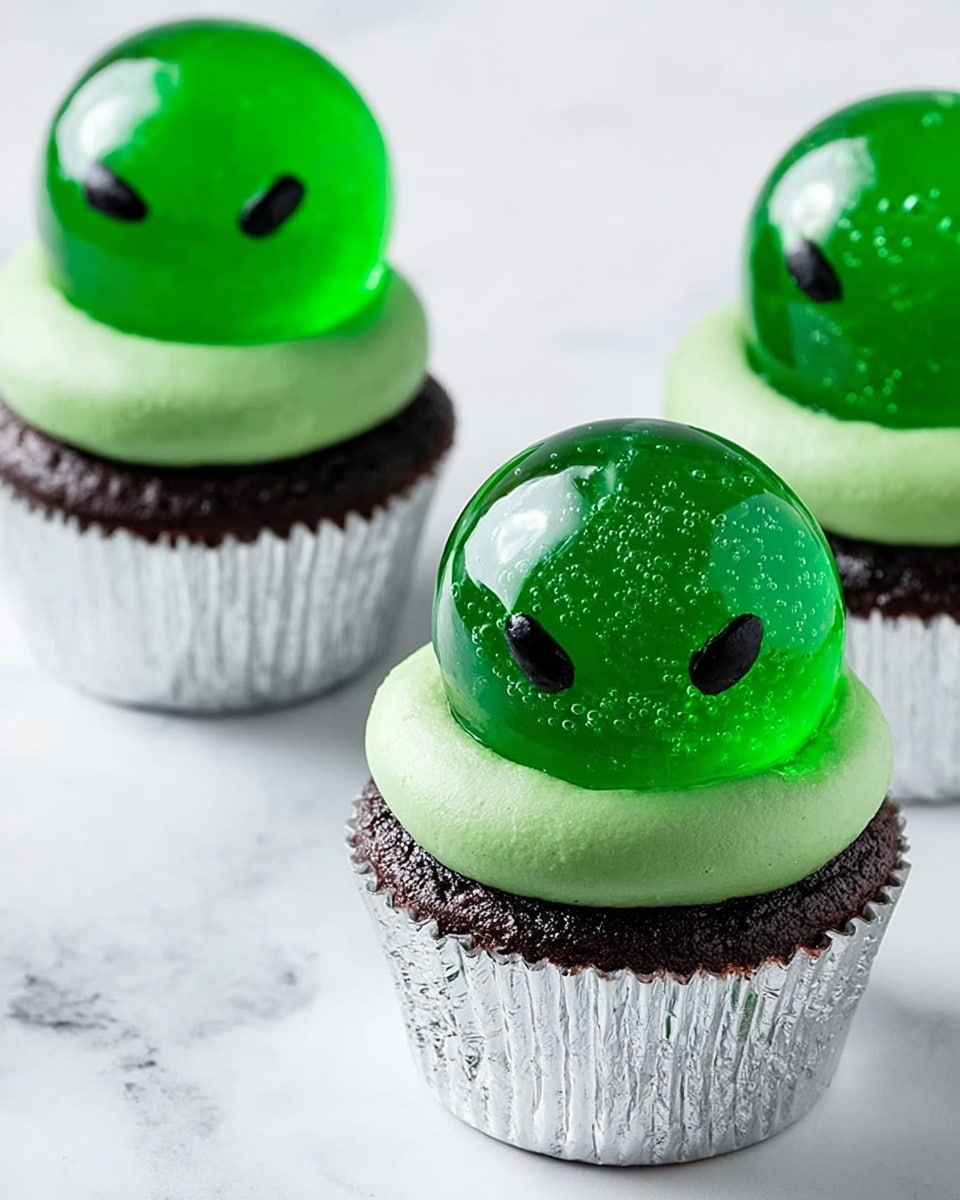
If you’re looking to wow your friends or family this Halloween with something unique and delightfully spooky, I absolutely love sharing this Spooky Gelatin Bubble Cupcakes Recipe. It’s one of those recipes that feels like a party trick but is surprisingly simple. You’ll find that the gelatin bubbles look like eerie translucent orbs perched atop cupcakes, giving you that Halloween magic without hours in the kitchen. I remember the first time I made these bubbles, my kids were totally amazed, thinking I’d conjured something out of a witch’s cauldron!
Why You’ll Love This Recipe
- Visually Stunning: The clear gelatin bubbles perched on cupcakes look like little haunted orbs, perfect for Halloween fun.
- Easy to Make: It only takes about 5 minutes prep, but with an overnight drying, giving you plenty of time to get other things ready.
- Kid-Friendly Fun: Great for involving the little ones who love watching the bubbles take shape.
- Customizable Decorations: The black decorating gel turns simple bubbles into spooky eyes, spiders, or creepy designs that thrill everyone.

Ingredients You’ll Need
The ingredients here are straightforward but work in perfect harmony to create those hauntingly beautiful bubbles. Picking the right gelatin is important to get a firm but delicate bubble, and using water balloons as molds adds a fun, 3D effect. Plus, a little black decorating gel brings those ghostly bubbles to life.
- Wooden pop sticks: These act as handles for the bubbles—look for thin ones to insert easily.
- Water balloons: Air-filled works best for easy removal; choose colors that contrast well to enhance bubble appearance.
- Water: The base liquid for the gelatin—use clean, warm water for quicker dissolving.
- Food coloring: Just a few drops add spooky tint to the bubbles without overwhelming their transparent look.
- Unflavored gelatin: This gives structure to the bubble—avoid flavored ones to keep the taste neutral.
- Black decorating gel: Essential for turning plain gelatin bubbles into creepy eyes or spiders.
- Frosted cupcakes: Your base to serve the bubbles on—I like vanilla or chocolate with simple frosting so the bubbles stand out.
Variations
I love that you can really make this Spooky Gelatin Bubble Cupcakes Recipe your own! Need it to be gluten-free? No problem. Want to add a little Halloween flair with different colors or flavors? Absolutely. Here are some ideas I’ve tried or want you to try!
- Flavored Gelatin Bubbles: I once added a tiny bit of fruit juice to the water instead of plain water for a subtle flavor in the bubbles. It’s subtle but adds complexity.
- Different Food Coloring: Red or green bubbles create a creepy vibe if you’re going for a blood or slime effect—my family goes crazy for the green slime look.
- Vegan Option: Use agar-agar powder as a substitute for gelatin, but expect a slightly firmer texture; this lets vegan friends join the fun.
- Mini Cupcakes: Try making mini versions for a party platter. The bubbles look even more magical on bite-sized treats.
How to Make Spooky Gelatin Bubble Cupcakes Recipe
Step 1: Prepare Your Bubble Molds
Start by inflating 3 to 4 water balloons with air to the size you want your gelatin bubbles. Insert wooden pop sticks through the tied ends of these balloons carefully—this acts like a handle and keeps the balloons sturdy while dipping. Pro tip: don’t overfill the balloons; you want them to be firm but not stretched too thin or they might pop easily.
Step 2: Mix Up Your Gelatin
In a microwave-safe bowl that’s a bit larger than your largest balloon, stir together 4 tablespoons of water with 2 to 3 drops of food coloring until you get your desired spooky tint. Sprinkle 2 tablespoons of unflavored gelatin over the colored water and let it bloom for a minute or two. Then, microwave it on high for about 15 seconds and stir until the gelatin dissolves completely—you want a smooth, lump-free mixture.
Step 3: Create and Dry Gelatin Bubbles
Hold each balloon by its pop stick and dip it into the gelatin mixture, turning slowly to coat evenly. Allow the excess to drip back into the bowl. Then, carefully insert each stick into a foam block or stand so the bubbles can dry upright overnight. This is the key moment—I always let mine dry a full 12 hours to make sure they’re firm and hold their shape without any sticky mess.
Step 4: Remove Balloons and Decorate
The next day, gently pierce the balloons inside each gelatin bubble with a pin and carefully pull out the popped balloons. If the openings seem uneven, trim with scissors for a clean edge. Now the fun part: decorate your bubbles using black decorating gel—think spooky eyes, spiders, or creepy faces. I love how a simple swirl or dot transforms these into characters that haunt the cupcakes perfectly.
Step 5: Assemble Your Cupcakes
Place each decorated gelatin bubble gently on a frosted cupcake. I like to use a spoon to help lift the bubbles onto the frosting without breaking them. Once they’re all perched, your spooky display is ready to impress!
Pro Tips for Making Spooky Gelatin Bubble Cupcakes Recipe
- Gentle Balloon Handling: Handle the air-filled balloons carefully—any sharp nails or rough surfaces can cause premature popping.
- Drying Patience: Don’t rush drying; letting bubbles set fully overnight results in sturdier, more manageable bubbles.
- Color Control: Start with just a drop or two of food coloring—you can always add more but can’t take it out once mixed.
- Storage: Keep cupcakes with gelatin bubbles refrigerated and uncovered to avoid condensation that can make bubbles soggy.
How to Serve Spooky Gelatin Bubble Cupcakes Recipe
Garnishes
I love to add extra creepy flair with black decorating gel — you can paint on spider webs, angry eyes, or creepy mouths right on the bubbles. Sometimes I sprinkle edible glitter or pearl dust for an eerie shimmer that catches the light just right. For that extra spooky touch, mini candy bones or edible eyeballs around the base of the cupcake elevate the presentation.
Side Dishes
For a Halloween spread, I pair these cupcakes with some blood-red berry punch and a cheese platter shaped like monster fingers. They’re also brilliant with simple treats like popcorn balls or caramel apples—easy eats that balance the fancy look of these cupcakes without competing for attention.
Creative Ways to Present
One of my favorite presentation tricks is to arrange the cupcakes on a black tray lined with dry ice; the fog creeps around the bubbles, making them look even more supernatural. Another time, I placed them inside small glass cloches sealed with “potion” labels for a spooky laboratory vibe. These little details make your Spooky Gelatin Bubble Cupcakes stand out at any Halloween party.
Make Ahead and Storage
Storing Leftovers
My experience is to store leftover cupcakes without the gelatin bubbles on top in an airtight container in the fridge. The bubbles can get a bit sticky or lose their shape if stored on top for too long. It’s best to add the bubbles fresh right before serving if you plan on saving some for the next day.
Freezing
I don’t recommend freezing the cupcakes with gelatin bubbles as the texture and clarity suffer. However, you can freeze the cupcakes separately, then add fresh bubbles after thawing. This keeps the spooky bubbles looking their best.
Reheating
Since these cupcakes are best served chilled, I usually let refrigerated cupcakes come to room temperature before serving, but I avoid reheating as it can melt the frosting and the gelatin bubbles won’t handle heat well. Cold or room temp is definitely the way to keep the magic intact.
FAQs
-
Can I use water-filled balloons instead of air-filled for the gelatin bubbles?
While water balloons might seem like the obvious choice, air-filled balloons are actually better because the gelatin mixture dries faster and holds its shape more easily. Water balloons slow drying and can make the gelatin stick, plus they’re harder to pop inside the bubble without spills.
-
How long can I store the gelatin bubbles once they’re made?
Gelatin bubbles are best used within 24 hours after drying to keep their firmness and clarity. Beyond that, they risk becoming brittle or sticky. Store them upright in a cool, dry place away from humidity to extend their shelf life a little.
-
What if my gelatin bubbles break while removing the balloons?
If some bubbles crack, don’t worry—practice makes perfect. Try gently piercing the balloons in multiple small spots and pulling the balloon material out slowly. Also, ensure your gelatin mix isn’t too thin; letting it dry fully is key to sturdiness.
-
Can I add flavor to the gelatin for tastier bubbles?
You can add a tiny amount of fruit juice or flavored extracts to the water before mixing gelatin, but don’t go overboard or it may affect the gelatin’s ability to set. I usually keep the bubbles neutral since the cupcake’s frosting is the real treat.
Final Thoughts
This Spooky Gelatin Bubble Cupcakes Recipe has totally changed how I approach Halloween treats. It’s simple, creative, and the reactions always make it worth the little bit of extra effort. If you want to impress guests or just have a hands-on, fun kitchen adventure, give this recipe a try. You’ll enjoy the process as much as the spooky, delicious results—trust me, once you’ve made these, your Halloween parties will never be the same!
Print
Spooky Gelatin Bubble Cupcakes Recipe
- Prep Time: 10 minutes
- Cook Time: 15 seconds microwaving, plus drying overnight
- Total Time: overnight drying plus 10 minutes prep
- Yield: 3 to 4 gelatin bubble cupcakes
- Category: Dessert
- Method: Microwaving with drying method
- Cuisine: American
Description
Create a spooky Halloween treat with these gelatin bubble cupcakes. Air-filled gelatin bubbles resembling eerie bubbles sit atop frosted cupcakes, providing a fun and creepy decoration perfect for parties. The bubbles are made by coating water balloons with a colorful gelatin mixture, allowing them to dry overnight, and then carefully removing the balloons to reveal delicate gelatin spheres that sit on your cupcakes with a playful, spooky charm.
Ingredients
For Gelatin Bubbles
- 3 to 4 wooden pop sticks
- 3 to 4 water balloons, filled with air
- 4 tablespoons water
- 2 to 3 drops food coloring
- 2 tablespoons unflavored gelatin
For Decoration
- Black decorating gel
- 3 to 4 frosted cupcakes
Instructions
- Prepare Balloon Sticks: Insert wooden pop sticks through the tied ends of the air-filled water balloons and set them aside carefully to avoid popping.
- Make Gelatin Mixture: In a bowl slightly larger than the biggest balloon, combine 4 tablespoons of water and 2 to 3 drops of food coloring. Stir in 2 tablespoons of unflavored gelatin until well combined.
- Microwave Gelatin: Microwave the gelatin mixture on high for 15 seconds. Stir well until the mixture is smooth with no lumps.
- Dip Balloons into Gelatin: Holding a pop stick, dip each balloon into the gelatin mixture, turning it to coat the entire surface evenly. Allow the excess gelatin to drip off the balloon.
- Set Up for Drying: Insert the pop stick into a foam block or other upright support to keep the coated balloons upright as they dry. Repeat the dipping and drying setup for all balloons.
- Dry Overnight: Let the gelatin-coated balloons dry completely overnight at room temperature until hardened.
- Remove Balloons: Carefully pierce the dried gelatin bubbles to release the air from the balloons. Gently remove the balloon from inside the hardened gelatin shell.
- Trim and Decorate: Using scissors, trim the openings of the gelatin bubbles if needed for a cleaner edge. Use black decorating gel to add spooky designs or details onto the bubbles.
- Serve: Place the finished gelatin bubbles on top of the frosted cupcakes and serve as a creepy, fun Halloween dessert.
Notes
- Be gentle when removing the balloons to avoid cracking the gelatin bubbles.
- Use a foam block or similar material to hold the balloons upright while drying.
- Choose vibrant food coloring to make the bubbles more visually striking.
- Allow sufficient drying time overnight for best results.
- This recipe is a decorative dessert suitable for Halloween or themed parties.
Nutrition
- Serving Size: 1 cupcake with gelatin bubble
- Calories: 250
- Sugar: 20g
- Sodium: 150mg
- Fat: 12g
- Saturated Fat: 4g
- Unsaturated Fat: 6g
- Trans Fat: 0g
- Carbohydrates: 30g
- Fiber: 1g
- Protein: 3g
- Cholesterol: 15mg

