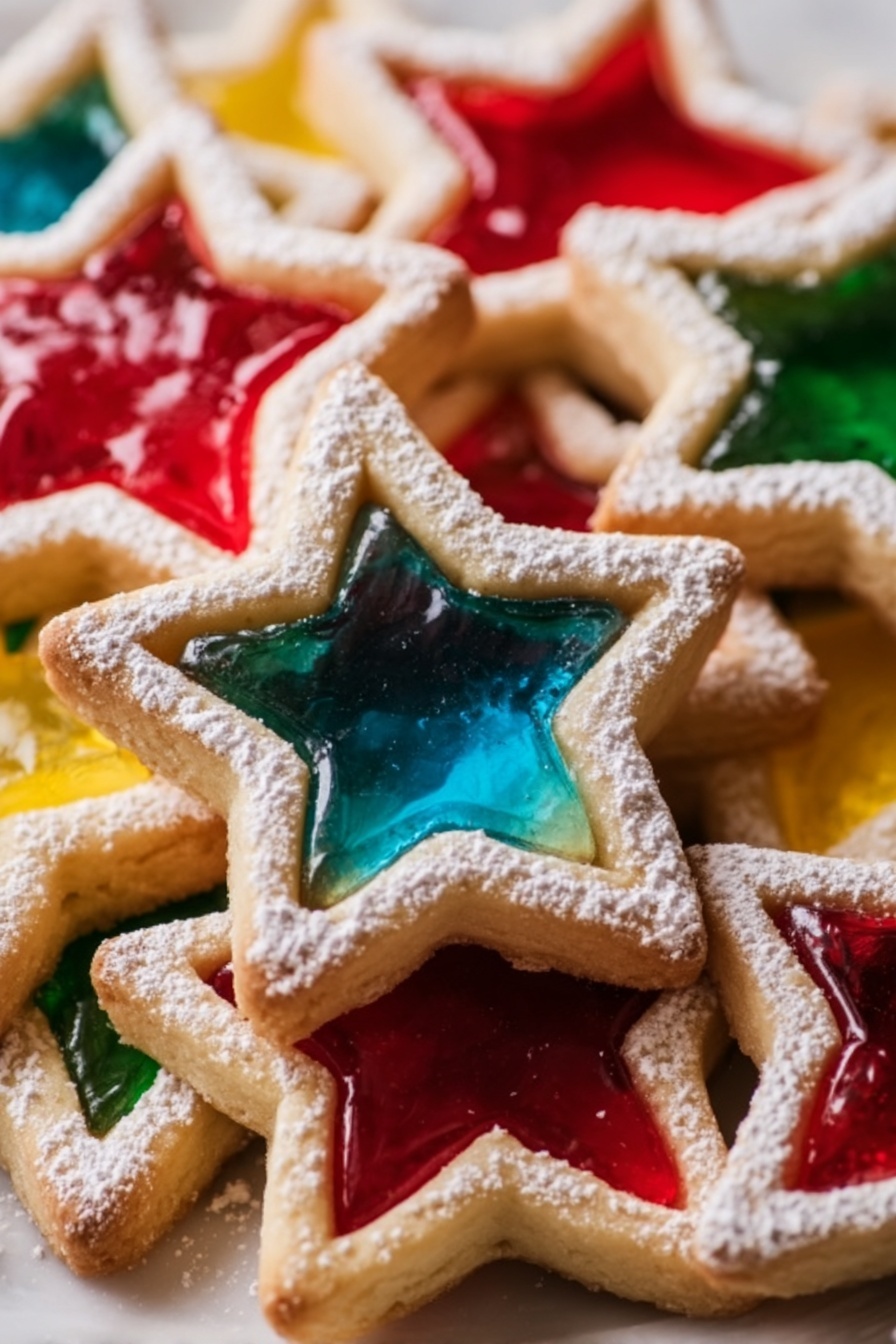
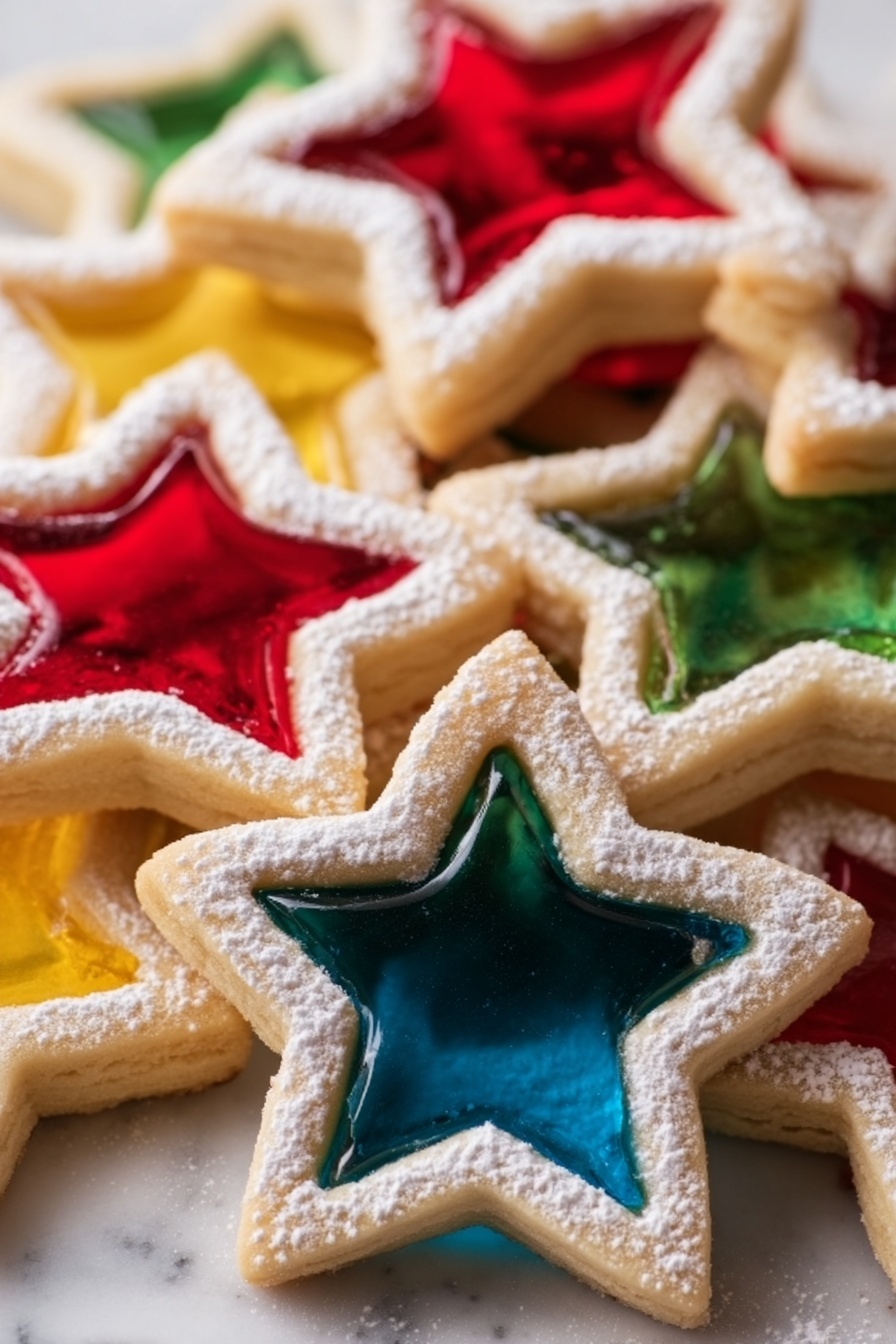
If you’re looking for a holiday cookie that’s both stunning and delicious, you’ve got to try this Stained Glass Cookie Recipe. Seriously, these cookies not only taste buttery and sweet but also have that magical translucent candy “window” that makes everyone stop and say, “Wow, how did you make those?” I absolutely love how festive and fun they turn out, and once you get the hang of the technique, you’ll find they’re easier than they look.
Why You’ll Love This Recipe
- Eye-Catching Beauty: These cookies have that iconic stained glass look that’s perfect for holiday decorating or gifts.
- Buttery and Tender: The cookie base is soft and buttery, making every bite melt in your mouth.
- Customizable Flavors: You can switch up the extracts or candy colors to match your mood or occasion.
- Fun for All Skill Levels: Whether you’re a cookie pro or a newbie, this recipe guides you through every step smoothly.

Ingredients You’ll Need
The ingredients here are classic cookie staples, but the magic comes when you combine the soft dough with the crushed candy centers. I always recommend using quality butter and fresh baking powder to get that perfect texture. Hard candies are a must-have for the stained glass effect—grab a variety of colors for a fun, jewel-toned display.
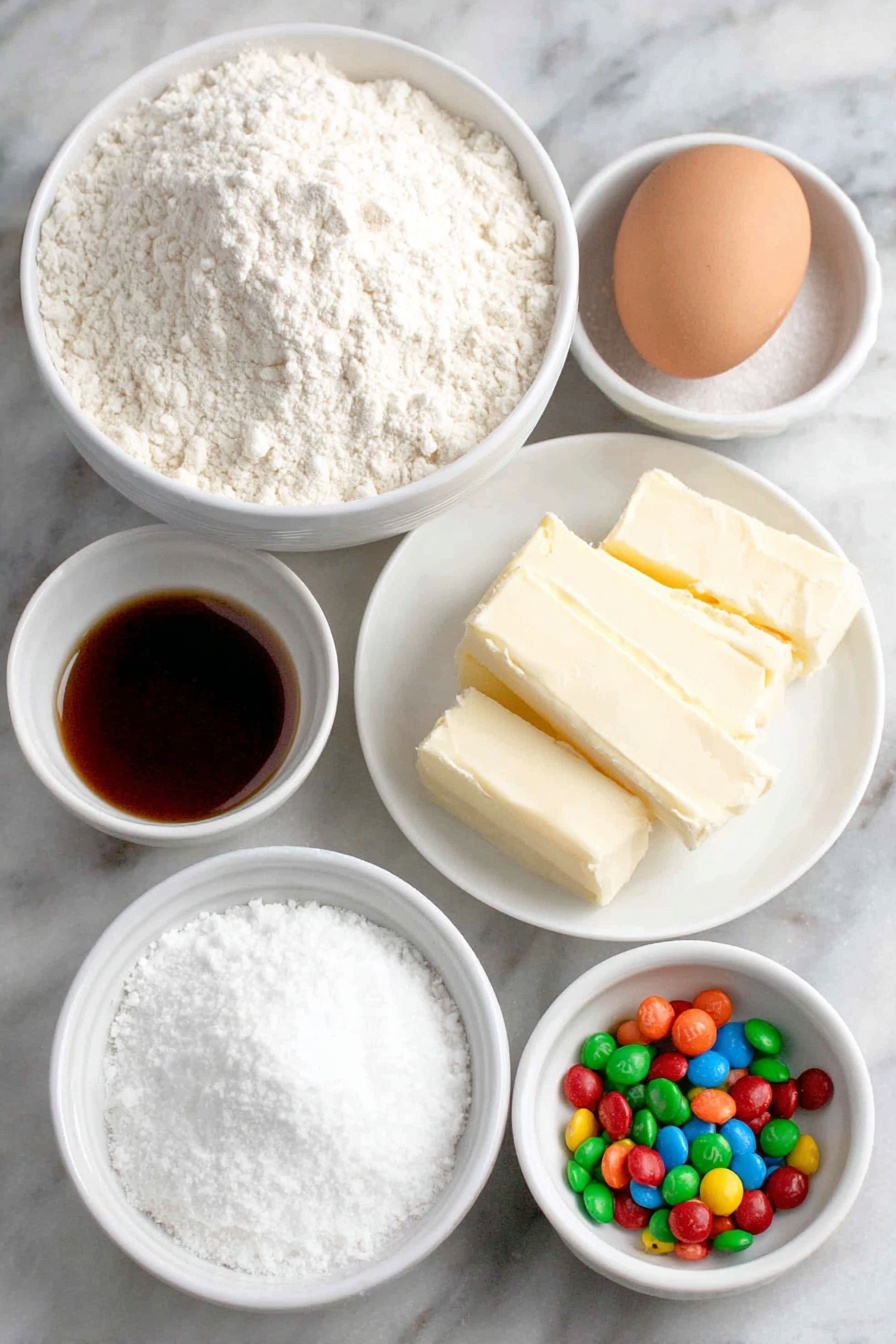
- All-purpose flour: The base for your cookie; make sure it’s fresh for best results.
- Baking powder: Helps the cookies rise just right without spreading too much.
- Salt: Balances sweetness and enhances flavor.
- Unsalted butter: Softened, but not melted, for a tender crumb and rich taste.
- Granulated sugar: Sweetens and helps achieve the perfect cookie texture.
- Large egg: Binds the dough and adds richness.
- Vanilla extract (or almond extract): Gives the cookies that warm, inviting aroma—almond adds a nice twist!
- Assorted hard candies: Pick your favorites like Jolly Ranchers or Life Savers, and sort by color to crush later.
- Powdered sugar: Optional, for a light dusting after baking.
- Ribbon or string: If you want to turn your cookies into beautiful ornaments.
Variations
I like to tweak this stained glass cookie recipe depending on the season or my mood. Trust me—once you try your first batch, you’ll want to experiment with flavors, shapes, or even candy combinations to make it your own.
- Lemon or Orange Extract: I once swapped vanilla for lemon extract and it gave the cookies a refreshing citrus brightness—so good for spring celebrations.
- Gluten-Free Version: Try using a 1:1 gluten-free flour blend; just chill the dough longer to help it hold together.
- Seasonal Shapes: For Christmas, I use stars and trees, but hearts for Valentine’s Day work beautifully too.
- Mixed Candy Colors: Mixing crushed candies in the center can create a playful rainbow effect that dazzles on any cookie tray.
How to Make Stained Glass Cookie Recipe
Step 1: Prepare the Dough with Care
Start by whisking your flour, baking powder, and salt in a bowl—that helps distribute everything evenly. Then, cream your softened butter and granulated sugar with an electric mixer until it’s pale and fluffy; this step is key for a tender cookie. Beat in your egg and extracts and scrape down the sides so everything mixes perfectly. Slowly add the dry ingredients and mix just until combined—overmixing is a common mistake that results in tough cookies. Once your dough looks ready, shape it into a flat disk, wrap it tightly, and pop it in the fridge for at least an hour. Trust me, chilling the dough is a game changer; it keeps the cookies from spreading too much when baked and makes cutting shapes so much easier.
Step 2: Crush the Candies for Your Stained Glass
While the dough chills, organize your hard candies by color into separate bags. Use a rolling pin or even a meat mallet to crush them into small, pebble-sized pieces—not too fine, or they’ll burn and not too chunky or they won’t melt evenly. This is the fun and colorful part! Having your candy ready and sorted will make assembly super smooth.
Step 3: Roll, Cut, and Fill
Once your dough is chilled, preheat your oven to 350°F (175°C). Roll out the dough on a floured surface to about ¼ inch thick—it’s just the right thickness to hold its shape and not be too heavy. Using a large cookie cutter (I love a star shape for festive vibes), cut out your cookies. Then, using a smaller cutter of the same shape, cut out the centers to make space for the stained glass. It might feel a bit fiddly at first, but a quick press and twist works best. Carefully transfer your cookies to parchment-lined baking sheets. Now, fill the centers with your crushed candy, pressing gently so the pieces are snug but not overflowing—the candies melt and spread during baking, so a little restraint here helps!
Step 4: Bake and Let Cool Completely
Bake the cookies for about 8-10 minutes. You’re looking for the edges to barely start turning golden and the candy centers to melt completely into a smooth “window.” The smell alone is worth every second! Let them cool on the baking sheet for around 5-10 minutes so the candy hardens nicely before moving to a wire rack to cool fully. This cooling time is important—moving them too soon might cause the candy to crack or break.
Step 5: Add Finishing Touches and Decorations
Once cooled, you can dust the edges lightly with powdered sugar for an extra snowy effect. If you want to turn these beauties into ornaments, poke a small hole near the top with a straw while the cookie is still warm, then thread ribbon or string through once fully cooled and hardened. My family loves hanging these on the tree each year—it adds a homemade charm that store-bought ornaments can’t match.
Pro Tips for Making Stained Glass Cookie Recipe
- Softened Butter is Key: Don’t melt the butter; softened is best for fluffy, tender cookies.
- Chill Your Dough Thoroughly: This step prevents spreading and keeps clean edges on your shapes.
- Don’t Overfill the Centers: Too much candy will overflow and caramelize on the baking sheet, creating a sticky mess.
- Let Cookies Cool Completely Before Handling: This prevents broken “glass” centers and keeps your cookies intact for decorating or hanging.
How to Serve Stained Glass Cookie Recipe
Garnishes
I often sprinkle the edges with powdered sugar or a tiny bit of edible glitter to add sparkle. Sometimes, a dollop of royal icing piped delicately around the cutouts makes them look even more special—especially if you want to gift them.
Side Dishes
These stained glass cookies pair so well with a warm cup of hot chocolate or spiced tea. I also like serving them alongside a platter of assorted holiday cookies for a festive cookie exchange.
Creative Ways to Present
For parties, I’ve arranged them hanging on tree branches in a festive centerpiece or tied in pastel ribbons and wrapped in clear cellophane as charming party favors. Trust me, they get compliments every time.
Make Ahead and Storage
Storing Leftovers
I keep leftover stained glass cookies in an airtight container layered with parchment paper to prevent sticking. Stored this way, they stay fresh and crisp for up to a week, but honestly, they rarely last that long in my house!
Freezing
You can freeze the dough well-wrapped for up to two months, which is great if you want to bake in batches. Just thaw overnight in the fridge before rolling out and cutting shapes. I don’t recommend freezing baked cookies with candy centers as the texture changes.
Reheating
If your cookies get a little soft, a quick 2-minute warm-up in a low oven (around 275°F) will help crisp them back up without melting the candy again. Just watch carefully so they don’t overbake.
FAQs
-
Can I use any hard candy for the stained glass centers?
Yes! Hard candies like Jolly Ranchers, Life Savers, or even peppermints work great. Just avoid candies with fillings or coatings, as these won’t melt properly to create the stained glass effect.
-
What if my candy centers crack after baking?
Cracks can happen if the candy cools too quickly or the cookie is handled too soon. Make sure to let the cookies cool fully on the baking sheet before moving and avoid sudden temperature changes.
-
Can I make these cookies vegan or dairy-free?
Yes, you can substitute vegan butter and use a flax egg or other egg replacer, but results may vary slightly in texture. The candy centers are usually dairy-free, but always check labels just in case.
-
How long do stained glass cookies keep their appearance?
The glossy candy centers stay beautiful for at least a week if stored in an airtight container away from humidity. Over time, the candy might dull slightly, but the taste stays great!
Final Thoughts
This Stained Glass Cookie Recipe is such a joyful holiday tradition for me and my family. The moment the cookies come out of the oven, and the candy centers are glowing bright, it just fills the kitchen with festive magic. I hope you’ll try making these yourself—they’re a wonderful way to create memories, share delicious treats, and impress everyone with your baking wow-factor. Plus, they taste as good as they look, and that’s what keeps me coming back every year!
Print
Stained Glass Cookie Recipe
- Prep Time: 30 minutes
- Cook Time: 10 minutes
- Total Time: 40 minutes
- Yield: 20 servings
- Category: Dessert
- Method: Baking
- Cuisine: American
- Diet: Vegetarian
Description
These Stained Glass Cookies are a festive and colorful treat perfect for holidays and special occasions. Featuring a buttery sugar cookie base with a unique stained glass center made from melted hard candies, these cookies are as beautiful as they are delicious. Fun to make and delightful to eat, they also double as charming edible ornaments when adorned with a ribbon.
Ingredients
For the Cookies:
- 2 ¾ cups all-purpose flour
- 1 teaspoon baking powder
- ¼ teaspoon salt
- 1 cup (2 sticks) unsalted butter, softened
- 1 cup granulated sugar
- 1 large egg
- 1 teaspoon vanilla extract (or almond extract for a twist)
- ½ teaspoon almond extract (optional)
For the Stained Glass:
- Assorted hard candies (like Jolly Ranchers or Life Savers), separated by color and crushed
For Decorating:
- Powdered sugar (for dusting)
- Ribbon or string (if hanging as ornaments)
Instructions
- Prepare the Dough: In a medium bowl, whisk together the flour, baking powder, and salt. In a large mixing bowl, use an electric mixer to cream the softened butter and sugar until light and fluffy, about 2-3 minutes. Beat in the egg, vanilla extract, and almond extract (if using), scraping down the sides to combine fully. Gradually add the flour mixture until the dough just comes together—avoid overmixing. Shape the dough into a disk, wrap in plastic wrap, and refrigerate for at least 1 hour or up to 2 days to help the cookies hold their shape during baking.
- Prepare the Candies: While the dough chills, separate hard candies by color into ziplock bags. Crush them into small pieces using a rolling pin or meat mallet, ensuring they are not too fine or chunky. Set aside.
- Shape the Cookies: Preheat oven to 350°F (175°C). Line two baking sheets with parchment paper. On a floured surface, roll the chilled dough to ¼-inch thickness. Using a large star-shaped cookie cutter (or your preferred shape), cut out the cookies, then use a smaller cutter of the same shape to cut out the centers. Transfer cookies to baking sheets and spoon crushed candies into the centers, filling holes completely but not overfilling.
- Bake and Cool: Bake cookies for 8-10 minutes until edges are lightly golden and candy centers have melted. Cool cookies on baking sheets for 5-10 minutes to allow candy centers to harden, then transfer to wire racks to cool completely.
- Dust and Decorate: Once completely cooled, dust edges lightly with powdered sugar for a festive look. If making ornaments, poke a small hole at the top of each cookie with a straw while warm, then thread ribbon or string through the hole after cooling.
Notes
- Chilling the dough is important for cookies to hold their shape and avoid spreading during baking.
- Use separate colors of candies to create vibrant stained glass centers.
- Be careful not to overfill the cookie centers with crushed candy to prevent spilling during baking.
- Allow cookies to cool sufficiently so the candy centers harden; otherwise, they may be sticky or fragile.
- If hanging as ornaments, handle cookies gently to avoid breakage.
Nutrition
- Serving Size: 1 cookie
- Calories: 150
- Sugar: 12g
- Sodium: 70mg
- Fat: 7g
- Saturated Fat: 4g
- Unsaturated Fat: 2.5g
- Trans Fat: 0g
- Carbohydrates: 20g
- Fiber: 0.5g
- Protein: 2g
- Cholesterol: 30mg


