
Let me tell you, this Vegan Pan-Fried Buns Recipe is one of those dishes that feels like a warm hug from the inside out. I absolutely love how these buns come out with a crispy golden crust on the outside, while the inside stays wonderfully soft and chewy. And the filling? A deliciously savory mix of cabbage, vermicelli, and carrots that’s seasoned just right — it’s the kind of snack or meal you can enjoy anytime, whether it’s a cozy dinner or an easy weekend treat.
When I first tried making these buns, I was surprised how straightforward it was to get that perfect pan-fry crust without deep-frying. You don’t need any fancy equipment or ingredients, and you can easily customize the filling. If you’re hunting for a comforting vegan dish that feels more special than your usual stir-fry, this Vegan Pan-Fried Buns Recipe is totally worth trying. Plus, they make fantastic leftovers, a bonus I’m sure you’ll appreciate as much as I do!
Why You’ll Love This Recipe
- Simple Ingredients: Uses everyday pantry staples with minimal fuss, making it easy to whip up anytime.
- Perfect Texture: Crispy outside and tender inside—a delightful contrast that always impresses.
- Customizable Filling: You can easily swap veggies or add spices to match your taste buds.
- Great Make-Ahead Option: These buns reheat beautifully, perfect for meal prep or a quick snack.

Ingredients You’ll Need
The beauty of this Vegan Pan-Fried Buns Recipe lies in its simple, wholesome ingredients that come together perfectly. You can find most stuff in your local grocery store, and using warm soy milk in the dough keeps it soft and pliable, which is key for those tender buns.
- All-purpose flour: The base of the dough; opt for unbleached if you can for better texture.
- Instant dry yeast: Helps the dough rise nicely; keep some in your freezer to keep it fresh longer.
- Sugar: Just a bit to activate the yeast and boost flavor.
- Salt: Balances out the sweetness and enhances the overall flavor.
- Roasted sesame seeds: Adds nutty crunch inside the dough for an amazing subtle texture.
- Soy milk (or other non-dairy milk): Warm and soothing; makes the dough soft and vegan-friendly.
- Toasted sesame oil (or neutral oil): For that rich, toasty aroma and smooth dough.
- Neutral oil (for cooking): Keeps the filling and buns from sticking during pan-frying.
- Cabbage: Fresh and shredded finely, the heart of the filling’s flavor and crunch.
- Vermicelli noodles: Soaked and chopped—adds body and fun texture inside the buns.
- Carrot: Sweet and colorful, shredded to blend seamlessly with the veggies.
- Scallions or chives: Brightness to lift the filling’s savory flavors.
- Soy sauce: For umami depth in the filling, so tasty.
- Salt: Adjust according to your taste for perfect seasoning.
- Roasted sesame seeds: Adds crunch and boosts nuttiness in the filling.
- Toasted sesame oil: A finishing touch for that irresistible aroma in the filling.
Variations
One of the reasons I keep coming back to this Vegan Pan-Fried Buns Recipe is how flexible it is. You can tweak the filling to suit whatever veggies you have on hand or spice levels you prefer—feel free to get creative!
- Spicy Kick: I sometimes add finely chopped fresh chili or a dash of chili oil in the filling, and my family goes crazy for the extra heat.
- Different Veggies: You can swap the cabbage for bok choy, spinach, or add shiitake mushrooms for umami depth.
- Gluten-Free Option: While I haven’t tested this personally, using a gluten-free flour blend and adjusting the liquid might get you close—but it’ll need some experimentation.
- Protein Adding: For a heartier version, toss in some crumbled tofu or cooked lentils in the filling.
How to Make Vegan Pan-Fried Buns Recipe
Step 1: Preparing the Dough
Start by mixing the dry ingredients in a large bowl—flour, yeast, sugar, salt, and roasted sesame seeds. Creating a well in the center, pour in the warm soy milk and sesame oil, then stir until the dough starts coming together. Knead it until smooth and elastic, about 8-10 minutes. I like to let the dough rest in a bowl covered with a damp towel for at least 2 hours to let it rise—that’s when the magic happens and the buns get that soft texture.
Step 2: Cooking the Filling
While the dough is resting, soak the vermicelli noodles in boiling water until soft (around 7-8 minutes), then chop them into bite-sized pieces. Heat a skillet with some neutral oil, then toss in chopped scallions, carrot, and shredded cabbage. Cook until the carrots are tender, then add the noodles, soy sauce, salt, sesame seeds, and toasted sesame oil. Cook everything together for a few minutes to meld the flavors, then drain the filling in a strainer to remove excess moisture—it helps the buns hold together without getting soggy.
Step 3: Forming the Wrappers
Once your dough has risen nicely, punch it down and roll it into a big ring by pushing a hole through the center. Slice the dough into 12 or 16 pieces (depending on how big you want your buns). Shape each piece into a smooth ball. Roll each ball out into a circle roughly 3-5 inches in diameter. Don’t worry if they aren’t perfectly round—mine rarely are! Keep your work surface lightly floured to prevent sticking, and place the wrappers on a tray covered with a dry kitchen towel so they stay soft and pliable while you work.
Step 4: Filling and Shaping the Buns
Place a couple of tablespoons of filling in the center of each wrapper. Using one hand, pinch the edges to form pleats around the bun while sealing the top with a twist—this step takes some practice, so be patient! Press down lightly on the top of each bun to flatten slightly and place them back on the tray. Keep covered so they don’t dry out before cooking.
Step 5: Pan-Frying the Buns
Heat a non-stick pan with about 1 tablespoon of oil for every 4 buns you’re cooking. Place the buns creased-side down and press gently to form a golden crust, cooking for 4-5 minutes on medium heat. Flip to the other side until it turns golden brown too. Then, pour in a little water (about 1 tablespoon per bun), cover the pan immediately, and let the steam finish cooking the buns for around 5-6 minutes. The buns get beautifully fluffy and steamed inside while the bottom stays crispy. Repeat with remaining buns and serve hot!
Pro Tips for Making Vegan Pan-Fried Buns Recipe
- Warm Liquid for Dough: Always use warm (not hot) soy milk to activate the yeast without killing it—this helps your dough rise beautifully.
- Drain Filling Well: Removing excess moisture after cooking the filling keeps the buns from becoming soggy inside.
- Use a Non-Stick Pan: This prevents buns from sticking and tearing during frying—trust me, it makes shaping and flipping much easier.
- Cover During Steaming: Don’t skip covering the pan after adding water; it steams the buns perfectly, ensuring fluffy insides.
How to Serve Vegan Pan-Fried Buns Recipe

Garnishes
I love sprinkling toasted sesame seeds and chopped fresh scallions on top of these buns right before serving—it adds freshness and a bit of crunch. A drizzle of chili oil or a side of dipping sauce made from soy sauce, sugar, chili, and sesame seeds always takes the experience up a notch. Simple, but oh so satisfying!
Side Dishes
These buns go beautifully with a crisp Asian cucumber salad, a refreshing miso soup, or even a vibrant stir-fried vegetable medley. If you’re feeling indulgent, pair them with some crispy tofu bites or plant-based dumplings for a full feast.
Creative Ways to Present
For special occasions, I like serving these Vegan Pan-Fried Buns Recipe on a bamboo steamer basket lined with banana leaves—it not only keeps them warm but adds a lovely touch of authenticity. You can also stack them in a pretty tiered plate stand for a fun party appetizer spread that’s sure to impress your friends!
Make Ahead and Storage
Storing Leftovers
I keep leftover pan-fried buns in an airtight container in the fridge for up to 5 days. When reheating, I usually pan-fry them again with a tiny splash of water to steam them, which revives that crispy exterior and fluffy inside perfectly. It’s a way better method than microwaving if you want to keep the texture alive.
Freezing
Freezing these buns works like a charm! I lay them out on a tray spaced apart so they don’t stick, freeze until firm, then transfer to a resealable bag. No need to thaw before reheating—just pop them straight into a pan or steamer. This trick has saved me so many times on busy days.
Reheating
To reheat, I pan fry with a little oil on medium heat and add a small amount of water before covering the pan to steam the buns again. This method brings back the original texture and warmth without drying them out. You can also use your oven toaster at low heat, but avoid the microwave unless you’re in a real hurry.
FAQs
-
Can I use regular milk instead of soy milk for the dough?
Absolutely! You can use any plant-based milk for the dough; soy milk is just what I prefer for its neutral flavor and availability. If you want to use regular dairy milk, the dough will still work fine, but it won’t be vegan anymore.
-
How long does the dough need to rise?
I recommend letting the dough rise for at least 2 hours in a warm spot to get that soft, airy texture. If your kitchen is cooler, it might take a bit longer. A good sign is when the dough doubles in size and feels springy to the touch.
-
Can I make the filling ahead of time?
Yes! The filling can be made a day in advance and stored in the fridge. Just make sure to drain it well before filling the buns to avoid sogginess.
-
What’s the best pan to use for pan-frying the buns?
I find a good quality non-stick skillet works best to prevent sticking and makes flipping easier. A well-seasoned cast iron pan can work too, but be gentle when flipping to avoid tearing the buns.
-
Can I freeze the buns before cooking?
While I usually freeze the cooked buns, you can freeze the shaped but uncooked buns as well. Just freeze them on a tray until firm, then store in a sealed bag. When ready, thaw slightly and cook as per instructions, though cooking might take a bit longer from frozen.
Final Thoughts
This Vegan Pan-Fried Buns Recipe holds a special place in my kitchen because it combines comforting textures and simple flavors that everyone can enjoy. It’s one of those recipes that feels like a little project but rewards you with delicious buns that truly satisfy. I hope you give this a go and end up loving it as much as I do—it’s perfect for sharing, snacking, or impressing guests with homemade vegan goodness!
Print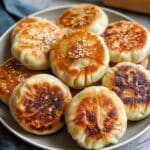
Vegan Pan-Fried Buns Recipe
- Prep Time: 1 hour
- Cook Time: 30 minutes
- Total Time: 2 hours 30 minutes
- Yield: 16 buns
- Category: Snack
- Method: Stovetop
- Cuisine: Vegan Asian
- Diet: Vegan
Description
These vegan pan-fried buns are soft, fluffy, and filled with a flavorful mixture of shredded cabbage, carrots, vermicelli noodles, and chives. Cooked with a delightful combination of pan-frying and steaming, these buns offer a crispy bottom with a tender steamed top, perfect as a snack or appetizer. They’re made from scratch with a simple yeast dough and seasoned vegetable filling, making them a delicious plant-based option for any occasion.
Ingredients
Dough – Dry Ingredients
- 3 cups all-purpose flour (375 g)
- 2 tsp instant dry yeast
- 2 tbsp sugar
- 1/2 tsp salt
- 1 tbsp roasted sesame seeds
Dough – Wet Ingredients
- 1 cup warm soy milk or other non-dairy milk
- 1 tbsp toasted sesame oil or neutral oil
Filling
- 1 tbsp neutral oil for cooking
- 6 cups raw shredded cabbage (from 1/2 large head)
- 3.5 oz uncooked vermicelli noodles (100 g total)
- 1 cup finely shredded or grated carrot (150 g)
- 1/2 cup chopped scallions or chives (25 g)
- 1 tbsp soy sauce
- 2 tsp salt or to taste
- 1 tbsp roasted sesame seeds
- 2 tbsp toasted sesame oil
Instructions
- Preparing the Dough: In a large bowl, combine all dry ingredients and mix well. Create a well in the center, then pour in warm soy milk and toasted sesame oil. Mix until a cohesive dough forms. Shape the dough into a ball, place it in a bowl, cover with a damp towel, and let it rest for at least 2 hours to allow the dough to rise and develop elasticity.
- Cooking the Filling: Soak the vermicelli noodles in boiling water for 7-8 minutes until cooked, then drain and chop into ½ inch pieces. Heat 1 tablespoon of neutral oil in a pan over medium-high heat. Add the chopped scallions, carrots, and shredded cabbage. Sauté for 4-5 minutes until the carrots are tender. Add the noodles, soy sauce, salt, roasted sesame seeds, and toasted sesame oil. Mix well and cook for another 2-3 minutes. Drain excess liquid through a strainer and set the filling aside to cool.
- Preparing the Wrappers: Punch a hole in the dough ball and stretch into a ring. Slice dough into 12 to 16 pieces (about 38-50 g each depending on desired bun size). Roll each piece into a ball, then flatten and roll out into 3-5 inch diameter wrappers, dusting with flour as needed to prevent sticking. Place rolled wrappers spaced on a tray, brush flour between stacked layers (no more than 4-5 wrappers high), and cover with a dry towel to prevent drying.
- Making the Buns: Place 2-3 tablespoons of filling in the center of each wrapper. Pinch and pleat the edges, then twist to seal the buns tightly. Press down lightly on top to flatten slightly. Place finished buns on a tray and cover with a towel to avoid drying out. Repeat with remaining wrappers and filling.
- Cooking the Buns: Heat a pan with a lid over medium heat and add 1 tablespoon of oil for every 4 buns. Place buns creased-side down in the pan, gently pressing to ensure contact. Cook undisturbed for 4-5 minutes until the bottoms turn golden brown. Flip buns and cook the other side until golden brown. Carefully pour 4 tablespoons of water into the pan, cover immediately to steam the buns, and cook for 5-6 minutes until the water has evaporated. Remove buns and repeat with remaining batches.
- Serving and Storing: Enjoy buns hot, optionally with a dipping sauce made from soy sauce, sugar, chili sauce, and sesame seeds. Store cooked buns in an airtight container in the refrigerator for up to 5 days. Reheat by pan-frying with a splash of water, oven toasting at low heat, or microwaving covered with a damp cloth. To freeze, arrange cooked buns spaced on a tray and freeze for 5-6 hours, then transfer to an airtight bag. Reheat from frozen as desired.
Notes
- Use warm soy milk to activate the yeast effectively.
- Make sure to drain the filling thoroughly to prevent soggy buns.
- Handle the dough gently and keep it covered to prevent drying out.
- Adjust seasoning of the filling to your taste before wrapping.
- Do not overcrowd the pan when cooking buns; batches may be necessary depending on pan size.
- Use a lid while steaming to trap moisture and steam buns evenly.
- Storage tip: Avoid stacking buns directly without flour between wrappers to prevent sticking.
Nutrition
- Serving Size: 1 bun
- Calories: 150 kcal
- Sugar: 2 g
- Sodium: 400 mg
- Fat: 4 g
- Saturated Fat: 0.5 g
- Unsaturated Fat: 3 g
- Trans Fat: 0 g
- Carbohydrates: 26 g
- Fiber: 3 g
- Protein: 4 g
- Cholesterol: 0 mg


