
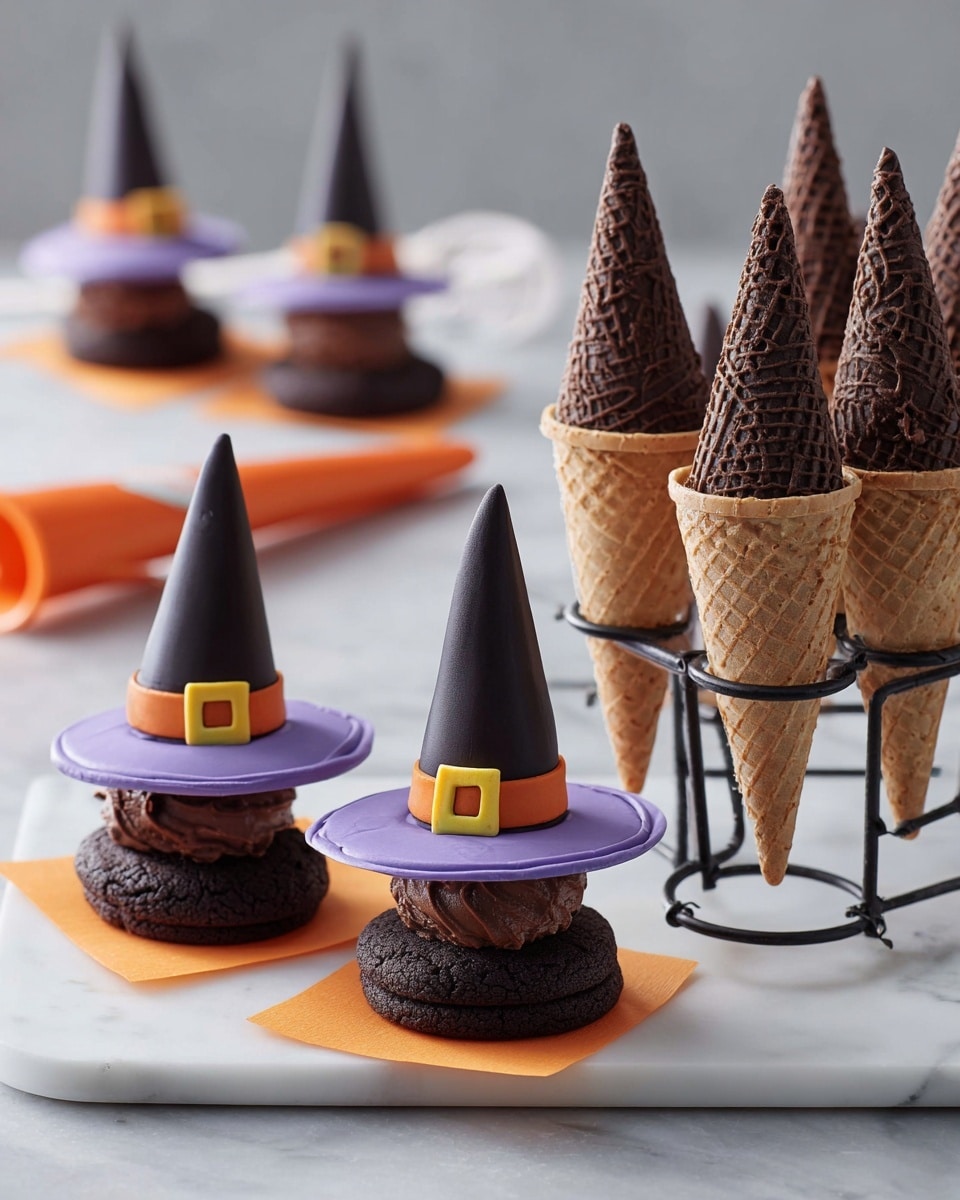
If you’re looking for a fun, show-stopping Halloween treat that’s as delightful to make as it is to eat, you’ll want to try my Wicked Halloween Witch Hat Cupcake Cones Recipe. These spooky little hat-shaped cupcakes combine moist cake, vibrant icing, and a crispy cone base to create a magical party centerpiece. Trust me, I’ve made these several times, and they never fail to impress guests — plus, kids go absolutely wild for them!
Why You’ll Love This Recipe
- Easy & Creative: You get a fun twist on cupcakes without complicated molds or tools.
- Customizable Colors: I love mixing orange, purple, and yellow icing to really capture that witchy vibe.
- Kid-Friendly & Crowd-Pleasing: My family (and neighborhood kids) practically beg for this every Halloween.
- Perfect for Parties: These hats are portable, mess-free, and adorable on any dessert table.

Ingredients You’ll Need
This recipe makes use of some classic baking pantry staples alongside a few special items that really bring the witch hats to life. The combination of cake batter in sugar cones and vibrant decorator icing brings that perfect balance of flavor and spooky charm. When picking colors, I always recommend gel or icing colors for bright hues that won’t thin the icing.
- Cake Mix (or your favorite recipe): I usually go for chocolate or a dark cake mix for that spooky, rich flavor.
- Sugar Cones: These form the base of your hats and add a delightful crunch.
- Decorative Icing Colors (Lemon Yellow, Golden Yellow, Orange, Violet, Rose Pink): Gel colors work best for vivid and smooth icing.
- Creamy White Decorator Icing: This provides a thick canvas for your color tinting and piping.
- Black Color Mist Food Coloring Spray: This gives the cones their authentic witch hat look with a deep matte black finish.
- Chocolate Cookies: These serve as the hat brims—adding texture and a tasty base.
- Disposable Decorating Bags & Piping Tips (2B and #3): Needed to pipe smooth icing bands and buckles.
- Unbleached Parchment Paper: For easy cleanup and drying.
Variations
One of the things I love about the Wicked Halloween Witch Hat Cupcake Cones Recipe is how easy it is to make it your own. Whether you want to switch up colors, flavors, or adapt for dietary needs, this recipe invites your creativity.
- Flavor Swaps: I’ve tried using red velvet batter instead of chocolate for a more dramatic red cone look—so fun and surprisingly delicious!
- Vegan/Dairy-Free: Swap in plant-based cake mix and vegan decorator icing—just make sure the cones fit your dietary needs.
- Spooky Themes: For a creepy twist, try green and black icing combos instead of traditional witch colors to create “poisonous” hats!
- Mini Cones: Use smaller cones for bite-sized witch hats perfect for kids’ parties where little hands want less mess.
How to Make Wicked Halloween Witch Hat Cupcake Cones Recipe
Step 1: Prepare and Bake Your Witch Hat Bases
Start by mixing your cake batter according to the package or recipe instructions. Set up your baking rack for cupcake cones on a cookie sheet—it keeps the cones upright and prevents spills. Fill each sugar cone with about 2 tablespoons of batter. Don’t overfill or the cake will spill over while baking. Bake according to your cake recipe’s recommended time. When they’re done, let them cool completely, then trim off any cake that rose above the cone tip for a neat finish.
Step 2: Give Your Cones a Mysterious Black Coat
Place the cooled cones wide side down on parchment paper, and gently spray them using black color mist food coloring spray. This transforms the cones into witch hats with the perfect matte black finish. Let the spray dry fully (around 10 to 15 minutes) so the color sets and doesn’t smudge later.
Step 3: Tint Your Icing and Get Ready to Decorate
Next, divide your creamy white decorator icing into three portions. I tint one cup orange and another cup purple by mixing in the respective gel colors (violet and rose for purple, a combo of golden yellow and lemon yellow for vividness). The final 1/4 cup of icing gets tinted yellow, which you’ll use for those sweet little buckles on the hats. Fill decorating bags fitted with a large basketweave tip (2B) with orange and purple icing, and a smaller round tip (#3) with the yellow icing for detailed piping.
Step 4: Assemble the Witch Hats
Pipe a small dot of orange or purple icing onto the center of each chocolate cookie, then gently press a black-sprayed cone on top — this cookie acts like the hat brim. Next, pipe a band around the wide rim of the cone with the same color icing, smooth it with a spatula for a sleek look, and let it set for 15 to 20 minutes. Finally, use the yellow icing with tip #3 to pipe tiny buckles around the bands, giving your witches a touch of magic. Let everything set again for another 15 to 20 minutes, and voilà – your Wicked Halloween Witch Hat Cupcake Cones are ready!
Pro Tips for Making Wicked Halloween Witch Hat Cupcake Cones Recipe
- Use Gel Icing Colors: I learned that using gel coloring keeps the icing thick enough for smooth piping without watering it down.
- Don’t Overfill Cones: Overfilling can cause the batter to overflow, so stick to 2 tablespoons for perfectly formed cupcake cones.
- Dry Fully Between Steps: Patience pays off—letting icing set before adding details prevents smudging and messy hats.
- Use a Spatula to Smooth Bands: This simple trick gives the hatbands a polished look that really stands out.
How to Serve Wicked Halloween Witch Hat Cupcake Cones Recipe
Garnishes
When I serve these, I often add a little edible glitter along the icing bands or tiny sugar pearls for an extra magical sparkle. Sometimes I sprinkle a pinch of crushed candy corn around the display for a fun Halloween flair. You can also pipe tiny spider webs on the cones with black icing if you’re feeling adventurous!
Side Dishes
These cupcake cones pair beautifully with simple drinks like hot apple cider or chilled pumpkin spice lattes. If you’re hosting a Halloween party, I like to set out bowls of caramel popcorn and gummy worms alongside them for a festive combo of sweet and chewy treats.
Creative Ways to Present
I once arranged these witch hat cupcakes in a basket lined with faux cobweb fabric for a dramatic table centerpiece. Another time, I stuck toothpicks in the bottom of the cones and arranged them standing in a Halloween-themed foam block decorated like a cauldron – it was a real conversation starter! Feel free to get creative — I promise, your guests will love whatever spooky display you dream up.
Make Ahead and Storage
Storing Leftovers
Once assembled and iced, store your Wicked Halloween Witch Hat Cupcake Cones in an airtight container at room temperature for up to two days. I found that the cones stay crisp if you keep them away from humidity. Refrigerating can make the cones soggy unless tightly sealed, so I usually avoid that if I plan to enjoy them soon.
Freezing
If you want to make these ahead of time, you can freeze the baked cupcake cone bases (without icing) wrapped tightly in plastic wrap for up to a month. I’ve frozen them successfully and thawed on the counter before decorating. However, freezing after adding icing doesn’t preserve the look or texture well.
Reheating
Since these are cupcake cones, reheating isn’t usually necessary. But if you do want slightly warm cupcakes, carefully peel off the cones from the cookie base and warm in the microwave for 10-15 seconds. Just be mindful not to melt the icing or lose that crisp cone texture.
FAQs
-
Can I use homemade cake batter instead of cake mix for the Wicked Halloween Witch Hat Cupcake Cones Recipe?
Absolutely! Homemade batter works great and lets you customize flavors fully. Just be sure to use a batter that isn’t overly thin—slightly thicker batters hold better inside the sugar cones and rise evenly.
-
How do I prevent the sugar cones from getting soggy?
To keep the cones crisp, bake them promptly after filling. Avoid storing assembled cupcake cones in humid conditions. Also, keeping the cone base dry until just before serving helps maintain crunch.
-
Can I make these cupcake cones vegan?
Yes, by choosing vegan cake mixes or recipes and plant-based decorator icing, you can adapt the recipe. Just double-check your sugar cones and cookies to ensure they are vegan-friendly.
-
What if I don’t have a cupcake cone baking rack?
You can fashion a makeshift rack using crumpled aluminum foil to hold the cones upright on a cookie sheet. Just be careful to keep them stable so the batter doesn’t spill.
-
How long do leftover Wicked Halloween Witch Hat Cupcake Cones stay fresh?
They typically stay fresh at room temperature for about two days when stored in an airtight container. After that, cones may start losing their crispness and icing can dry out.
Final Thoughts
I absolutely love how this Wicked Halloween Witch Hat Cupcake Cones Recipe has become my go-to for Halloween baking. It’s whimsical, fun, and always brings smiles at every party. If you’re looking for a treat that’s interactive to assemble and swoon-worthy to eat, give this recipe a try — you’ll enjoy every step as much as the final spooky presentation. Plus, once you’ve nailed the technique, you can experiment with all sorts of creative color combos and decorations. Happy baking, and may your Halloween be wickedly delicious!
Print
Wicked Halloween Witch Hat Cupcake Cones Recipe
- Prep Time: 45 minutes
- Cook Time: 1 hour
- Total Time: 1 hour 45 minutes
- Yield: 12 cupcake cones
- Category: Dessert
- Method: Baking
- Cuisine: American
Description
These Wicked Halloween Witch Hat Cupcake Cones are a fun and festive treat perfect for Halloween celebrations. Combining moist baked cupcake cones with colorful and vibrant icing decorations, these witch hats are sure to delight kids and adults alike. The cupcake cones are baked in sugar cones, then sprayed black and decorated with bands and buckles in bright orange, purple, and yellow icing for a spooky and playful look.
Ingredients
Cake and Base Ingredients
- Favorite Cake Mix (or Wilton’s Chocolate Cake Recipe) – quantity as per recipe instructions
- 12 Sugar Cones
- Store Bought Chocolate Cookies (or homemade recipe)
- Light Cocoa Candy Melts Candy, 12 oz. (if using)
Decorating Ingredients
- Creamy White Decorator Icing, 4 lb. Tub
- Lemon Yellow Icing Color, 1 oz.
- Lemon Yellow Gel Food Coloring, 1 oz.
- Black Color Mist Food Coloring Spray, 1.5 oz.
- Rose Icing Colors Pink Food Coloring, 1 oz.
- Rose Gel Food Coloring, 1 oz.
- Violet Icing Color, 1 oz. Gel Food Coloring
- Violet Gel Food Coloring, 1 oz.
- Golden Yellow Icing Color, 1 oz.
- Orange Icing Color, 1 oz.
- Orange Gel Food Coloring, 1 oz.
Tools and Equipment
- Unbleached Parchment Paper
- 12-Inch Disposable Decorating Bags, 12-Count
- Cupcake Cones Baking Rack
- Recipe Right Non-Stick Cookie Sheet
- Large Basketweave Decorating Tip 2B
- Round Cake Decorating Tip 3
- Straight Black Spatula, 9-Inch
- Knife
Instructions
- Prepare & bake the cones:
Prepare your cake mix following the instructions of your chosen recipe. Place the Cupcake Cones Baking Rack on the non-stick cookie sheet and insert the sugar cones into the rack upright. Fill each cone with about 2 tablespoons of cake batter. Bake the cones according to the timing and temperature specified in your cake mix recipe. Once baked, allow the cones to cool completely.
- Trim and spray the cones:
If the cake has risen above the rim of the cones, carefully trim it flush with the top using a knife. Place the cones wide side down on parchment paper. Using Black Color Mist Food Coloring Spray, evenly coat the cones black. Allow the spray to dry for 10 to 15 minutes.
- Tint the icing and prepare decorating bags:
Divide the creamy white decorator icing into portions. Tint 1 cup orange by mixing in the orange and golden yellow icing colors. Tint another 1 cup purple by combining violet and rose icing colors. Tint 1/4 cup yellow by blending golden yellow and lemon yellow icing colors. Prepare disposable decorating bags fitted with tip 2B for the orange and purple icings, and a bag with tip 3 for the yellow icing.
- Assemble the witch hats:
Start by piping a small dollop of orange icing onto a chocolate cookie and place a black sprayed cone on top to form a hat. Using the basketweave tip 2B, pipe a band around the wide end of the cone with the smooth side facing outward, smoothing with a spatula. Repeat this process for half the cones using orange icing, and the other half using purple icing. Allow the icing bands to set for 15 to 20 minutes.
- Decorate buckles and finish:
Using the yellow tinted icing with tip 3, pipe buckles onto the bands of the witch hats. Let the finished cupcakes set for an additional 15 to 20 minutes to allow the decorations to firm up. Your Wicked Halloween Witch Hat Cupcake Cones are now ready to serve and enjoy!
Notes
- Ensure the cones and baked cupcake are cooled before spraying to prevent smudging the spray color.
- Use disposable decorating bags for easier cleanup and precise piping.
- If you prefer, homemade chocolate cookies can be used instead of store-bought cookies.
- Be gentle when trimming the cake tops so as not to break the cone structure.
- Allow ample drying time between decorating steps to maintain clean lines and prevent colors from running.
Nutrition
- Serving Size: 1 cupcake cone
- Calories: 320
- Sugar: 24g
- Sodium: 180mg
- Fat: 14g
- Saturated Fat: 7g
- Unsaturated Fat: 5g
- Trans Fat: 0g
- Carbohydrates: 42g
- Fiber: 1g
- Protein: 3g
- Cholesterol: 35mg


